
Last Wish introduces a variety of mechanics that appear throughout multiple encounters.
While each encounter has unique objectives, understanding these recurring systems makes progression significantly easier.
Many encounters use a shared set of Dreaming City symbols.
Players must identify, communicate, and interact with these symbols throughout the raid.
Accurate callouts are one of the most important skills in Last Wish.
Teams should establish symbol names before beginning the raid.
Several encounters require players to collect Taken Strength.
These objects are used to progress mechanics and prevent encounter failure.
Managing Taken Strength correctly is often the difference between success and a wipe.
Certain mechanics apply negative effects that must be cleansed.
Players frequently use specific encounter mechanics to remove debuffs and continue progressing safely.
Eye of Riven enemies appear during several encounters.
Defeating these enemies grants special abilities that are required to complete mechanics.
Because these abilities are often central to encounter progression, Eye of Riven enemies should be treated as priority targets.
The Ascendant Realm appears throughout the raid and plays a major role in several encounters.
Players frequently move between the physical world and Ascendant spaces while solving mechanics.
Maintaining awareness of both locations is critical.
Last Wish contains a hidden area known as the Wall of Wishes.
By entering specific symbol combinations, players can activate various effects ranging from encounter checkpoints to cosmetic rewards.
The main guide will notify players when they reach the Wall, while all wish combinations and effects are covered in the dedicated Wall of Wishes guide.
Last Wish does not feature a Master difficulty version.
Instead, raid mastery is primarily represented through encounter challenges, triumphs, flawless completions, and progress toward the Rivensbane title.
Players pursuing Rivensbane should plan challenge completions and triumph runs carefully, as many objectives can be combined to reduce the total number of clears required.
The Wall of Wishes can be accessed before beginning the Kalli encounter.
By entering specific symbol combinations, players can activate a variety of effects including encounter checkpoints, cosmetic rewards, dialogue, and other unique interactions throughout Last Wish.
Players interested in using the Wall of Wishes should do so before starting the raid.
See the Wall of Wishes Guide for all wish combinations and their effects.
Kalli, the Corrupted is the first encounter of Last Wish and serves as an introduction to the raid’s symbol-based mechanics.
The fireteam must identify active plates, defeat Taken enemies, survive Kalli’s wipe mechanic, and complete multiple damage phases before defeating the boss.
While Kalli is one of the simpler encounters in Last Wish, success still requires communication, awareness, and proper positioning.
The encounter takes place in a large circular arena divided into multiple sections.
Several plates surround the room, each displaying a symbol.
During the encounter, specific plates become active and must be occupied to progress the fight.
At the center of the arena is Kalli herself, who remains the primary target throughout the encounter.
At the beginning of each cycle, several plates become active.
Players must locate and stand on the correct plates while eliminating enemies that spawn nearby.
Successfully completing a plate activates the next stage of the encounter.
Completing a plate summons enemies that must be defeated before the mechanic can progress.
These enemies should be eliminated quickly so players can return to their assigned positions.
After enough plates have been completed, Kalli becomes vulnerable.
The fireteam should group together and deal as much damage as possible before the phase ends.
At the end of each damage phase, Kalli attempts to wipe the fireteam.
Players must enter one of the safe rooms that opens around the arena to survive.
Each safe room can only protect a limited number of players.
After surviving Annihilation, the encounter resets and begins another mechanic cycle.
The process repeats until Kalli is defeated.
Begin by assigning players to cover different portions of the arena.
When the encounter starts, identify the active plates and move to the correct locations.
Stand on the plates while defeating the enemies that appear.
Once enough plates have been completed, regroup and begin damaging Kalli.
As the damage phase ends, locate an available safe room and enter before Annihilation occurs.
After surviving the wipe mechanic, return to the arena and repeat the process.
Continue completing plate mechanics, damaging Kalli, and surviving Annihilation until she is defeated.
The most common cause of failure is players missing their assigned plates.
Many groups also struggle when multiple players attempt to use the same safe room during Annihilation.
Another common issue occurs when players focus entirely on damage and fail to prepare for the wipe mechanic in time.
Strong communication and awareness of safe room locations greatly improve consistency.
Complete the encounter while successfully managing every plate activation required by the challenge.
Assign plate responsibilities before beginning the encounter and ensure all players understand their positions.
Because the challenge revolves around proper execution of the plate mechanics, communication and positioning are significantly more important than damage output.
Focus on completing each mechanic cycle cleanly before worrying about shortening the encounter.
Most failures occur when players move to the wrong plate or fail to react quickly enough during mechanic transitions.
Clear callouts and predetermined assignments dramatically improve consistency.
The first secret chest in Last Wish can be obtained after completing Kalli, the Corrupted.
See the Secret Chest Guide for the full walkthrough and location details.
Because this chest can only reward previously acquired Last Wish weapons and armor, it becomes more valuable as your collection grows.
Shuro Chi is the second encounter of Last Wish and introduces one of the raid’s most mechanic-heavy fights.
The fireteam must defeat waves of Taken enemies, interrupt Shuro Chi’s song, solve symbol puzzles, and progress through multiple floors of the arena before finally defeating her.
Success depends on communication, add clear, and efficient puzzle solving.
The encounter takes place across several ascending levels connected by short traversal sections.
Each floor contains combat areas, puzzle rooms, and damage opportunities.
As the encounter progresses, the fireteam moves upward through the structure while preventing Shuro Chi from completing her song.
Throughout the encounter, Shuro Chi continuously sings a deadly song.
If the song reaches completion, the fireteam wipes.
Players must interrupt the song by progressing encounter mechanics and advancing through each floor.
Eye of Riven enemies appear throughout the encounter.
Defeating an Eye of Riven grants a special Taken Essence relic.
The relic is required to complete several encounter mechanics.
The Taken Essence relic provides unique abilities.
Players can use the relic to cleanse enemies, remove shields, and activate encounter objectives.
Proper relic management is critical throughout the fight.
Large crystals appear during the encounter.
Players must position themselves correctly around the crystal to destroy it and continue progressing.
Failure to destroy crystals quickly can halt encounter progression.
Between damage phases, the fireteam must complete symbol puzzles.
Players stand on the correct plates to recreate a displayed pattern and unlock the next section of the encounter.
After completing mechanics on each floor, Shuro Chi becomes vulnerable.
Deal as much damage as possible before she retreats to the next area.
Multiple damage phases are required to complete the encounter.
Begin by clearing enemies and defeating the Eye of Riven.
Use the Taken Essence relic to complete the required mechanics and destroy any crystals that appear.
Once the area has been secured, damage Shuro Chi until she retreats.
After each damage phase, complete the symbol puzzle to unlock the path forward.
Proceed to the next floor and repeat the process.
Continue clearing enemies, managing the Taken Essence, solving puzzles, and damaging Shuro Chi until she is defeated.
The most common cause of failure is slow puzzle completion.
Many groups also struggle when the Taken Essence relic is lost or used incorrectly.
Another common issue occurs when players fail to position themselves correctly around crystals.
Strong communication and clear role assignments greatly improve consistency.
Defeat all of Shuro Chi’s clones before damaging the real Shuro Chi.
Whenever Shuro Chi splits into multiple copies, every clone must be eliminated before the damage phase can begin.
As soon as the clones appear, spread out and identify their locations around the arena.
Assign players to specific clones to ensure they are all defeated quickly and efficiently.
Because the clones have relatively little health, coordination is generally more important than raw damage output.
Once every clone has been defeated, regroup and proceed with the encounter normally.
The most common failure occurs when a single clone is overlooked during the phase.
Many groups also waste time by having multiple players focus on the same clone while another remains alive elsewhere in the room.
Clear communication and area assignments make this challenge significantly easier.
The second secret chest in Last Wish can be obtained before reaching Morgeth, the Spirekeeper.
See the Secret Chest Guide for the full walkthrough and location details.
Because this chest can only reward previously acquired Last Wish weapons and armor, it becomes more valuable as your collection grows.
Morgeth, the Spirekeeper is the fourth encounter of Last Wish and serves as the raid’s first major Taken Strength encounter.
The fireteam must collect Taken Strength, manage trapped players, and damage Morgeth before his strength reaches its limit.
This encounter is less puzzle-heavy than Shuro Chi or The Vault, but it requires precise timing and strong communication across the entire team.
The encounter takes place on a large bridge leading deeper into the Dreaming City.
Morgeth stands at the far end of the arena while Taken enemies spawn across the battlefield.
Taken Strength orbs appear around the arena and must be collected in a controlled order.
Taken Strength appears as glowing Taken orbs around the arena.
Players collect these orbs to progress the encounter.
Each player can hold a limited amount of Taken Strength before becoming vulnerable to being trapped.
Players who collect too much Taken Strength become trapped by Umbral Enervation.
A trapped player cannot move or continue mechanics until another player frees them.
Eye of Riven enemies spawn during the encounter.
Defeating one grants a Taken Essence relic that can be used to free trapped players.
Taken Essence is used to cleanse trapped teammates.
The player carrying the Essence should move to the trapped Guardian and use the relic to free them before continuing the encounter.
Morgeth gains strength throughout the encounter.
If his strength reaches full capacity, the encounter wipes the fireteam.
After enough Taken Strength has been collected and mechanics have been completed, Morgeth becomes vulnerable.
The fireteam should group together and deal as much damage as possible before the phase ends.
Begin by clearing enemies and collecting the first Taken Strength orbs.
Assign players to collect orbs in a controlled order so no one accidentally takes too many.
When a player becomes trapped, defeat the Eye of Riven and use the Taken Essence to free them.
Continue collecting Taken Strength while monitoring Morgeth’s strength level.
Once enough orbs have been collected, regroup for damage.
Use supers, heavy weapons, and damage buffs to defeat Morgeth before his strength reaches its maximum.
If Morgeth survives the damage phase, repeat the process and continue managing Taken Strength until he is defeated.
The most common cause of failure is players collecting Taken Strength out of order.
Many groups also struggle when trapped players are not freed quickly enough.
Another common issue occurs when the Eye of Riven is killed too late, delaying the cleanse and allowing Morgeth’s strength to rise.
Clear orb assignments and fast trap cleanses make the encounter significantly more consistent.
Defeat Morgeth without killing any Ogres during the encounter.
The fireteam must complete the fight while allowing the Ogres to remain alive.
Focus on controlling enemy pressure without accidentally killing the Ogres.
Players should avoid using weapons, supers, or abilities that might unintentionally damage them.
Because the Ogres remain active throughout the fight, survivability becomes more important than usual.
Position carefully, use cover, and complete Taken Strength mechanics as efficiently as possible.
The goal is to reach and complete damage before the surviving Ogres overwhelm the team.
Most failures occur when an Ogre is accidentally killed during add clear.
Explosive weapons, roaming supers, and area-of-effect abilities can easily invalidate the challenge.
Teams should be deliberate with their damage and avoid unnecessary attacks near the Ogres.
The Vault is the fourth encounter of Last Wish and one of the raid’s most communication-heavy sections.
The fireteam must read symbols, determine which rooms require Penumbra or Antumbra, defeat Eye of Riven enemies, and use Taken Essence to cleanse the correct locations before the Vault timer expires.
There is no boss damage phase in this encounter. Success depends entirely on symbol callouts, relic movement, and accurate room assignments.
The Vault is divided into three rooms arranged around a central chamber.
Most teams refer to these rooms as Left, Middle, and Right.
Each room contains a plate and a set of symbols. Players use these symbols to determine whether each room requires Penumbra or Antumbra.
Each room displays a set of symbols.
Players must compare symbols between rooms to determine which locations need Penumbra or Antumbra.
Accurate callouts are the most important part of the encounter.
Penumbra and Antumbra are the two possible cleanse types used during the encounter.
Each room will require one of these two effects.
The team must determine the correct requirement before relic carriers begin cleansing.
Eye of Riven enemies spawn during each round.
Defeating one drops a Taken Essence relic.
The Taken Essence relic is used to cleanse the correct room.
The relic holder must know whether they have Penumbra or Antumbra and move to the room that requires it.
The encounter is timed.
If the correct cleanses are not completed before the timer expires, the fireteam wipes.
Begin by assigning one player to each room and having them read their symbols.
Compare the symbols between rooms to determine which rooms require Penumbra and which require Antumbra.
Defeat the Eye of Riven enemies when they spawn and have designated players pick up the Taken Essence relics.
Each relic holder should call out whether they have Penumbra or Antumbra.
Guide each relic holder to the correct room and cleanse the required location.
After all required cleanses are completed, the round resets.
Repeat the symbol reading, relic collection, and cleansing process until the Vault opens and the encounter is complete.
The most common cause of failure is unclear symbol callouts.
Many teams also struggle when relic holders forget whether they have Penumbra or Antumbra.
Another common issue occurs when players delay moving to their cleanse rooms, leaving too little time before the Vault timer expires.
Clear callouts, consistent symbol names, and calm relic movement make this encounter much easier.
Defeat the Might of Riven Knights before they enter the center room.
If a Knight reaches the center area before being killed, the challenge fails.
Assign players to watch each side room and call out Knight spawns immediately.
As soon as a Might of Riven appears, focus it down before it can move into the center chamber.
Because the Vault encounter already requires strong communication, the challenge mostly adds pressure to enemy control.
Players should prioritize Knights over general add clear whenever they appear.
Most failures occur when a Knight spawns and moves unnoticed toward the center.
Another common issue is players becoming too focused on symbol callouts or relic movement and ignoring enemy spawns.
Keep one player responsible for calling out Knights in each room, and eliminate them as soon as they appear.
Riven of a Thousand Voices is the final boss encounter of Last Wish and one of the most mechanically complex encounters ever created in Destiny 2.
The fireteam must communicate symbols between separate rooms, manage Eye of Riven relics, identify the correct eyes to destroy, and navigate multiple phases throughout Riven’s lair. While many groups now use a high-damage strategy that bypasses most of the encounter, the full fight remains one of Destiny’s most iconic raid experiences.
Success depends on communication, symbol recognition, and precise execution.
The encounter takes place across multiple floors within Riven’s chamber.
Throughout the encounter, the fireteam is split between mirrored rooms and required to communicate information between locations.
Several mechanics occur simultaneously, requiring coordination between both groups.
Symbols are the foundation of the encounter.
Players must identify and communicate symbols between rooms in order to determine the correct actions required for progression.
Accurate callouts are critical.
Eye of Riven enemies appear throughout the encounter.
Defeating an Eye of Riven grants a Taken Essence relic that is used to cleanse mechanics and progress the encounter.
The Taken Essence relic allows players to cleanse specific objectives and support teammates.
Improper relic usage can quickly cause the encounter to fail.
During several phases, players must identify specific eyes that need to be destroyed.
Destroying the wrong eye immediately wipes the fireteam.
Communication and accuracy are essential.

The encounter periodically transitions players into the Ascendant Realm.
Mechanics must be completed successfully in both the physical and Ascendant spaces.
Split the fireteam into two groups and begin clearing enemies within each room.
As symbols appear, communicate them between teams and determine the correct objectives.
Defeat Eye of Riven enemies and use the Taken Essence relics to complete the required cleanses.
As Riven reveals herself, identify the correct eyes and communicate the required callouts.
Continue progressing through each floor while successfully completing symbol mechanics and eye phases.
Eventually, the fireteam enters Riven’s body and destroys the Taken growths within.
Escape successfully and complete the final damage sequence to defeat Riven.
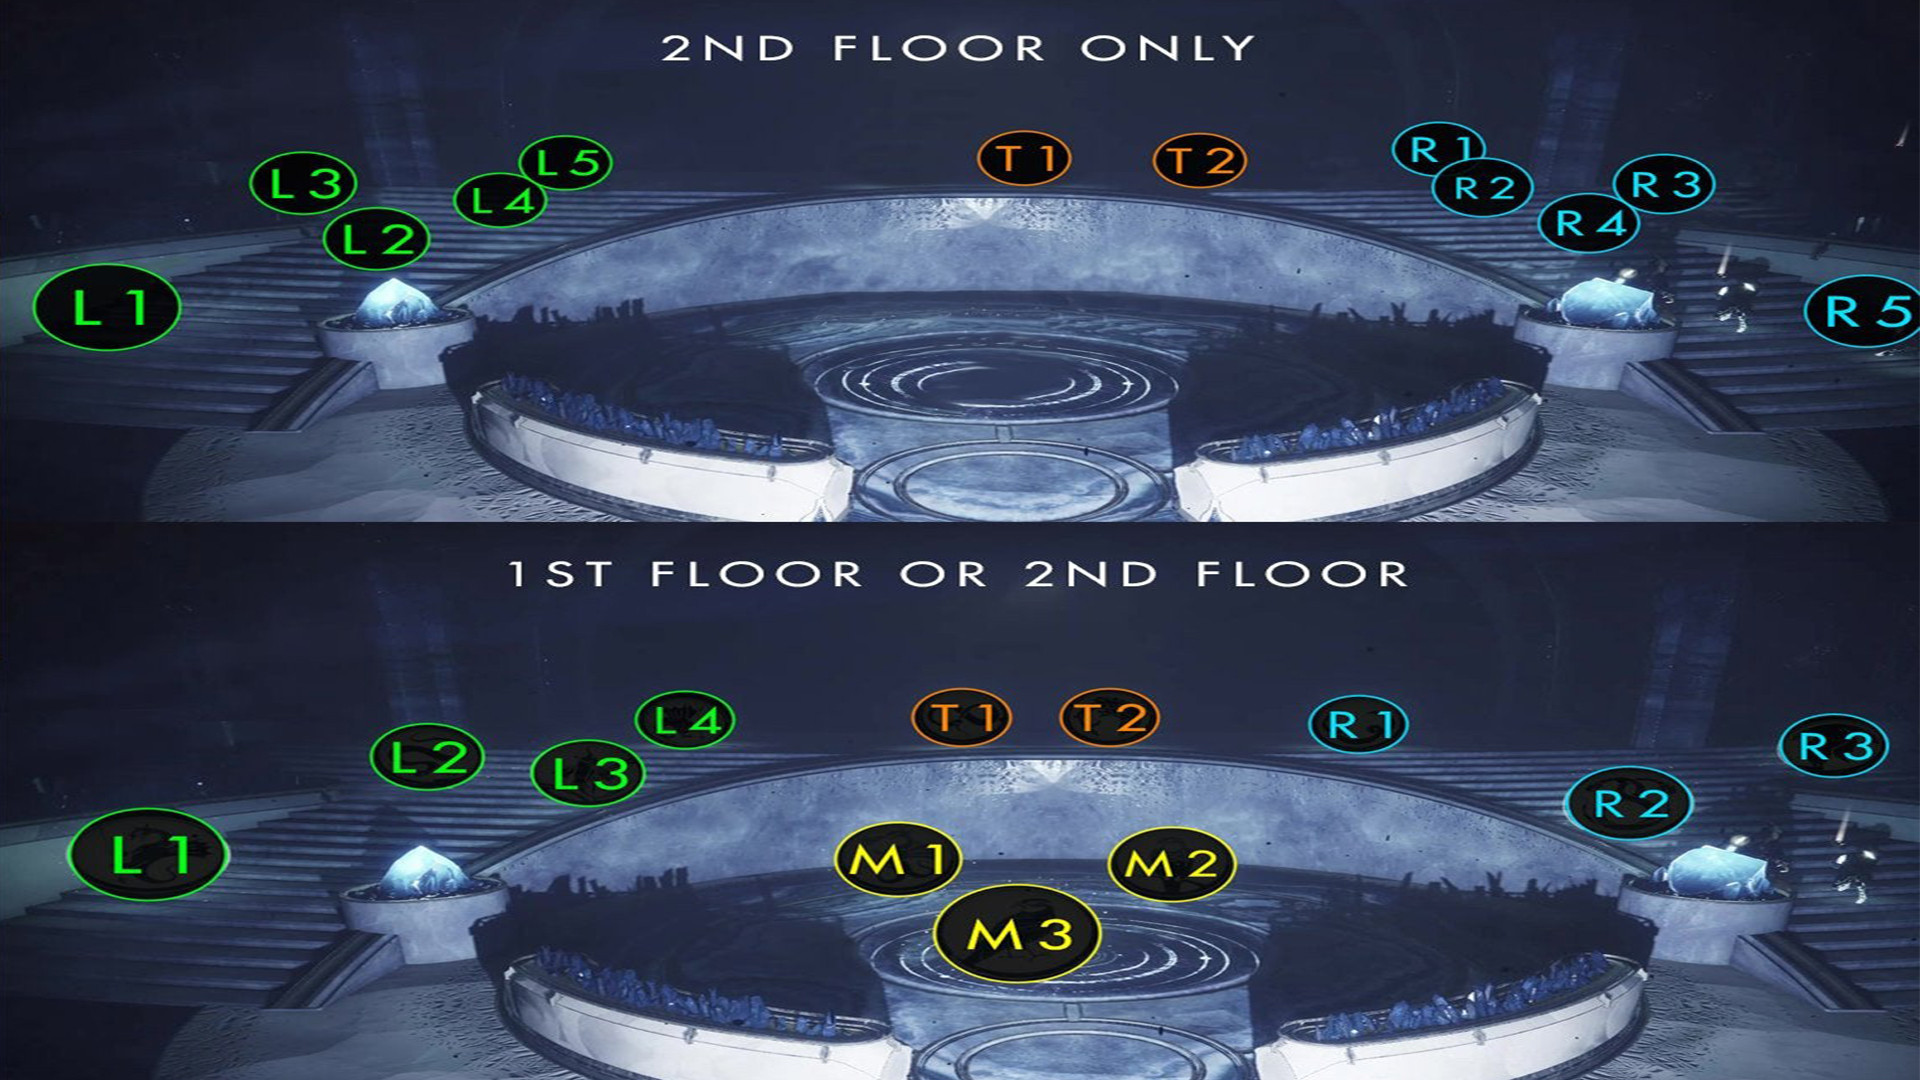
The most common cause of failure is incorrect eye communication.
Many teams also struggle with symbol callouts when multiple players attempt to speak simultaneously.
Assigning dedicated callers and maintaining consistent terminology dramatically improves success.
Many modern groups choose to bypass the majority of Riven’s mechanics through overwhelming damage.
When Riven appears in the correct room, gather the fireteam and immediately begin dealing damage.
Most groups use high-damage weapons and abilities to force Riven into her final sequence before the majority of mechanics occur.
After enough damage has been dealt, continue through the remaining portions of the encounter and proceed into Riven’s body.
Destroy the Taken growths and complete the encounter normally.
The most common cause of failure is insufficient damage output.
Many groups also lose valuable damage by standing in poor positions or delaying their burst damage abilities.
Ensure all players are prepared before the damage phase begins.
During the legitimate encounter, players may not cleanse the same symbol twice throughout the fight.
Each symbol can only be used once during the encounter.
Track every symbol that has already been cleansed and communicate clearly between teams.
Before completing a cleanse, verify that the symbol has not already been used during a previous phase.
Many groups find it helpful to designate one player to track completed symbols throughout the encounter.
The most common failure occurs when teams lose track of previously cleansed symbols during later phases.
Another common issue occurs when multiple players attempt to manage symbol tracking independently and provide conflicting information.
Maintaining a single source of truth for symbol tracking greatly improves consistency.
Queenswalk is the final encounter of Last Wish and serves as the true conclusion to the raid.
After defeating Riven, the fireteam must carry Riven’s Heart through the Dreaming City while escaping the Taken corruption spreading throughout the area.
Unlike most final encounters, Queenswalk does not feature a traditional boss fight. Instead, success depends on movement, communication, and coordination as the fireteam transports the Heart to its destination.
Queenswalk takes place across a long route through the Dreaming City.
The encounter begins inside Riven’s chamber and gradually progresses through a series of pathways, bridges, and Ascendant spaces before reaching the final destination.
As the encounter continues, the available safe area becomes increasingly limited.
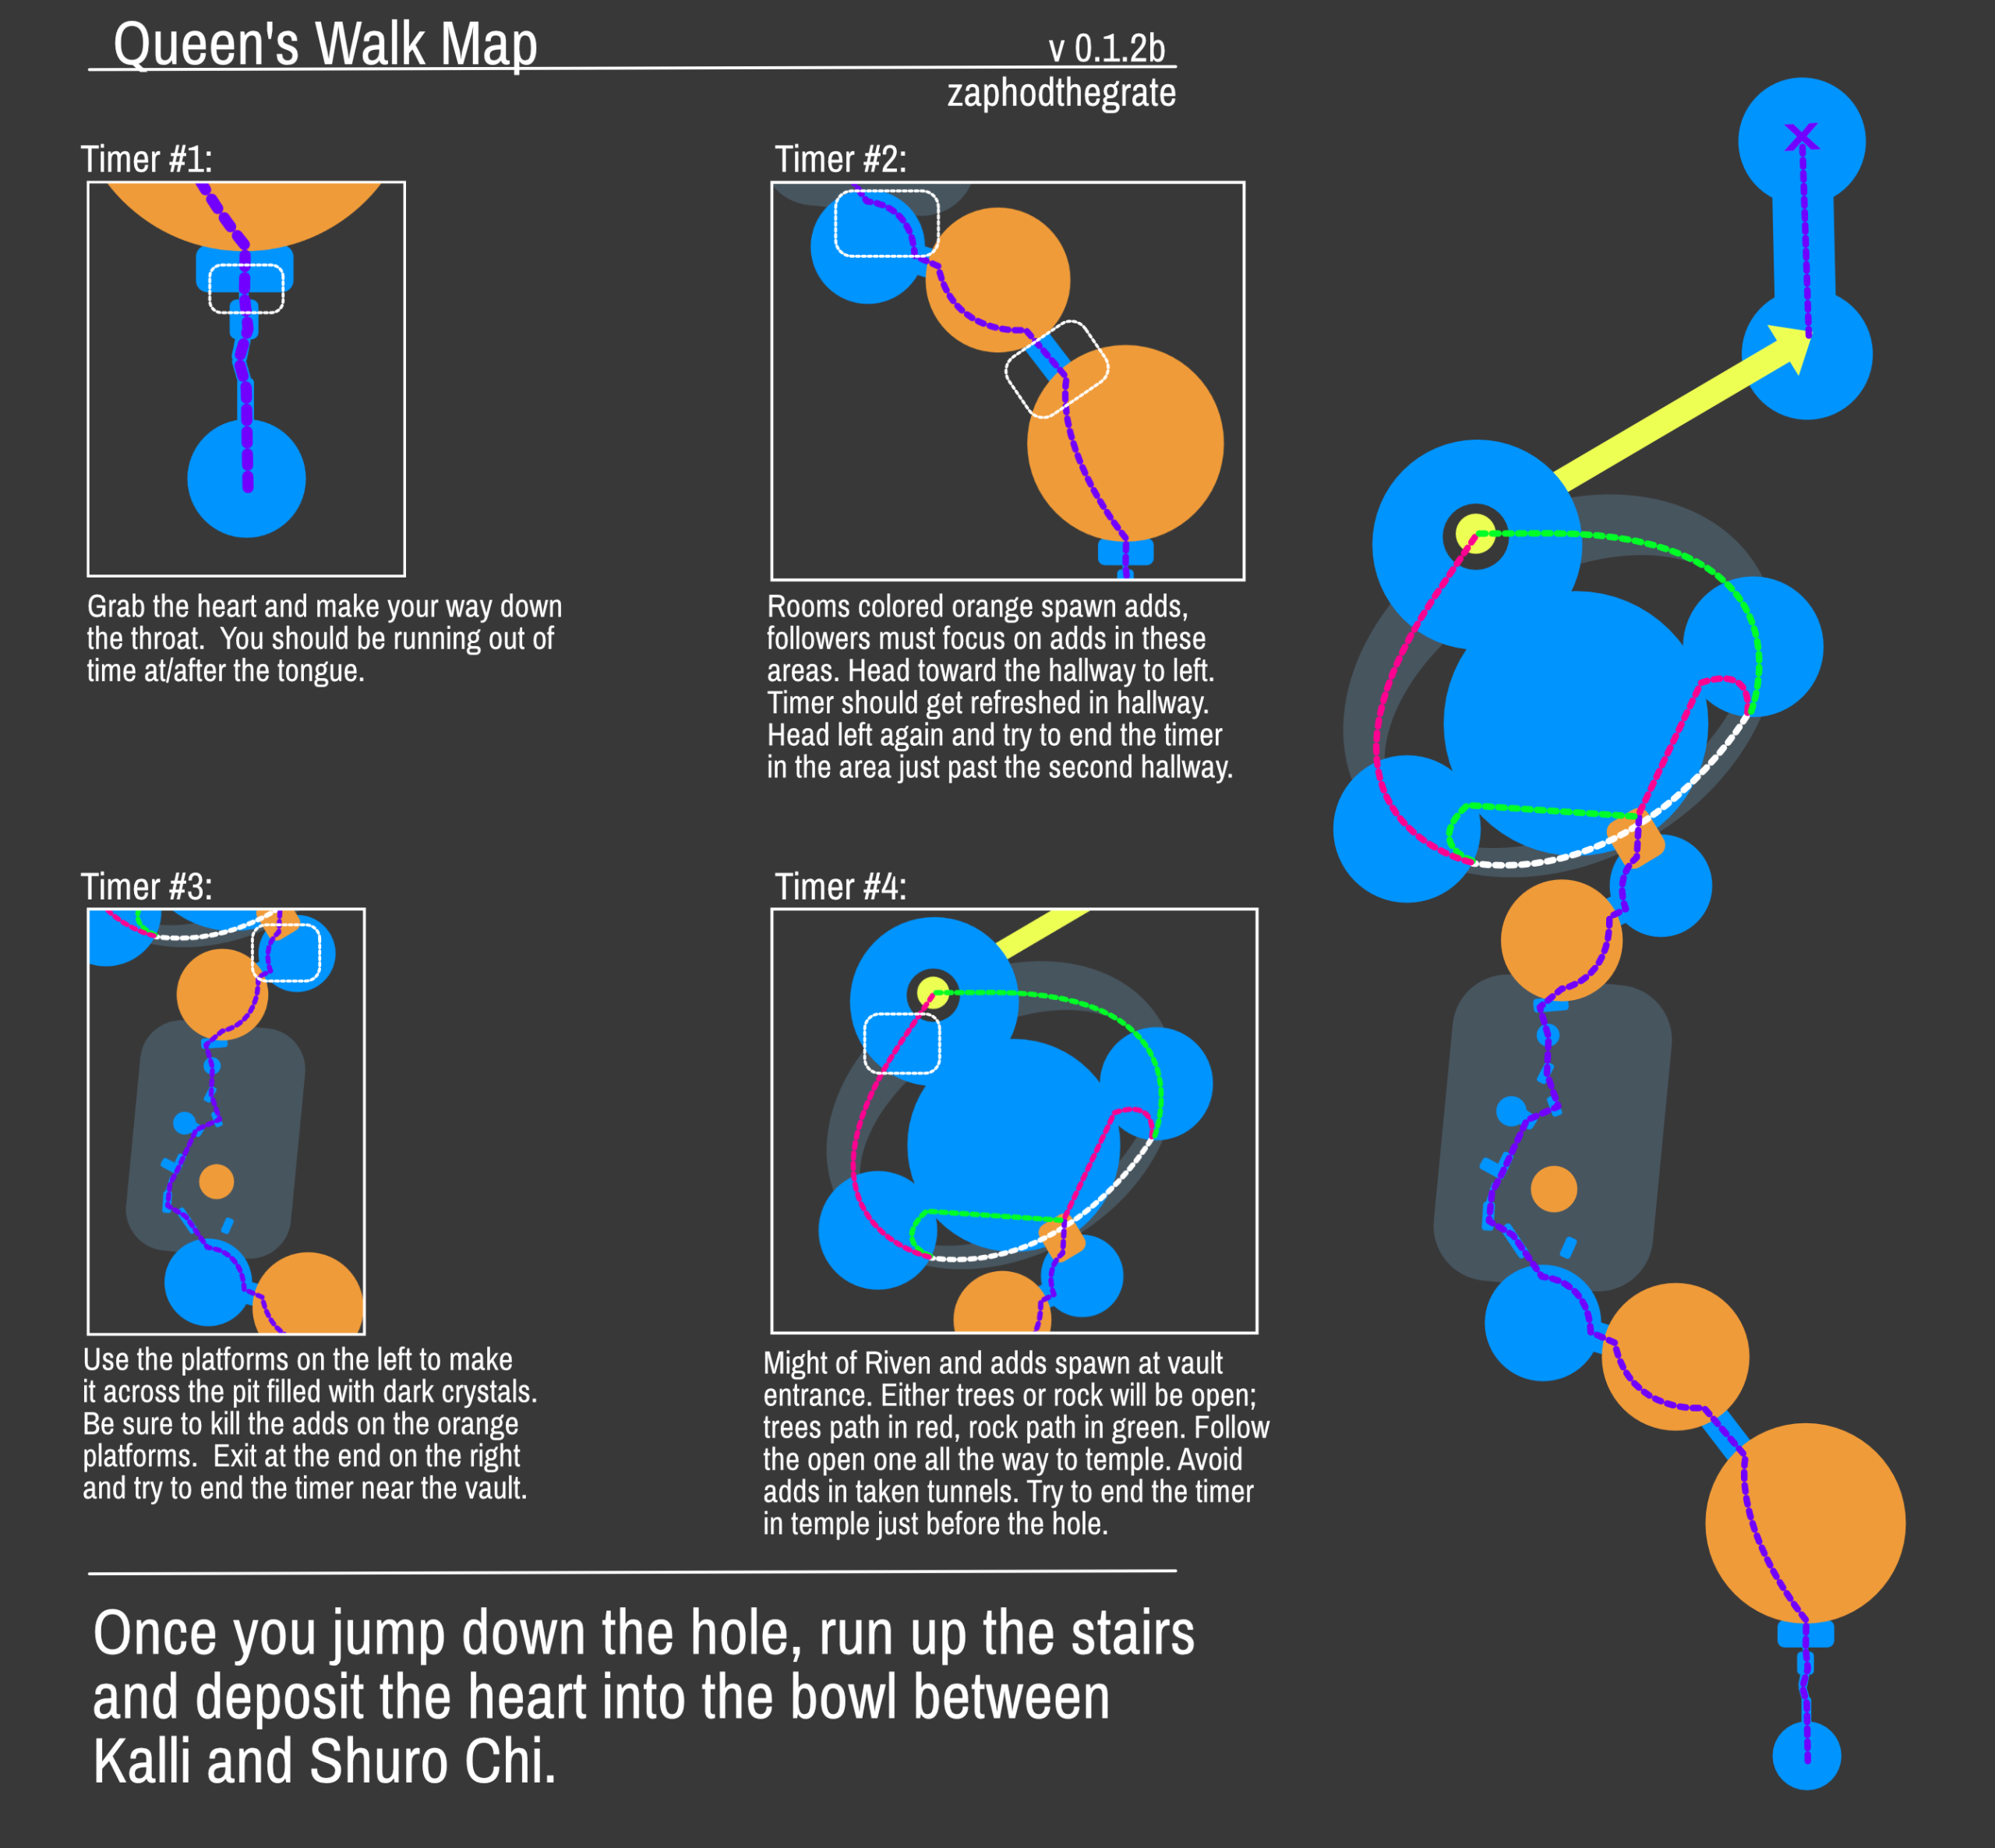
One player begins the encounter carrying Riven’s Heart.
The Heart creates a protective aura around the carrier that shields nearby players from the surrounding corruption.
The carrier cannot hold the Heart indefinitely and must eventually pass it to another player.
Players outside the Heart’s protective aura accumulate Creeping Darkness.
Allowing this debuff to stack too high results in death.
The fireteam should remain close to the Heart carrier whenever possible.
Throughout the encounter, Taken Strength appears and must be collected.
These pickups help progress the encounter and prevent the Heart from becoming trapped.
As the encounter progresses, players are periodically teleported inside the Heart.
When this occurs, another player must take possession of the Heart and continue leading the group forward.
Every member of the fireteam will eventually participate in carrying the Heart.
Players teleported inside the Heart continue assisting the team by collecting Taken Strength and providing callouts.
Although separated from the main group, they remain an important part of the encounter.
Begin by following the player carrying Riven’s Heart.
Stay within the protective aura while defeating Taken enemies and collecting Taken Strength.
As players are pulled into the Heart, assign a new carrier and continue moving forward.
Maintain communication regarding carrier rotations and Taken Strength collection.
Continue advancing through the route while ensuring the group remains protected by the Heart’s aura.
As more players are teleported inside the Heart, continue rotating responsibilities until the fireteam reaches the final destination.
Deposit the Heart to complete the encounter and finish the raid.
The most common cause of failure is players drifting too far away from the Heart carrier and accumulating excessive Creeping Darkness.
Many groups also struggle when carrier rotations are not communicated clearly.
Another common issue occurs when Taken Strength pickups are missed during chaotic moments.
Staying together and maintaining clear communication dramatically improves consistency.
Completing Queenswalk grants access to the final reward room.
Players with Ethereal Keys can open the chests within the room for a chance to obtain One Thousand Voices and other Last Wish rewards.
Because multiple chests are available, saving Ethereal Keys can increase the number of reward opportunities available after a successful clear.
Last Wish introduces a variety of mechanics that appear throughout multiple encounters.
While each encounter has unique objectives, understanding these recurring systems makes progression significantly easier.
Many encounters use a shared set of Dreaming City symbols.
Players must identify, communicate, and interact with these symbols throughout the raid.
Accurate callouts are one of the most important skills in Last Wish.
Teams should establish symbol names before beginning the raid.
Several encounters require players to collect Taken Strength.
These objects are used to progress mechanics and prevent encounter failure.
Managing Taken Strength correctly is often the difference between success and a wipe.
Certain mechanics apply negative effects that must be cleansed.
Players frequently use specific encounter mechanics to remove debuffs and continue progressing safely.
Eye of Riven enemies appear during several encounters.
Defeating these enemies grants special abilities that are required to complete mechanics.
Because these abilities are often central to encounter progression, Eye of Riven enemies should be treated as priority targets.
The Ascendant Realm appears throughout the raid and plays a major role in several encounters.
Players frequently move between the physical world and Ascendant spaces while solving mechanics.
Maintaining awareness of both locations is critical.
Last Wish contains a hidden area known as the Wall of Wishes.
By entering specific symbol combinations, players can activate various effects ranging from encounter checkpoints to cosmetic rewards.
The main guide will notify players when they reach the Wall, while all wish combinations and effects are covered in the dedicated Wall of Wishes guide.
Last Wish does not feature a Master difficulty version.
Instead, raid mastery is primarily represented through encounter challenges, triumphs, flawless completions, and progress toward the Rivensbane title.
Players pursuing Rivensbane should plan challenge completions and triumph runs carefully, as many objectives can be combined to reduce the total number of clears required.
The Wall of Wishes can be accessed before beginning the Kalli encounter.
By entering specific symbol combinations, players can activate a variety of effects including encounter checkpoints, cosmetic rewards, dialogue, and other unique interactions throughout Last Wish.
Players interested in using the Wall of Wishes should do so before starting the raid.
See the Wall of Wishes Guide for all wish combinations and their effects.
Kalli, the Corrupted is the first encounter of Last Wish and serves as an introduction to the raid’s symbol-based mechanics.
The fireteam must identify active plates, defeat Taken enemies, survive Kalli’s wipe mechanic, and complete multiple damage phases before defeating the boss.
While Kalli is one of the simpler encounters in Last Wish, success still requires communication, awareness, and proper positioning.
The encounter takes place in a large circular arena divided into multiple sections.
Several plates surround the room, each displaying a symbol.
During the encounter, specific plates become active and must be occupied to progress the fight.
At the center of the arena is Kalli herself, who remains the primary target throughout the encounter.
At the beginning of each cycle, several plates become active.
Players must locate and stand on the correct plates while eliminating enemies that spawn nearby.
Successfully completing a plate activates the next stage of the encounter.
Completing a plate summons enemies that must be defeated before the mechanic can progress.
These enemies should be eliminated quickly so players can return to their assigned positions.
After enough plates have been completed, Kalli becomes vulnerable.
The fireteam should group together and deal as much damage as possible before the phase ends.
At the end of each damage phase, Kalli attempts to wipe the fireteam.
Players must enter one of the safe rooms that opens around the arena to survive.
Each safe room can only protect a limited number of players.
After surviving Annihilation, the encounter resets and begins another mechanic cycle.
The process repeats until Kalli is defeated.
Begin by assigning players to cover different portions of the arena.
When the encounter starts, identify the active plates and move to the correct locations.
Stand on the plates while defeating the enemies that appear.
Once enough plates have been completed, regroup and begin damaging Kalli.
As the damage phase ends, locate an available safe room and enter before Annihilation occurs.
After surviving the wipe mechanic, return to the arena and repeat the process.
Continue completing plate mechanics, damaging Kalli, and surviving Annihilation until she is defeated.
The most common cause of failure is players missing their assigned plates.
Many groups also struggle when multiple players attempt to use the same safe room during Annihilation.
Another common issue occurs when players focus entirely on damage and fail to prepare for the wipe mechanic in time.
Strong communication and awareness of safe room locations greatly improve consistency.
Complete the encounter while successfully managing every plate activation required by the challenge.
Assign plate responsibilities before beginning the encounter and ensure all players understand their positions.
Because the challenge revolves around proper execution of the plate mechanics, communication and positioning are significantly more important than damage output.
Focus on completing each mechanic cycle cleanly before worrying about shortening the encounter.
Most failures occur when players move to the wrong plate or fail to react quickly enough during mechanic transitions.
Clear callouts and predetermined assignments dramatically improve consistency.
The first secret chest in Last Wish can be obtained after completing Kalli, the Corrupted.
See the Secret Chest Guide for the full walkthrough and location details.
Because this chest can only reward previously acquired Last Wish weapons and armor, it becomes more valuable as your collection grows.
Shuro Chi is the second encounter of Last Wish and introduces one of the raid’s most mechanic-heavy fights.
The fireteam must defeat waves of Taken enemies, interrupt Shuro Chi’s song, solve symbol puzzles, and progress through multiple floors of the arena before finally defeating her.
Success depends on communication, add clear, and efficient puzzle solving.
The encounter takes place across several ascending levels connected by short traversal sections.
Each floor contains combat areas, puzzle rooms, and damage opportunities.
As the encounter progresses, the fireteam moves upward through the structure while preventing Shuro Chi from completing her song.
Throughout the encounter, Shuro Chi continuously sings a deadly song.
If the song reaches completion, the fireteam wipes.
Players must interrupt the song by progressing encounter mechanics and advancing through each floor.
Eye of Riven enemies appear throughout the encounter.
Defeating an Eye of Riven grants a special Taken Essence relic.
The relic is required to complete several encounter mechanics.
The Taken Essence relic provides unique abilities.
Players can use the relic to cleanse enemies, remove shields, and activate encounter objectives.
Proper relic management is critical throughout the fight.
Large crystals appear during the encounter.
Players must position themselves correctly around the crystal to destroy it and continue progressing.
Failure to destroy crystals quickly can halt encounter progression.
Between damage phases, the fireteam must complete symbol puzzles.
Players stand on the correct plates to recreate a displayed pattern and unlock the next section of the encounter.
After completing mechanics on each floor, Shuro Chi becomes vulnerable.
Deal as much damage as possible before she retreats to the next area.
Multiple damage phases are required to complete the encounter.
Begin by clearing enemies and defeating the Eye of Riven.
Use the Taken Essence relic to complete the required mechanics and destroy any crystals that appear.
Once the area has been secured, damage Shuro Chi until she retreats.
After each damage phase, complete the symbol puzzle to unlock the path forward.
Proceed to the next floor and repeat the process.
Continue clearing enemies, managing the Taken Essence, solving puzzles, and damaging Shuro Chi until she is defeated.
The most common cause of failure is slow puzzle completion.
Many groups also struggle when the Taken Essence relic is lost or used incorrectly.
Another common issue occurs when players fail to position themselves correctly around crystals.
Strong communication and clear role assignments greatly improve consistency.
Defeat all of Shuro Chi’s clones before damaging the real Shuro Chi.
Whenever Shuro Chi splits into multiple copies, every clone must be eliminated before the damage phase can begin.
As soon as the clones appear, spread out and identify their locations around the arena.
Assign players to specific clones to ensure they are all defeated quickly and efficiently.
Because the clones have relatively little health, coordination is generally more important than raw damage output.
Once every clone has been defeated, regroup and proceed with the encounter normally.
The most common failure occurs when a single clone is overlooked during the phase.
Many groups also waste time by having multiple players focus on the same clone while another remains alive elsewhere in the room.
Clear communication and area assignments make this challenge significantly easier.
The second secret chest in Last Wish can be obtained before reaching Morgeth, the Spirekeeper.
See the Secret Chest Guide for the full walkthrough and location details.
Because this chest can only reward previously acquired Last Wish weapons and armor, it becomes more valuable as your collection grows.
Morgeth, the Spirekeeper is the fourth encounter of Last Wish and serves as the raid’s first major Taken Strength encounter.
The fireteam must collect Taken Strength, manage trapped players, and damage Morgeth before his strength reaches its limit.
This encounter is less puzzle-heavy than Shuro Chi or The Vault, but it requires precise timing and strong communication across the entire team.
The encounter takes place on a large bridge leading deeper into the Dreaming City.
Morgeth stands at the far end of the arena while Taken enemies spawn across the battlefield.
Taken Strength orbs appear around the arena and must be collected in a controlled order.
Taken Strength appears as glowing Taken orbs around the arena.
Players collect these orbs to progress the encounter.
Each player can hold a limited amount of Taken Strength before becoming vulnerable to being trapped.
Players who collect too much Taken Strength become trapped by Umbral Enervation.
A trapped player cannot move or continue mechanics until another player frees them.
Eye of Riven enemies spawn during the encounter.
Defeating one grants a Taken Essence relic that can be used to free trapped players.
Taken Essence is used to cleanse trapped teammates.
The player carrying the Essence should move to the trapped Guardian and use the relic to free them before continuing the encounter.
Morgeth gains strength throughout the encounter.
If his strength reaches full capacity, the encounter wipes the fireteam.
After enough Taken Strength has been collected and mechanics have been completed, Morgeth becomes vulnerable.
The fireteam should group together and deal as much damage as possible before the phase ends.
Begin by clearing enemies and collecting the first Taken Strength orbs.
Assign players to collect orbs in a controlled order so no one accidentally takes too many.
When a player becomes trapped, defeat the Eye of Riven and use the Taken Essence to free them.
Continue collecting Taken Strength while monitoring Morgeth’s strength level.
Once enough orbs have been collected, regroup for damage.
Use supers, heavy weapons, and damage buffs to defeat Morgeth before his strength reaches its maximum.
If Morgeth survives the damage phase, repeat the process and continue managing Taken Strength until he is defeated.
The most common cause of failure is players collecting Taken Strength out of order.
Many groups also struggle when trapped players are not freed quickly enough.
Another common issue occurs when the Eye of Riven is killed too late, delaying the cleanse and allowing Morgeth’s strength to rise.
Clear orb assignments and fast trap cleanses make the encounter significantly more consistent.
Defeat Morgeth without killing any Ogres during the encounter.
The fireteam must complete the fight while allowing the Ogres to remain alive.
Focus on controlling enemy pressure without accidentally killing the Ogres.
Players should avoid using weapons, supers, or abilities that might unintentionally damage them.
Because the Ogres remain active throughout the fight, survivability becomes more important than usual.
Position carefully, use cover, and complete Taken Strength mechanics as efficiently as possible.
The goal is to reach and complete damage before the surviving Ogres overwhelm the team.
Most failures occur when an Ogre is accidentally killed during add clear.
Explosive weapons, roaming supers, and area-of-effect abilities can easily invalidate the challenge.
Teams should be deliberate with their damage and avoid unnecessary attacks near the Ogres.
The Vault is the fourth encounter of Last Wish and one of the raid’s most communication-heavy sections.
The fireteam must read symbols, determine which rooms require Penumbra or Antumbra, defeat Eye of Riven enemies, and use Taken Essence to cleanse the correct locations before the Vault timer expires.
There is no boss damage phase in this encounter. Success depends entirely on symbol callouts, relic movement, and accurate room assignments.
The Vault is divided into three rooms arranged around a central chamber.
Most teams refer to these rooms as Left, Middle, and Right.
Each room contains a plate and a set of symbols. Players use these symbols to determine whether each room requires Penumbra or Antumbra.
Each room displays a set of symbols.
Players must compare symbols between rooms to determine which locations need Penumbra or Antumbra.
Accurate callouts are the most important part of the encounter.
Penumbra and Antumbra are the two possible cleanse types used during the encounter.
Each room will require one of these two effects.
The team must determine the correct requirement before relic carriers begin cleansing.
Eye of Riven enemies spawn during each round.
Defeating one drops a Taken Essence relic.
The Taken Essence relic is used to cleanse the correct room.
The relic holder must know whether they have Penumbra or Antumbra and move to the room that requires it.
The encounter is timed.
If the correct cleanses are not completed before the timer expires, the fireteam wipes.
Begin by assigning one player to each room and having them read their symbols.
Compare the symbols between rooms to determine which rooms require Penumbra and which require Antumbra.
Defeat the Eye of Riven enemies when they spawn and have designated players pick up the Taken Essence relics.
Each relic holder should call out whether they have Penumbra or Antumbra.
Guide each relic holder to the correct room and cleanse the required location.
After all required cleanses are completed, the round resets.
Repeat the symbol reading, relic collection, and cleansing process until the Vault opens and the encounter is complete.
The most common cause of failure is unclear symbol callouts.
Many teams also struggle when relic holders forget whether they have Penumbra or Antumbra.
Another common issue occurs when players delay moving to their cleanse rooms, leaving too little time before the Vault timer expires.
Clear callouts, consistent symbol names, and calm relic movement make this encounter much easier.
Defeat the Might of Riven Knights before they enter the center room.
If a Knight reaches the center area before being killed, the challenge fails.
Assign players to watch each side room and call out Knight spawns immediately.
As soon as a Might of Riven appears, focus it down before it can move into the center chamber.
Because the Vault encounter already requires strong communication, the challenge mostly adds pressure to enemy control.
Players should prioritize Knights over general add clear whenever they appear.
Most failures occur when a Knight spawns and moves unnoticed toward the center.
Another common issue is players becoming too focused on symbol callouts or relic movement and ignoring enemy spawns.
Keep one player responsible for calling out Knights in each room, and eliminate them as soon as they appear.
Riven of a Thousand Voices is the final boss encounter of Last Wish and one of the most mechanically complex encounters ever created in Destiny 2.
The fireteam must communicate symbols between separate rooms, manage Eye of Riven relics, identify the correct eyes to destroy, and navigate multiple phases throughout Riven’s lair. While many groups now use a high-damage strategy that bypasses most of the encounter, the full fight remains one of Destiny’s most iconic raid experiences.
Success depends on communication, symbol recognition, and precise execution.
The encounter takes place across multiple floors within Riven’s chamber.
Throughout the encounter, the fireteam is split between mirrored rooms and required to communicate information between locations.
Several mechanics occur simultaneously, requiring coordination between both groups.
Symbols are the foundation of the encounter.
Players must identify and communicate symbols between rooms in order to determine the correct actions required for progression.
Accurate callouts are critical.
Eye of Riven enemies appear throughout the encounter.
Defeating an Eye of Riven grants a Taken Essence relic that is used to cleanse mechanics and progress the encounter.
The Taken Essence relic allows players to cleanse specific objectives and support teammates.
Improper relic usage can quickly cause the encounter to fail.
During several phases, players must identify specific eyes that need to be destroyed.
Destroying the wrong eye immediately wipes the fireteam.
Communication and accuracy are essential.
The encounter periodically transitions players into the Ascendant Realm.
Mechanics must be completed successfully in both the physical and Ascendant spaces.
Split the fireteam into two groups and begin clearing enemies within each room.
As symbols appear, communicate them between teams and determine the correct objectives.
Defeat Eye of Riven enemies and use the Taken Essence relics to complete the required cleanses.
As Riven reveals herself, identify the correct eyes and communicate the required callouts.
Continue progressing through each floor while successfully completing symbol mechanics and eye phases.
Eventually, the fireteam enters Riven’s body and destroys the Taken growths within.
Escape successfully and complete the final damage sequence to defeat Riven.
The most common cause of failure is incorrect eye communication.
Many teams also struggle with symbol callouts when multiple players attempt to speak simultaneously.
Assigning dedicated callers and maintaining consistent terminology dramatically improves success.
Many modern groups choose to bypass the majority of Riven’s mechanics through overwhelming damage.
When Riven appears in the correct room, gather the fireteam and immediately begin dealing damage.
Most groups use high-damage weapons and abilities to force Riven into her final sequence before the majority of mechanics occur.
After enough damage has been dealt, continue through the remaining portions of the encounter and proceed into Riven’s body.
Destroy the Taken growths and complete the encounter normally.
The most common cause of failure is insufficient damage output.
Many groups also lose valuable damage by standing in poor positions or delaying their burst damage abilities.
Ensure all players are prepared before the damage phase begins.
During the legitimate encounter, players may not cleanse the same symbol twice throughout the fight.
Each symbol can only be used once during the encounter.
Track every symbol that has already been cleansed and communicate clearly between teams.
Before completing a cleanse, verify that the symbol has not already been used during a previous phase.
Many groups find it helpful to designate one player to track completed symbols throughout the encounter.
The most common failure occurs when teams lose track of previously cleansed symbols during later phases.
Another common issue occurs when multiple players attempt to manage symbol tracking independently and provide conflicting information.
Maintaining a single source of truth for symbol tracking greatly improves consistency.
Queenswalk is the final encounter of Last Wish and serves as the true conclusion to the raid.
After defeating Riven, the fireteam must carry Riven’s Heart through the Dreaming City while escaping the Taken corruption spreading throughout the area.
Unlike most final encounters, Queenswalk does not feature a traditional boss fight. Instead, success depends on movement, communication, and coordination as the fireteam transports the Heart to its destination.
Queenswalk takes place across a long route through the Dreaming City.
The encounter begins inside Riven’s chamber and gradually progresses through a series of pathways, bridges, and Ascendant spaces before reaching the final destination.
As the encounter continues, the available safe area becomes increasingly limited.
One player begins the encounter carrying Riven’s Heart.
The Heart creates a protective aura around the carrier that shields nearby players from the surrounding corruption.
The carrier cannot hold the Heart indefinitely and must eventually pass it to another player.
Players outside the Heart’s protective aura accumulate Creeping Darkness.
Allowing this debuff to stack too high results in death.
The fireteam should remain close to the Heart carrier whenever possible.
Throughout the encounter, Taken Strength appears and must be collected.
These pickups help progress the encounter and prevent the Heart from becoming trapped.
As the encounter progresses, players are periodically teleported inside the Heart.
When this occurs, another player must take possession of the Heart and continue leading the group forward.
Every member of the fireteam will eventually participate in carrying the Heart.
Players teleported inside the Heart continue assisting the team by collecting Taken Strength and providing callouts.
Although separated from the main group, they remain an important part of the encounter.
Begin by following the player carrying Riven’s Heart.
Stay within the protective aura while defeating Taken enemies and collecting Taken Strength.
As players are pulled into the Heart, assign a new carrier and continue moving forward.
Maintain communication regarding carrier rotations and Taken Strength collection.
Continue advancing through the route while ensuring the group remains protected by the Heart’s aura.
As more players are teleported inside the Heart, continue rotating responsibilities until the fireteam reaches the final destination.
Deposit the Heart to complete the encounter and finish the raid.
The most common cause of failure is players drifting too far away from the Heart carrier and accumulating excessive Creeping Darkness.
Many groups also struggle when carrier rotations are not communicated clearly.
Another common issue occurs when Taken Strength pickups are missed during chaotic moments.
Staying together and maintaining clear communication dramatically improves consistency.
Completing Queenswalk grants access to the final reward room.
Players with Ethereal Keys can open the chests within the room for a chance to obtain One Thousand Voices and other Last Wish rewards.
Because multiple chests are available, saving Ethereal Keys can increase the number of reward opportunities available after a successful clear.