Before entering the Dreadnaught, it is important to understand the mechanics that appear throughout King’s Fall.
Several encounters require players to stand on plates in a specific sequence.
Activating plates often reveals hidden platforms, begins encounter mechanics, or enables progression.
Communication is essential because many plate mechanics require multiple players to coordinate simultaneously.
Brand buffs are one of the defining mechanics of King’s Fall.
A player carrying a Brand creates an aura around themselves that provides important benefits to nearby teammates.
Most commonly, players must stand inside a Brand aura to damage bosses or survive encounter mechanics.
Throughout the raid, Brand holders must transfer their buff to another player before the timer expires.
Certain encounters introduce the Brand Claimer buff.
Players with Brand Claimer can steal a Brand from another player, resetting the timer and allowing the encounter to continue.
Managing Brand transfers correctly is one of the most important mechanics in King’s Fall.
Taken Strength appears during several encounters.
Players collect these floating orbs to progress mechanics and trigger damage phases.
Failing to collect Taken Strength can delay progression or cause encounters to fail.
Some encounters require players to identify and communicate specific locations or symbols.
Accurate callouts become increasingly important later in the raid, particularly during the final encounters.
King’s Fall contains a hidden Deepsight chest puzzle.
Players activate a series of hidden symbols throughout the raid to unlock an additional guaranteed Deepsight weapon at the end of the run.
The main guide will notify players whenever they are approaching a symbol location, while the complete walkthrough is covered in the dedicated Deepsight Chest Guide.
Hall of Souls serves as the opening encounter of King’s Fall and introduces many of the raid’s core mechanics.
The fireteam must activate a massive Hive portal by collecting and depositing Relics while defending key positions from incoming enemies. Although mechanically simple compared to later encounters, Hall of Souls establishes the teamwork and plate coordination that appear throughout the raid.
Success depends on efficient Relic running and strong add clear.
The encounter takes place in a large chamber dominated by a massive portal at its center.
Two side rooms contain Relics that must be collected and brought to the central statue. Enemy waves continuously spawn throughout the encounter and attempt to disrupt progress.
The central area serves as the primary objective location while the side rooms act as Relic collection points.
Relics spawn in side rooms throughout the encounter.
Players must collect the Relics and transport them to the central statue.
Depositing enough Relics powers the portal and progresses the encounter.
The left and right side rooms alternate throughout the encounter.
Fireteams should maintain awareness of which side is currently active and assign runners accordingly.
Hive enemies continuously spawn while the encounter is active.
Although the mechanics are straightforward, ignoring enemies can quickly overwhelm Relic runners and delay progress.
As Relics are deposited, the portal gradually powers up.
Once enough energy has been supplied, the portal activates and allows the fireteam to advance deeper into the Dreadnaught.
Begin by splitting responsibilities between Relic runners and add-clear players.
When a side room activates, enter the room, collect the Relic, and return it to the central statue.
Continue rotating between active rooms while eliminating enemies that threaten the runners.
As more Relics are deposited, the portal becomes increasingly energized.
Maintain control of the arena and continue depositing Relics until the portal is fully activated.
Once the encounter is complete, enter the portal and proceed deeper into the Dreadnaught.
The most common cause of delays is allowing enemy waves to overwhelm the active side room.
Many groups also lose time when players are unsure who is responsible for collecting the next Relic.
Establishing clear runner assignments before beginning the encounter makes progression much smoother.
During the encounter, every player must stand on both the left and right plates before the encounter is completed.
No player may remain assigned to only one side for the entire encounter.
Before beginning the encounter, divide the fireteam into left and right teams.
After each successful Relic deposit cycle, rotate players so everyone eventually participates on both sides of the arena.
Because the encounter itself is relatively simple, the challenge is primarily about tracking participation rather than completing additional mechanics.
Many groups find success by rotating the entire team after each cycle.
The most common failure occurs when a player forgets to switch sides during the encounter.
Another common issue occurs when teams complete the encounter too quickly before every player has participated on both plates.
Keep track of rotations throughout the encounter and verify participation before finishing the final cycle.
Complete the Hall of Souls encounter while preventing enemy control of the central area.
Maintain strong add clear throughout the encounter and prioritize enemies approaching the central statue.
Relic runners should focus on efficient deliveries while the remaining players keep the arena under control.
Most failures occur when enemy waves are ignored while players focus solely on Relic progression.
Maintaining control of the center of the arena is more important than rushing deposits.
Additional Champions appear throughout the encounter and significantly increase pressure on Relic runners.
Enemy density is substantially higher than on Normal difficulty, making add clear far more important.
Because runners frequently travel through dangerous areas of the arena, teams should prioritize survivability and Champion elimination before attempting to accelerate progression.
A controlled pace and consistent arena management are usually more effective than rushing Relic deposits.
The King’s Fall Deepsight Chest puzzle begins during The Portal traversal section.
Three Hive symbols appear in this area and determine which hidden plates must be activated throughout the remainder of the raid.
Players pursuing the bonus Deepsight chest should record or remember these symbols before continuing.
The symbols shown here change each raid instance and determine the correct activation locations later in the raid.
See the Deepsight Chest Guide for all symbol locations and activation requirements.
The first secret chest in King’s Fall can be obtained during this traversal section.
See the Secret Chest Guide for the full walkthrough and location details.
Because this chest can only reward previously acquired King’s Fall weapons and armor, it becomes more valuable as your collection grows.
The Tombships is the traversal section connecting Totems and Warpriest.
Guardians must travel across a fleet of Hive Tombships suspended within the Dreadnaught. As ships move into position, new routes become available and allow the fireteam to continue progressing toward the Warpriest encounter.
Unlike later traversal sections, this area focuses primarily on platforming and movement rather than hidden objectives.
The route consists of a series of Hive Tombships moving throughout a massive chasm.
Some ships remain stationary while others reposition after players board them, creating temporary pathways deeper into the Dreadnaught.
Because the route changes as ships move, players should pay attention to where the next jump becomes available.
After completing Totems, follow the route onto the first Tombship.
Wait for ships to move into position before attempting difficult jumps. As you progress, additional Tombships will arrive and create the next section of the path.
Continue moving from ship to ship while following the route toward the Warpriest encounter.
Once the final Tombship reaches its destination, proceed into the Warpriest arena.
The most common cause of death is attempting jumps before a ship has fully moved into position.
Many players also rush ahead and miss visual cues showing where the next route appears.
Take your time, watch ship movement carefully, and regroup before advancing.
Totems is the first major encounter of King’s Fall and introduces the Brand mechanics that define much of the raid.
The fireteam must rotate between two sides of the arena while collecting Deathsinger’s Power and managing Brand transfers. Success requires constant movement, coordinated rotations, and efficient enemy control.
Unlike many encounters that culminate in a damage phase, Totems is purely a mechanics encounter. The objective is to survive and complete enough cycles to satisfy the encounter requirements.
The arena is divided into left and right sides connected by a central room.
Each side contains a Totem, a plate, and a Brand holder location.
The center room serves as the location where Deathsinger’s Power is deposited and where Brand Claimer buffs are obtained.
Players continuously rotate between these locations throughout the encounter.
One side begins with Brand of the Weaver.
The Brand holder must stand beneath the active Totem to prevent a wipe.
Nearby players receive protection while standing within the Brand aura.
The opposite side uses Brand of the Unraveler.
Like the Weaver Brand, it must remain active beneath its corresponding Totem.
Players defeat specific enemies to obtain the Brand Claimer buff.
This buff allows them to steal a Brand from the current holder, refreshing the timer and continuing the rotation.
Enemies defeated while standing within a Brand aura grant Deathsinger’s Power.
Players carrying this resource must deposit it in the center room.
Depositing enough Deathsinger’s Power completes the encounter.
Split the fireteam into left and right teams.
Each side should maintain a Brand holder beneath its Totem while teammates defeat enemies and generate Deathsinger’s Power.
When the Brand timer begins running low, defeat the appropriate enemy, obtain Brand Claimer, and steal the Brand from the current holder.
The previous Brand holder should immediately move to the center room and deposit their accumulated Deathsinger’s Power.
After depositing, rotate back to their assigned side and prepare for the next cycle.
Continue rotating Brands, collecting Deathsinger’s Power, and defending both Totems until enough power has been deposited to complete the encounter.
The most common cause of failure is delayed Brand transfers.
Allowing a Brand timer to expire usually causes a wipe.
Many groups also struggle when players forget to deposit Deathsinger’s Power before returning to their side.
Maintaining a consistent rotation and communicating every Brand transfer greatly improves reliability.
Players may only steal the Brand from a player who currently has less than 10 seconds remaining on their Brand timer.
Every Brand transfer throughout the encounter must occur when the timer is below 10 seconds.
Patience is the key to this challenge.
When a player obtains the Brand Claimer buff, they should wait until the current Brand holder’s timer drops below 10 seconds before performing the steal.
Because Totems is built around constant rotations, teams should communicate timer values clearly and call out when the transfer window becomes available.
Many groups find success by having the Brand holder announce their timer at 10 seconds and again at 5 seconds.
The most common cause of failure is stealing the Brand too early.
Players often become concerned about the timer expiring and perform the transfer before reaching the required threshold.
Another common issue occurs when players fail to communicate timer values clearly, resulting in uncertainty about when the transfer should occur.
Remain calm and trust the timing. The transfer window is larger than many players initially expect.
Complete the Totems encounter while never allowing more than a small amount of Deathsinger’s Power to remain undeposited.
Deposit Deathsinger’s Power consistently throughout the encounter rather than allowing players to accumulate excessive amounts.
Efficient rotations and frequent deposits help ensure the team remains on pace while maintaining control of both sides of the arena.
Because the encounter naturally encourages frequent movement through the center room, teams that follow their normal rotation pattern often complete this triumph without significant adjustments.
Most failures occur when players become focused on add clear and forget to deposit accumulated Deathsinger’s Power.
Another common issue occurs when delayed Brand transfers disrupt the normal rotation cycle and prevent timely deposits.
Maintaining a consistent rhythm throughout the encounter greatly improves success.
Additional Champions appear on both sides of the arena and significantly increase the pressure placed on Brand holders.
Enemy density is substantially higher, making survivability and crowd control far more important than on Normal difficulty.
Because Brand holders are required to remain beneath the Totems, they often become priority targets for incoming enemies. Teams should focus on keeping Brand holders alive while eliminating Champions as quickly as possible.
Communication becomes even more important than usual, as delayed Brand transfers and missed Champion kills can quickly spiral into a wipe.
A controlled pace and clean rotations are far more valuable than aggressive play.
Warpriest is the first major boss encounter in King’s Fall and introduces many of the mechanics that define the rest of the raid.
The fireteam must read plate sequences, claim the Brand of the Initiate, and coordinate damage phases while surviving increasingly dangerous enemy waves.
Success depends on accurate callouts, disciplined positioning, and efficient Brand management.
The arena consists of three primary plates positioned on the left, center, and right sides of the room.
A large central platform serves as the primary damage location.
Several pillars throughout the arena provide cover during damage phases but are gradually destroyed as the encounter progresses.
After clearing enemies, the encounter reveals a sequence of plates that must be activated in the correct order.
Players standing on the plates trigger the next phase of the encounter.
The final player to activate the sequence receives the Brand of the Initiate.
This Brand creates the aura required for the fireteam to damage Warpriest.
Players must remain inside the Brand aura to damage Warpriest.
As the Brand timer decreases, another player must obtain Brand Claimer and steal the Brand to extend the phase.
Successful Brand management significantly increases total damage.
At the end of each damage phase, Warpriest attempts to wipe the fireteam.
Players must hide behind one of the remaining pillars to survive.
Each surviving pillar is destroyed after use.
Begin by clearing the initial enemies and identifying the active plate sequence.
Activate the plates in the correct order and claim the Brand of the Initiate.
Gather near the Brand holder and begin damaging Warpriest.
As the timer decreases, obtain Brand Claimer and transfer the Brand to another player.
Continue extending the damage phase until no further transfers are possible.
When Warpriest prepares the Oculus attack, move behind an intact pillar and wait for the attack to finish.
Repeat the process by completing additional plate sequences and damage phases until Warpriest is defeated.
The most common cause of failure is incorrect plate callouts.
Many groups also lose damage opportunities due to delayed Brand transfers.
Another common issue occurs when players position themselves incorrectly during the Oculus attack and fail to reach cover in time.
Clear communication and disciplined positioning are the keys to success.
Players may only steal the Brand of the Initiate after defeating the Taken Knight that appears on the opposite side of the arena from the current Brand holder.
If the wrong Knight is defeated and the Brand is stolen, the challenge fails.
Before each damage phase, determine where the current Brand holder is positioned.
When the Brand timer begins running low, identify the Taken Knight spawning on the opposite side of the room and defeat it to obtain Brand Claimer.
Once Brand Claimer has been acquired from the correct Knight, steal the Brand and continue the damage phase normally.
Because the required Knight changes depending on the current Brand holder’s location, communication is extremely important.
Call out the Brand holder’s position and confirm the correct Knight before killing it.
The most common failure occurs when players automatically kill the nearest Taken Knight without checking whether it is the correct one.
Many groups also struggle when communication becomes unclear during damage phases and players lose track of which side currently holds the Brand.
Always verify the Brand holder’s location before engaging a Knight.
Complete the Warpriest encounter while demonstrating mastery of Brand transfers and damage phase mechanics.
Maintain clean Brand rotations throughout the encounter and avoid unnecessary mistakes during transfers.
Consistent communication between the Brand holder and Brand Claimer is essential.
Because Warpriest is one of the first encounters where damage phases can be significantly extended through proper execution, teams should focus on smooth transfers rather than maximizing damage output.
Most failures occur when Brand transfers are delayed or when players become focused on damage and lose track of timers.
Maintaining awareness of the Brand timer throughout every phase dramatically improves consistency.
Additional Champions appear throughout the encounter and significantly increase pressure during both mechanic and damage phases.
Enemy waves are more aggressive, requiring dedicated attention even while preparing plate sequences.
Because fewer mistakes can be recovered from on Master difficulty, teams should prioritize survival and Champion elimination before attempting to optimize damage.
Warpriest’s damage output is also significantly more threatening, making defensive abilities and survivability tools especially valuable.
Fireteams should focus on clean plate activations, efficient Brand transfers, and controlled damage phases rather than attempting risky strategies.
A King’s Fall Deepsight symbol can be activated within Golgoroth’s Cellar.
Players pursuing the bonus Deepsight chest should activate the symbol before proceeding.
See the Deepsight Chest Guide for all symbol locations and activation requirements.
The second secret chest in King’s Fall can be obtained within Golgoroth’s Cellar.
See the Secret Chest Guide for the full walkthrough and location details.
Because this chest can only reward previously acquired King’s Fall weapons and armor, it becomes more valuable as your collection grows.
Golgoroth’s Cellar is the maze-like traversal section connecting Warpriest and Golgoroth.
The area consists of winding tunnels, hidden pathways, environmental hazards, and several optional objectives, including a Deepsight activation and the raid’s second secret chest.
Although there are no encounter mechanics here, players should take time to complete all optional objectives before advancing.
The Cellar is made up of interconnected tunnels running beneath the Dreadnaught.
Several routes lead through the area, though only one ultimately progresses toward Golgoroth’s arena.
Hidden alcoves and side passages contain optional objectives.
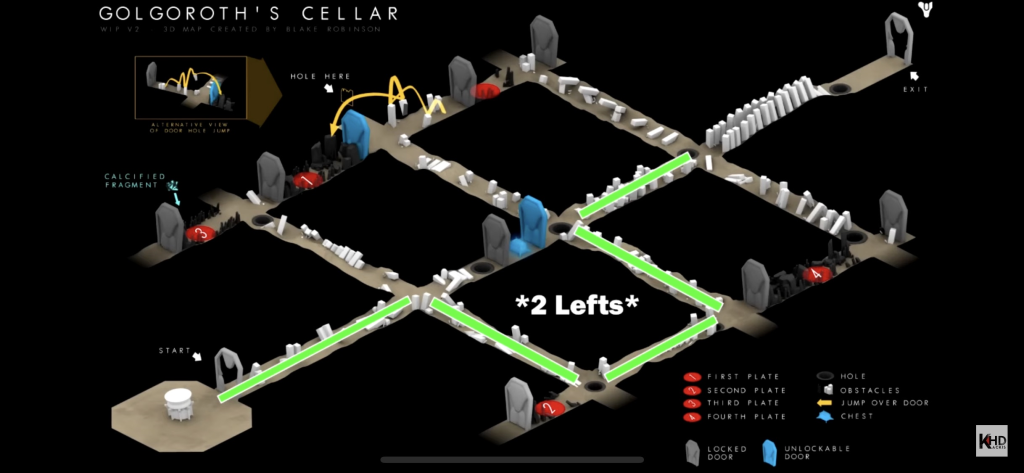
After defeating Warpriest, descend into Golgoroth’s Cellar and begin navigating the underground tunnels.
As you progress, activate the required Deepsight symbol if your team is pursuing the bonus Deepsight chest.
Before leaving the area, collect the second secret chest.
Continue following the tunnels until reaching Golgoroth’s arena.
The most common issue is players advancing too quickly and causing teammates to miss optional objectives.
Many groups also become separated while exploring alternate routes through the Cellar.
Before entering Golgoroth’s arena, confirm that all players have completed the Deepsight activation and collected the secret chest if desired.
Golgoroth is the second major boss encounter of King’s Fall and introduces the Gaze mechanic that defines the entire fight.
The fireteam must rotate Golgoroth’s attention between players while standing in Pools of Reclaimed Light to damage the boss. At the same time, players must manage Taken enemies, collect unstable light effects, and coordinate Gaze transfers throughout the encounter.
Success depends on communication, positioning, and efficient Gaze management.
The arena is a large chamber with Golgoroth positioned in the center.
Several suspended orbs hang from the ceiling above the arena. Destroying these orbs creates Pools of Reclaimed Light that allow players to damage Golgoroth.
The rear of the room provides locations for Gaze holders, while the center serves as the primary damage area.
Enemies spawn from both sides of the arena throughout the encounter.
Players can draw Golgoroth’s attention by shooting the weak point on his back.
While a player holds the Gaze, Golgoroth focuses exclusively on them.
This allows the rest of the fireteam to safely damage the boss from the active Pool of Reclaimed Light.
Destroying the hanging orbs creates Pools of Reclaimed Light.
Players standing inside these pools gain the ability to damage Golgoroth effectively.
Each pool lasts for a limited time before disappearing.
Random players receive the Unstable Light debuff during damage phases.
When the timer expires, the affected player explodes and deals significant damage to nearby targets.
Players with Unstable Light should move toward Golgoroth before detonating.
Taken enemies continuously spawn throughout the encounter.
Ignoring these enemies can quickly overwhelm the arena and disrupt damage phases.
Begin by clearing the initial enemies and preparing for the damage phase.
When Golgoroth becomes active, a designated player should shoot the weak point on his back to obtain Golgoroth’s Gaze.
Once the Gaze has been secured, destroy a hanging orb and gather inside the resulting Pool of Reclaimed Light.
Damage Golgoroth while standing in the pool.
When players receive Unstable Light, move close to Golgoroth and detonate safely away from teammates.
As the Gaze timer begins to expire, a second player should prepare to take Golgoroth’s Gaze and continue the damage phase.
Repeat this process through multiple pools until the phase ends.
Continue cycling through add-clear phases and damage phases until Golgoroth is defeated.
The most common cause of failure is losing Golgoroth’s Gaze unexpectedly.
Many teams also struggle when players with Unstable Light fail to move away from teammates before detonating.
Another common issue occurs when too many enemies remain alive during damage phases and overwhelm the fireteam.
Clear communication between Gaze holders and damage players greatly improves consistency.
Every member of the fireteam must successfully take Golgoroth’s Gaze during each damage phase.
All six players must participate in the Gaze rotation before the damage phase ends.
Before beginning the encounter, assign a Gaze order for all six players.
As the damage phase progresses, each player should take Golgoroth’s Gaze once before passing it to the next person in the rotation.
Because damage phases can end early if too much time is lost, teams should prioritize clean Gaze transfers over maximizing damage.
Communication is critical, as everyone must know when it is their turn to take the Gaze.
The most common failure occurs when a player misses their Gaze transfer and the rotation skips a member of the fireteam.
Another common issue occurs when damage players focus entirely on DPS and lose track of the Gaze order.
Maintaining a consistent rotation and clearly announcing transfers helps prevent mistakes.
Defeat Golgoroth while ensuring every player participates in the encounter’s primary mechanics.
Assign clear roles before beginning the encounter and rotate responsibilities throughout the fight.
Allow different players to participate in Gaze management, add clear, and damage responsibilities rather than relying on the same players every phase.
Most failures occur when teams allow a small group of players to handle all mechanic responsibilities throughout the encounter.
Maintaining balanced participation makes the triumph significantly easier.
Additional Champions appear throughout the encounter and significantly increase the pressure on add-clear teams.
Enemy density is much higher than on Normal difficulty, making arena control one of the most important aspects of the fight.
Gaze holders face substantially greater incoming damage and should prioritize survivability while maintaining control of Golgoroth’s attention.
Because mistakes are far less forgiving on Master difficulty, teams should focus on clean Gaze transfers and safe damage phases rather than attempting aggressive strategies.
A consistent multi-phase clear is often more reliable than attempting to maximize damage at the expense of mechanics.
A King’s Fall Deepsight symbol can be activated during The Transept.
Players pursuing the bonus Deepsight chest should activate the symbol before continuing toward the Daughters of Oryx encounter.
See the Deepsight Chest Guide for all symbol locations and activation requirements.
The second secret chest in King’s Fall can be obtained during The Tombships traversal section.
See the Secret Chest Guide for the full walkthrough and location details.
Because this chest can only reward previously acquired King’s Fall weapons and armor, it becomes more valuable as your collection grows.
The Transept is the final traversal section before Daughters of Oryx.
Guardians must navigate a narrow passage filled with massive pistons that repeatedly launch players into the abyss. The section is simple mechanically but can quickly become frustrating if players rush forward without paying attention to the piston timing.
The Transept is a long corridor divided into several sections.
Large piston traps line the walls and activate at regular intervals. Small alcoves along the route provide safe locations where players can wait for the next opening.
After defeating Golgoroth, proceed into The Transept and begin advancing through the corridor.
Move from safe area to safe area while avoiding the pistons. Watch their timing carefully and only cross when a clear opening is available.
As you progress, continue advancing through each section until reaching the far end of the corridor.
Once the final piston section has been cleared, follow the path into the Daughters of Oryx arena.
The most common cause of death is attempting to sprint through the corridor without waiting for a safe opening.
Many players also panic after reaching a checkpoint and immediately run into the next piston.
Patience is the key to this traversal section. Waiting a few seconds for a safe opening is far more reliable than attempting to rush through.
The Daughters of Oryx encounter serves as the final test before confronting Oryx himself.
The fireteam must activate plates, navigate a sequence of floating platforms, and claim a Brand aura while dealing damage to one of Oryx’s daughters.
Many of the mechanics introduced earlier in King’s Fall return here in a streamlined form that emphasizes execution and communication.
Success depends on accurate plate callouts, efficient movement, and strong damage phases.
The encounter takes place on four platforms positioned around a central arena.
Each platform can be activated to create a path of floating platforms leading toward the center of the room.
The two daughters occupy elevated positions overlooking the arena and alternate which one can be damaged.
One player becomes Torn Between Dimensions and gains the ability to see and traverse the floating platform path.
This player is responsible for reaching the center of the arena and claiming the Brand aura.
Three other players must stand on specific plates to create the platform path.
The activation order changes each round and must be communicated clearly.
The player who reaches the center receives a Brand aura.
This aura allows nearby players to damage the correct Daughter.
Only one Daughter can be damaged during each phase.
The active target changes throughout the encounter.
Once the Brand has been claimed, gather beneath the active Daughter and deal damage while remaining inside the Brand aura.
Multiple phases may be required.
Begin by identifying which player is Torn Between Dimensions.
Determine the correct plate sequence and activate the floating platforms.
As the path is created, the Torn Between Dimensions player should move across the platforms and claim the Brand aura.
Once the Brand has been obtained, gather beneath the active Daughter and begin dealing damage.
After the damage phase ends, repeat the process by activating a new platform sequence and claiming the next Brand.
Continue cycling through mechanics and damage phases until both Daughters have been defeated.
The most common cause of failure is incorrect plate communication.
Many groups also lose valuable time when the Torn Between Dimensions player hesitates while navigating the platform path.
Another common issue occurs when players step outside the Brand aura during damage phases and lose damage opportunities.
Clear callouts and confident platform movement are the keys to success.
A different player must stand on each plate during every platform-building sequence.
No player may activate the same plate twice in a row.
Assign plate rotations before beginning the encounter.
After each damage phase, rotate players so different Guardians activate the plates during the next sequence.
Because the challenge primarily tests coordination, maintaining a clear rotation system is more important than speed.
Many teams simply rotate clockwise around the arena after every phase.
The most common failure occurs when players instinctively return to the same plate they used during the previous phase.
Another common issue occurs when confusion about the rotation causes multiple players to move toward the same plate.
Establishing a fixed rotation before the encounter begins prevents most mistakes.
Complete the Daughters of Oryx encounter while minimizing unnecessary contact with the arena floor during platform sequences.
Focus on clean movement and precise execution while navigating the platform paths.
Players should remain aware of their positioning throughout every phase and avoid unnecessary movement.
Most failures occur because players rush between mechanics and lose track of positioning requirements.
Patience and communication greatly improve consistency.
Additional Champions appear throughout the encounter and increase pressure on players responsible for plate activations.
Enemy density is significantly higher than on Normal difficulty, making add clear a larger priority.
Because plate players are often exposed while building platform paths, survivability tools and defensive abilities become much more valuable.
Teams should focus on maintaining arena control while executing mechanics cleanly.
A safe multi-phase clear is generally more reliable than attempting to force aggressive damage phases.
Touch of Malice has a chance to drop from the final reward chest after defeating Oryx.
Players pursuing the Exotic Scout Rifle should see the Touch of Malice Guide for drop rates, acquisition details, and drop rate increases.
A King’s Fall Deepsight symbol can be activated during the Oryx encounter.
If all required symbols throughout the raid have been activated, players can claim an additional guaranteed Deepsight weapon after completing the raid.
See the Deepsight Chest Guide for all symbol locations and activation requirements.
Oryx, the Taken King is the final encounter of King’s Fall and serves as the culmination of nearly every mechanic introduced throughout the raid.
The fireteam must activate plates, navigate floating platforms, collect Brand buffs, detonate Corrupted Light bombs, and survive Oryx’s devastating attacks while gradually weakening the Taken King.
Unlike many raid bosses, Oryx is not damaged directly by weapons during the primary damage phase. Instead, players use the encounter mechanics themselves to inflict damage.
Success depends on communication, positioning, and precise execution.
The encounter takes place on four platforms positioned around a large central arena.
Each corner contains a plate that can be activated to create floating platforms.
Oryx occupies the far end of the arena and periodically moves around the battlefield as mechanics progress.
Corrupted Light bombs appear near the plates throughout the encounter and play a central role in damaging the boss.
One player becomes Torn Between Dimensions during each cycle.
This player gains the ability to see and traverse the floating platforms created by teammates.
Their objective is to reach the end of the platform path and claim the Brand of Immortality.
Three players must activate specific plates to create the floating platform path.
The activation order changes each cycle and must be communicated clearly.
The player who reaches the end of the platform path claims the Brand of Immortality.
This aura protects nearby players from Oryx’s wipe mechanics and is required to survive key phases of the encounter.
Four Light-Eater Ogres spawn during each cycle.
When defeated, they create Corrupted Light bombs near their death locations.
These bombs are used to damage Oryx later in the phase.
Light-Eater Knights attempt to reach and consume the Corrupted Light bombs.
These enemies should be eliminated immediately before they can destroy a bomb.
The bombs created by the Ogres are the primary method of damaging Oryx.
Players must detonate the bombs at the correct time while protected by the Brand of Immortality.
At certain health thresholds, Oryx pulls the fireteam into a separate dimension and summons the Shade of Oryx.
The Shade must be defeated before the timer expires.
After enough successful damage phases, Oryx enters his final stand.
The fireteam must deal enough weapon damage to defeat him before the encounter wipes the group.
Begin by identifying the player who becomes Torn Between Dimensions.
Activate the required plates and create the floating platform path.
As the runner advances through the platforms, eliminate the Light-Eater Ogres and prepare to defend the Corrupted Light bombs.
Once the Brand of Immortality has been claimed, eliminate the Light-Eater Knights before they can consume the bombs.
When Oryx exposes his chest, damage the weak point and prepare for bomb detonation.
At the appropriate time, players should enter the Corrupted Light bombs and immediately return to the protection of the Brand aura.
The bombs will detonate and damage Oryx.
After surviving the resulting mechanics, repeat the process through multiple cycles.
Continue building platforms, defeating Ogres, protecting bombs, and detonating Corrupted Light until Oryx reaches final stand.
Commit all remaining damage resources and defeat him before the wipe mechanic completes.
The most common cause of failure is allowing Light-Eater Knights to consume Corrupted Light bombs.
Many groups also struggle when plate activations are delayed or when the runner hesitates while navigating the platform path.
Another common issue occurs when players detonate bombs too early or fail to return to the Brand aura in time.
Consistent communication and disciplined execution are the keys to success.
Players may not kill the same Light-Eater Ogre or Light-Eater Knight twice throughout the encounter.
Each player must rotate responsibilities and avoid repeatedly killing the same enemy type in the same position.
Assign players to different corners each round.
After every damage cycle, rotate positions clockwise or counterclockwise around the arena so players naturally engage different Ogres and Knights throughout the encounter.
Because the challenge requires consistent participation from the entire fireteam, maintaining a predetermined rotation is the safest approach.
The most common failure occurs when players automatically return to the same corner after every phase.
Many teams also lose track of assignments during later phases and accidentally repeat responsibilities.
A simple rotation system prevents most challenge failures.
Complete the Oryx encounter while demonstrating mastery of the encounter’s core mechanics.
Maintain clean bomb detonations, eliminate Light-Eater Knights immediately, and execute every platform sequence correctly.
Because Oryx is heavily mechanics-driven, consistency is more important than maximizing damage output.
Most failures occur because teams lose control of bomb management or allow a Knight to reach a Corrupted Light bomb.
Focusing on mechanics first and damage second dramatically improves success rates.
Additional Champions appear throughout the encounter and significantly increase pressure on plate holders and add-clear teams.
Enemy density is substantially higher than on Normal difficulty, making Ogre and Knight control even more important.
Because a single missed Knight can result in a lost bomb and failed damage phase, teams should prioritize arena control over aggressive damage strategies.
The Shade of Oryx phase is also considerably more dangerous due to increased enemy lethality.
Fireteams attempting Master difficulty should focus on survivability, communication, and mechanic execution before worrying about maximizing damage.
Before entering the Dreadnaught, it is important to understand the mechanics that appear throughout King’s Fall.
Several encounters require players to stand on plates in a specific sequence.
Activating plates often reveals hidden platforms, begins encounter mechanics, or enables progression.
Communication is essential because many plate mechanics require multiple players to coordinate simultaneously.
Brand buffs are one of the defining mechanics of King’s Fall.
A player carrying a Brand creates an aura around themselves that provides important benefits to nearby teammates.
Most commonly, players must stand inside a Brand aura to damage bosses or survive encounter mechanics.
Throughout the raid, Brand holders must transfer their buff to another player before the timer expires.
Certain encounters introduce the Brand Claimer buff.
Players with Brand Claimer can steal a Brand from another player, resetting the timer and allowing the encounter to continue.
Managing Brand transfers correctly is one of the most important mechanics in King’s Fall.
Taken Strength appears during several encounters.
Players collect these floating orbs to progress mechanics and trigger damage phases.
Failing to collect Taken Strength can delay progression or cause encounters to fail.
Some encounters require players to identify and communicate specific locations or symbols.
Accurate callouts become increasingly important later in the raid, particularly during the final encounters.
King’s Fall contains a hidden Deepsight chest puzzle.
Players activate a series of hidden symbols throughout the raid to unlock an additional guaranteed Deepsight weapon at the end of the run.
The main guide will notify players whenever they are approaching a symbol location, while the complete walkthrough is covered in the dedicated Deepsight Chest Guide.
Hall of Souls serves as the opening encounter of King’s Fall and introduces many of the raid’s core mechanics.
The fireteam must activate a massive Hive portal by collecting and depositing Relics while defending key positions from incoming enemies. Although mechanically simple compared to later encounters, Hall of Souls establishes the teamwork and plate coordination that appear throughout the raid.
Success depends on efficient Relic running and strong add clear.
The encounter takes place in a large chamber dominated by a massive portal at its center.
Two side rooms contain Relics that must be collected and brought to the central statue. Enemy waves continuously spawn throughout the encounter and attempt to disrupt progress.
The central area serves as the primary objective location while the side rooms act as Relic collection points.
Relics spawn in side rooms throughout the encounter.
Players must collect the Relics and transport them to the central statue.
Depositing enough Relics powers the portal and progresses the encounter.
The left and right side rooms alternate throughout the encounter.
Fireteams should maintain awareness of which side is currently active and assign runners accordingly.
Hive enemies continuously spawn while the encounter is active.
Although the mechanics are straightforward, ignoring enemies can quickly overwhelm Relic runners and delay progress.
As Relics are deposited, the portal gradually powers up.
Once enough energy has been supplied, the portal activates and allows the fireteam to advance deeper into the Dreadnaught.
Begin by splitting responsibilities between Relic runners and add-clear players.
When a side room activates, enter the room, collect the Relic, and return it to the central statue.
Continue rotating between active rooms while eliminating enemies that threaten the runners.
As more Relics are deposited, the portal becomes increasingly energized.
Maintain control of the arena and continue depositing Relics until the portal is fully activated.
Once the encounter is complete, enter the portal and proceed deeper into the Dreadnaught.
The most common cause of delays is allowing enemy waves to overwhelm the active side room.
Many groups also lose time when players are unsure who is responsible for collecting the next Relic.
Establishing clear runner assignments before beginning the encounter makes progression much smoother.
During the encounter, every player must stand on both the left and right plates before the encounter is completed.
No player may remain assigned to only one side for the entire encounter.
Before beginning the encounter, divide the fireteam into left and right teams.
After each successful Relic deposit cycle, rotate players so everyone eventually participates on both sides of the arena.
Because the encounter itself is relatively simple, the challenge is primarily about tracking participation rather than completing additional mechanics.
Many groups find success by rotating the entire team after each cycle.
The most common failure occurs when a player forgets to switch sides during the encounter.
Another common issue occurs when teams complete the encounter too quickly before every player has participated on both plates.
Keep track of rotations throughout the encounter and verify participation before finishing the final cycle.
Complete the Hall of Souls encounter while preventing enemy control of the central area.
Maintain strong add clear throughout the encounter and prioritize enemies approaching the central statue.
Relic runners should focus on efficient deliveries while the remaining players keep the arena under control.
Most failures occur when enemy waves are ignored while players focus solely on Relic progression.
Maintaining control of the center of the arena is more important than rushing deposits.
Additional Champions appear throughout the encounter and significantly increase pressure on Relic runners.
Enemy density is substantially higher than on Normal difficulty, making add clear far more important.
Because runners frequently travel through dangerous areas of the arena, teams should prioritize survivability and Champion elimination before attempting to accelerate progression.
A controlled pace and consistent arena management are usually more effective than rushing Relic deposits.
The King’s Fall Deepsight Chest puzzle begins during The Portal traversal section.
Three Hive symbols appear in this area and determine which hidden plates must be activated throughout the remainder of the raid.
Players pursuing the bonus Deepsight chest should record or remember these symbols before continuing.
The symbols shown here change each raid instance and determine the correct activation locations later in the raid.
See the Deepsight Chest Guide for all symbol locations and activation requirements.
The first secret chest in King’s Fall can be obtained during this traversal section.
See the Secret Chest Guide for the full walkthrough and location details.
Because this chest can only reward previously acquired King’s Fall weapons and armor, it becomes more valuable as your collection grows.
The Tombships is the traversal section connecting Totems and Warpriest.
Guardians must travel across a fleet of Hive Tombships suspended within the Dreadnaught. As ships move into position, new routes become available and allow the fireteam to continue progressing toward the Warpriest encounter.
Unlike later traversal sections, this area focuses primarily on platforming and movement rather than hidden objectives.
The route consists of a series of Hive Tombships moving throughout a massive chasm.
Some ships remain stationary while others reposition after players board them, creating temporary pathways deeper into the Dreadnaught.
Because the route changes as ships move, players should pay attention to where the next jump becomes available.
After completing Totems, follow the route onto the first Tombship.
Wait for ships to move into position before attempting difficult jumps. As you progress, additional Tombships will arrive and create the next section of the path.
Continue moving from ship to ship while following the route toward the Warpriest encounter.
Once the final Tombship reaches its destination, proceed into the Warpriest arena.
The most common cause of death is attempting jumps before a ship has fully moved into position.
Many players also rush ahead and miss visual cues showing where the next route appears.
Take your time, watch ship movement carefully, and regroup before advancing.
Totems is the first major encounter of King’s Fall and introduces the Brand mechanics that define much of the raid.
The fireteam must rotate between two sides of the arena while collecting Deathsinger’s Power and managing Brand transfers. Success requires constant movement, coordinated rotations, and efficient enemy control.
Unlike many encounters that culminate in a damage phase, Totems is purely a mechanics encounter. The objective is to survive and complete enough cycles to satisfy the encounter requirements.
The arena is divided into left and right sides connected by a central room.
Each side contains a Totem, a plate, and a Brand holder location.
The center room serves as the location where Deathsinger’s Power is deposited and where Brand Claimer buffs are obtained.
Players continuously rotate between these locations throughout the encounter.
One side begins with Brand of the Weaver.
The Brand holder must stand beneath the active Totem to prevent a wipe.
Nearby players receive protection while standing within the Brand aura.
The opposite side uses Brand of the Unraveler.
Like the Weaver Brand, it must remain active beneath its corresponding Totem.
Players defeat specific enemies to obtain the Brand Claimer buff.
This buff allows them to steal a Brand from the current holder, refreshing the timer and continuing the rotation.
Enemies defeated while standing within a Brand aura grant Deathsinger’s Power.
Players carrying this resource must deposit it in the center room.
Depositing enough Deathsinger’s Power completes the encounter.
Split the fireteam into left and right teams.
Each side should maintain a Brand holder beneath its Totem while teammates defeat enemies and generate Deathsinger’s Power.
When the Brand timer begins running low, defeat the appropriate enemy, obtain Brand Claimer, and steal the Brand from the current holder.
The previous Brand holder should immediately move to the center room and deposit their accumulated Deathsinger’s Power.
After depositing, rotate back to their assigned side and prepare for the next cycle.
Continue rotating Brands, collecting Deathsinger’s Power, and defending both Totems until enough power has been deposited to complete the encounter.
The most common cause of failure is delayed Brand transfers.
Allowing a Brand timer to expire usually causes a wipe.
Many groups also struggle when players forget to deposit Deathsinger’s Power before returning to their side.
Maintaining a consistent rotation and communicating every Brand transfer greatly improves reliability.
Players may only steal the Brand from a player who currently has less than 10 seconds remaining on their Brand timer.
Every Brand transfer throughout the encounter must occur when the timer is below 10 seconds.
Patience is the key to this challenge.
When a player obtains the Brand Claimer buff, they should wait until the current Brand holder’s timer drops below 10 seconds before performing the steal.
Because Totems is built around constant rotations, teams should communicate timer values clearly and call out when the transfer window becomes available.
Many groups find success by having the Brand holder announce their timer at 10 seconds and again at 5 seconds.
The most common cause of failure is stealing the Brand too early.
Players often become concerned about the timer expiring and perform the transfer before reaching the required threshold.
Another common issue occurs when players fail to communicate timer values clearly, resulting in uncertainty about when the transfer should occur.
Remain calm and trust the timing. The transfer window is larger than many players initially expect.
Complete the Totems encounter while never allowing more than a small amount of Deathsinger’s Power to remain undeposited.
Deposit Deathsinger’s Power consistently throughout the encounter rather than allowing players to accumulate excessive amounts.
Efficient rotations and frequent deposits help ensure the team remains on pace while maintaining control of both sides of the arena.
Because the encounter naturally encourages frequent movement through the center room, teams that follow their normal rotation pattern often complete this triumph without significant adjustments.
Most failures occur when players become focused on add clear and forget to deposit accumulated Deathsinger’s Power.
Another common issue occurs when delayed Brand transfers disrupt the normal rotation cycle and prevent timely deposits.
Maintaining a consistent rhythm throughout the encounter greatly improves success.
Additional Champions appear on both sides of the arena and significantly increase the pressure placed on Brand holders.
Enemy density is substantially higher, making survivability and crowd control far more important than on Normal difficulty.
Because Brand holders are required to remain beneath the Totems, they often become priority targets for incoming enemies. Teams should focus on keeping Brand holders alive while eliminating Champions as quickly as possible.
Communication becomes even more important than usual, as delayed Brand transfers and missed Champion kills can quickly spiral into a wipe.
A controlled pace and clean rotations are far more valuable than aggressive play.
Warpriest is the first major boss encounter in King’s Fall and introduces many of the mechanics that define the rest of the raid.
The fireteam must read plate sequences, claim the Brand of the Initiate, and coordinate damage phases while surviving increasingly dangerous enemy waves.
Success depends on accurate callouts, disciplined positioning, and efficient Brand management.
The arena consists of three primary plates positioned on the left, center, and right sides of the room.
A large central platform serves as the primary damage location.
Several pillars throughout the arena provide cover during damage phases but are gradually destroyed as the encounter progresses.
After clearing enemies, the encounter reveals a sequence of plates that must be activated in the correct order.
Players standing on the plates trigger the next phase of the encounter.
The final player to activate the sequence receives the Brand of the Initiate.
This Brand creates the aura required for the fireteam to damage Warpriest.
Players must remain inside the Brand aura to damage Warpriest.
As the Brand timer decreases, another player must obtain Brand Claimer and steal the Brand to extend the phase.
Successful Brand management significantly increases total damage.
At the end of each damage phase, Warpriest attempts to wipe the fireteam.
Players must hide behind one of the remaining pillars to survive.
Each surviving pillar is destroyed after use.
Begin by clearing the initial enemies and identifying the active plate sequence.
Activate the plates in the correct order and claim the Brand of the Initiate.
Gather near the Brand holder and begin damaging Warpriest.
As the timer decreases, obtain Brand Claimer and transfer the Brand to another player.
Continue extending the damage phase until no further transfers are possible.
When Warpriest prepares the Oculus attack, move behind an intact pillar and wait for the attack to finish.
Repeat the process by completing additional plate sequences and damage phases until Warpriest is defeated.
The most common cause of failure is incorrect plate callouts.
Many groups also lose damage opportunities due to delayed Brand transfers.
Another common issue occurs when players position themselves incorrectly during the Oculus attack and fail to reach cover in time.
Clear communication and disciplined positioning are the keys to success.
Players may only steal the Brand of the Initiate after defeating the Taken Knight that appears on the opposite side of the arena from the current Brand holder.
If the wrong Knight is defeated and the Brand is stolen, the challenge fails.
Before each damage phase, determine where the current Brand holder is positioned.
When the Brand timer begins running low, identify the Taken Knight spawning on the opposite side of the room and defeat it to obtain Brand Claimer.
Once Brand Claimer has been acquired from the correct Knight, steal the Brand and continue the damage phase normally.
Because the required Knight changes depending on the current Brand holder’s location, communication is extremely important.
Call out the Brand holder’s position and confirm the correct Knight before killing it.
The most common failure occurs when players automatically kill the nearest Taken Knight without checking whether it is the correct one.
Many groups also struggle when communication becomes unclear during damage phases and players lose track of which side currently holds the Brand.
Always verify the Brand holder’s location before engaging a Knight.
Complete the Warpriest encounter while demonstrating mastery of Brand transfers and damage phase mechanics.
Maintain clean Brand rotations throughout the encounter and avoid unnecessary mistakes during transfers.
Consistent communication between the Brand holder and Brand Claimer is essential.
Because Warpriest is one of the first encounters where damage phases can be significantly extended through proper execution, teams should focus on smooth transfers rather than maximizing damage output.
Most failures occur when Brand transfers are delayed or when players become focused on damage and lose track of timers.
Maintaining awareness of the Brand timer throughout every phase dramatically improves consistency.
Additional Champions appear throughout the encounter and significantly increase pressure during both mechanic and damage phases.
Enemy waves are more aggressive, requiring dedicated attention even while preparing plate sequences.
Because fewer mistakes can be recovered from on Master difficulty, teams should prioritize survival and Champion elimination before attempting to optimize damage.
Warpriest’s damage output is also significantly more threatening, making defensive abilities and survivability tools especially valuable.
Fireteams should focus on clean plate activations, efficient Brand transfers, and controlled damage phases rather than attempting risky strategies.
A King’s Fall Deepsight symbol can be activated within Golgoroth’s Cellar.
Players pursuing the bonus Deepsight chest should activate the symbol before proceeding.
See the Deepsight Chest Guide for all symbol locations and activation requirements.
The second secret chest in King’s Fall can be obtained within Golgoroth’s Cellar.
See the Secret Chest Guide for the full walkthrough and location details.
Because this chest can only reward previously acquired King’s Fall weapons and armor, it becomes more valuable as your collection grows.
Golgoroth’s Cellar is the maze-like traversal section connecting Warpriest and Golgoroth.
The area consists of winding tunnels, hidden pathways, environmental hazards, and several optional objectives, including a Deepsight activation and the raid’s second secret chest.
Although there are no encounter mechanics here, players should take time to complete all optional objectives before advancing.
The Cellar is made up of interconnected tunnels running beneath the Dreadnaught.
Several routes lead through the area, though only one ultimately progresses toward Golgoroth’s arena.
Hidden alcoves and side passages contain optional objectives.
After defeating Warpriest, descend into Golgoroth’s Cellar and begin navigating the underground tunnels.
As you progress, activate the required Deepsight symbol if your team is pursuing the bonus Deepsight chest.
Before leaving the area, collect the second secret chest.
Continue following the tunnels until reaching Golgoroth’s arena.
The most common issue is players advancing too quickly and causing teammates to miss optional objectives.
Many groups also become separated while exploring alternate routes through the Cellar.
Before entering Golgoroth’s arena, confirm that all players have completed the Deepsight activation and collected the secret chest if desired.
Golgoroth is the second major boss encounter of King’s Fall and introduces the Gaze mechanic that defines the entire fight.
The fireteam must rotate Golgoroth’s attention between players while standing in Pools of Reclaimed Light to damage the boss. At the same time, players must manage Taken enemies, collect unstable light effects, and coordinate Gaze transfers throughout the encounter.
Success depends on communication, positioning, and efficient Gaze management.
The arena is a large chamber with Golgoroth positioned in the center.
Several suspended orbs hang from the ceiling above the arena. Destroying these orbs creates Pools of Reclaimed Light that allow players to damage Golgoroth.
The rear of the room provides locations for Gaze holders, while the center serves as the primary damage area.
Enemies spawn from both sides of the arena throughout the encounter.
Players can draw Golgoroth’s attention by shooting the weak point on his back.
While a player holds the Gaze, Golgoroth focuses exclusively on them.
This allows the rest of the fireteam to safely damage the boss from the active Pool of Reclaimed Light.
Destroying the hanging orbs creates Pools of Reclaimed Light.
Players standing inside these pools gain the ability to damage Golgoroth effectively.
Each pool lasts for a limited time before disappearing.
Random players receive the Unstable Light debuff during damage phases.
When the timer expires, the affected player explodes and deals significant damage to nearby targets.
Players with Unstable Light should move toward Golgoroth before detonating.
Taken enemies continuously spawn throughout the encounter.
Ignoring these enemies can quickly overwhelm the arena and disrupt damage phases.
Begin by clearing the initial enemies and preparing for the damage phase.
When Golgoroth becomes active, a designated player should shoot the weak point on his back to obtain Golgoroth’s Gaze.
Once the Gaze has been secured, destroy a hanging orb and gather inside the resulting Pool of Reclaimed Light.
Damage Golgoroth while standing in the pool.
When players receive Unstable Light, move close to Golgoroth and detonate safely away from teammates.
As the Gaze timer begins to expire, a second player should prepare to take Golgoroth’s Gaze and continue the damage phase.
Repeat this process through multiple pools until the phase ends.
Continue cycling through add-clear phases and damage phases until Golgoroth is defeated.
The most common cause of failure is losing Golgoroth’s Gaze unexpectedly.
Many teams also struggle when players with Unstable Light fail to move away from teammates before detonating.
Another common issue occurs when too many enemies remain alive during damage phases and overwhelm the fireteam.
Clear communication between Gaze holders and damage players greatly improves consistency.
Every member of the fireteam must successfully take Golgoroth’s Gaze during each damage phase.
All six players must participate in the Gaze rotation before the damage phase ends.
Before beginning the encounter, assign a Gaze order for all six players.
As the damage phase progresses, each player should take Golgoroth’s Gaze once before passing it to the next person in the rotation.
Because damage phases can end early if too much time is lost, teams should prioritize clean Gaze transfers over maximizing damage.
Communication is critical, as everyone must know when it is their turn to take the Gaze.
The most common failure occurs when a player misses their Gaze transfer and the rotation skips a member of the fireteam.
Another common issue occurs when damage players focus entirely on DPS and lose track of the Gaze order.
Maintaining a consistent rotation and clearly announcing transfers helps prevent mistakes.
Defeat Golgoroth while ensuring every player participates in the encounter’s primary mechanics.
Assign clear roles before beginning the encounter and rotate responsibilities throughout the fight.
Allow different players to participate in Gaze management, add clear, and damage responsibilities rather than relying on the same players every phase.
Most failures occur when teams allow a small group of players to handle all mechanic responsibilities throughout the encounter.
Maintaining balanced participation makes the triumph significantly easier.
Additional Champions appear throughout the encounter and significantly increase the pressure on add-clear teams.
Enemy density is much higher than on Normal difficulty, making arena control one of the most important aspects of the fight.
Gaze holders face substantially greater incoming damage and should prioritize survivability while maintaining control of Golgoroth’s attention.
Because mistakes are far less forgiving on Master difficulty, teams should focus on clean Gaze transfers and safe damage phases rather than attempting aggressive strategies.
A consistent multi-phase clear is often more reliable than attempting to maximize damage at the expense of mechanics.
A King’s Fall Deepsight symbol can be activated during The Transept.
Players pursuing the bonus Deepsight chest should activate the symbol before continuing toward the Daughters of Oryx encounter.
See the Deepsight Chest Guide for all symbol locations and activation requirements.
The second secret chest in King’s Fall can be obtained during The Tombships traversal section.
See the Secret Chest Guide for the full walkthrough and location details.
Because this chest can only reward previously acquired King’s Fall weapons and armor, it becomes more valuable as your collection grows.
The Transept is the final traversal section before Daughters of Oryx.
Guardians must navigate a narrow passage filled with massive pistons that repeatedly launch players into the abyss. The section is simple mechanically but can quickly become frustrating if players rush forward without paying attention to the piston timing.
The Transept is a long corridor divided into several sections.
Large piston traps line the walls and activate at regular intervals. Small alcoves along the route provide safe locations where players can wait for the next opening.
After defeating Golgoroth, proceed into The Transept and begin advancing through the corridor.
Move from safe area to safe area while avoiding the pistons. Watch their timing carefully and only cross when a clear opening is available.
As you progress, continue advancing through each section until reaching the far end of the corridor.
Once the final piston section has been cleared, follow the path into the Daughters of Oryx arena.
The most common cause of death is attempting to sprint through the corridor without waiting for a safe opening.
Many players also panic after reaching a checkpoint and immediately run into the next piston.
Patience is the key to this traversal section. Waiting a few seconds for a safe opening is far more reliable than attempting to rush through.
The Daughters of Oryx encounter serves as the final test before confronting Oryx himself.
The fireteam must activate plates, navigate a sequence of floating platforms, and claim a Brand aura while dealing damage to one of Oryx’s daughters.
Many of the mechanics introduced earlier in King’s Fall return here in a streamlined form that emphasizes execution and communication.
Success depends on accurate plate callouts, efficient movement, and strong damage phases.
The encounter takes place on four platforms positioned around a central arena.
Each platform can be activated to create a path of floating platforms leading toward the center of the room.
The two daughters occupy elevated positions overlooking the arena and alternate which one can be damaged.
One player becomes Torn Between Dimensions and gains the ability to see and traverse the floating platform path.
This player is responsible for reaching the center of the arena and claiming the Brand aura.
Three other players must stand on specific plates to create the platform path.
The activation order changes each round and must be communicated clearly.
The player who reaches the center receives a Brand aura.
This aura allows nearby players to damage the correct Daughter.
Only one Daughter can be damaged during each phase.
The active target changes throughout the encounter.
Once the Brand has been claimed, gather beneath the active Daughter and deal damage while remaining inside the Brand aura.
Multiple phases may be required.
Begin by identifying which player is Torn Between Dimensions.
Determine the correct plate sequence and activate the floating platforms.
As the path is created, the Torn Between Dimensions player should move across the platforms and claim the Brand aura.
Once the Brand has been obtained, gather beneath the active Daughter and begin dealing damage.
After the damage phase ends, repeat the process by activating a new platform sequence and claiming the next Brand.
Continue cycling through mechanics and damage phases until both Daughters have been defeated.
The most common cause of failure is incorrect plate communication.
Many groups also lose valuable time when the Torn Between Dimensions player hesitates while navigating the platform path.
Another common issue occurs when players step outside the Brand aura during damage phases and lose damage opportunities.
Clear callouts and confident platform movement are the keys to success.
A different player must stand on each plate during every platform-building sequence.
No player may activate the same plate twice in a row.
Assign plate rotations before beginning the encounter.
After each damage phase, rotate players so different Guardians activate the plates during the next sequence.
Because the challenge primarily tests coordination, maintaining a clear rotation system is more important than speed.
Many teams simply rotate clockwise around the arena after every phase.
The most common failure occurs when players instinctively return to the same plate they used during the previous phase.
Another common issue occurs when confusion about the rotation causes multiple players to move toward the same plate.
Establishing a fixed rotation before the encounter begins prevents most mistakes.
Complete the Daughters of Oryx encounter while minimizing unnecessary contact with the arena floor during platform sequences.
Focus on clean movement and precise execution while navigating the platform paths.
Players should remain aware of their positioning throughout every phase and avoid unnecessary movement.
Most failures occur because players rush between mechanics and lose track of positioning requirements.
Patience and communication greatly improve consistency.
Additional Champions appear throughout the encounter and increase pressure on players responsible for plate activations.
Enemy density is significantly higher than on Normal difficulty, making add clear a larger priority.
Because plate players are often exposed while building platform paths, survivability tools and defensive abilities become much more valuable.
Teams should focus on maintaining arena control while executing mechanics cleanly.
A safe multi-phase clear is generally more reliable than attempting to force aggressive damage phases.
Touch of Malice has a chance to drop from the final reward chest after defeating Oryx.
Players pursuing the Exotic Scout Rifle should see the Touch of Malice Guide for drop rates, acquisition details, and drop rate increases.
A King’s Fall Deepsight symbol can be activated during the Oryx encounter.
If all required symbols throughout the raid have been activated, players can claim an additional guaranteed Deepsight weapon after completing the raid.
See the Deepsight Chest Guide for all symbol locations and activation requirements.
Oryx, the Taken King is the final encounter of King’s Fall and serves as the culmination of nearly every mechanic introduced throughout the raid.
The fireteam must activate plates, navigate floating platforms, collect Brand buffs, detonate Corrupted Light bombs, and survive Oryx’s devastating attacks while gradually weakening the Taken King.
Unlike many raid bosses, Oryx is not damaged directly by weapons during the primary damage phase. Instead, players use the encounter mechanics themselves to inflict damage.
Success depends on communication, positioning, and precise execution.
The encounter takes place on four platforms positioned around a large central arena.
Each corner contains a plate that can be activated to create floating platforms.
Oryx occupies the far end of the arena and periodically moves around the battlefield as mechanics progress.
Corrupted Light bombs appear near the plates throughout the encounter and play a central role in damaging the boss.
One player becomes Torn Between Dimensions during each cycle.
This player gains the ability to see and traverse the floating platforms created by teammates.
Their objective is to reach the end of the platform path and claim the Brand of Immortality.
Three players must activate specific plates to create the floating platform path.
The activation order changes each cycle and must be communicated clearly.
The player who reaches the end of the platform path claims the Brand of Immortality.
This aura protects nearby players from Oryx’s wipe mechanics and is required to survive key phases of the encounter.
Four Light-Eater Ogres spawn during each cycle.
When defeated, they create Corrupted Light bombs near their death locations.
These bombs are used to damage Oryx later in the phase.
Light-Eater Knights attempt to reach and consume the Corrupted Light bombs.
These enemies should be eliminated immediately before they can destroy a bomb.
The bombs created by the Ogres are the primary method of damaging Oryx.
Players must detonate the bombs at the correct time while protected by the Brand of Immortality.
At certain health thresholds, Oryx pulls the fireteam into a separate dimension and summons the Shade of Oryx.
The Shade must be defeated before the timer expires.
After enough successful damage phases, Oryx enters his final stand.
The fireteam must deal enough weapon damage to defeat him before the encounter wipes the group.
Begin by identifying the player who becomes Torn Between Dimensions.
Activate the required plates and create the floating platform path.
As the runner advances through the platforms, eliminate the Light-Eater Ogres and prepare to defend the Corrupted Light bombs.
Once the Brand of Immortality has been claimed, eliminate the Light-Eater Knights before they can consume the bombs.
When Oryx exposes his chest, damage the weak point and prepare for bomb detonation.
At the appropriate time, players should enter the Corrupted Light bombs and immediately return to the protection of the Brand aura.
The bombs will detonate and damage Oryx.
After surviving the resulting mechanics, repeat the process through multiple cycles.
Continue building platforms, defeating Ogres, protecting bombs, and detonating Corrupted Light until Oryx reaches final stand.
Commit all remaining damage resources and defeat him before the wipe mechanic completes.
The most common cause of failure is allowing Light-Eater Knights to consume Corrupted Light bombs.
Many groups also struggle when plate activations are delayed or when the runner hesitates while navigating the platform path.
Another common issue occurs when players detonate bombs too early or fail to return to the Brand aura in time.
Consistent communication and disciplined execution are the keys to success.
Players may not kill the same Light-Eater Ogre or Light-Eater Knight twice throughout the encounter.
Each player must rotate responsibilities and avoid repeatedly killing the same enemy type in the same position.
Assign players to different corners each round.
After every damage cycle, rotate positions clockwise or counterclockwise around the arena so players naturally engage different Ogres and Knights throughout the encounter.
Because the challenge requires consistent participation from the entire fireteam, maintaining a predetermined rotation is the safest approach.
The most common failure occurs when players automatically return to the same corner after every phase.
Many teams also lose track of assignments during later phases and accidentally repeat responsibilities.
A simple rotation system prevents most challenge failures.
Complete the Oryx encounter while demonstrating mastery of the encounter’s core mechanics.
Maintain clean bomb detonations, eliminate Light-Eater Knights immediately, and execute every platform sequence correctly.
Because Oryx is heavily mechanics-driven, consistency is more important than maximizing damage output.
Most failures occur because teams lose control of bomb management or allow a Knight to reach a Corrupted Light bomb.
Focusing on mechanics first and damage second dramatically improves success rates.
Additional Champions appear throughout the encounter and significantly increase pressure on plate holders and add-clear teams.
Enemy density is substantially higher than on Normal difficulty, making Ogre and Knight control even more important.
Because a single missed Knight can result in a lost bomb and failed damage phase, teams should prioritize arena control over aggressive damage strategies.
The Shade of Oryx phase is also considerably more dangerous due to increased enemy lethality.
Fireteams attempting Master difficulty should focus on survivability, communication, and mechanic execution before worrying about maximizing damage.