
Before beginning Deep Stone Crypt, it is important to understand the raid’s Augment system. Most encounters revolve around three specialized roles that provide unique abilities and responsibilities.
Throughout the raid, players can acquire Augments from special Vandal enemies.
Each Augment grants a specific role and can be transferred between players using Augment Terminals.
Most encounters require multiple Augments working together to complete mechanics successfully.
The Operator Augment is identified by a red icon.
Operators are responsible for interacting with the environment by shooting panels, opening pathways, releasing trapped teammates, and activating encounter mechanics.
Many encounters cannot progress without the Operator performing specific actions.
The Scanner Augment is identified by a yellow icon.
Scanners can identify important objectives that other players cannot see.
Depending on the encounter, the Scanner may identify the correct fuse, replication target, deposit location, or Nuclear Core container.
Accurate Scanner callouts are critical throughout the raid.
The Suppressor Augment is identified by a blue icon.
Suppressors disable enemies and bosses by standing beneath specific drones and applying damage to designated targets.
Many encounters require the Suppressor to stun enemies before other mechanics can continue.
Augment Terminals allow players to transfer Augments between teammates.
These terminals become increasingly important throughout the raid, especially when Augment roles must be rotated between players.
Teams should always know where the nearest terminal is located.
Several encounters feature Radiation.
Radiation stacks increase while carrying Nuclear Cores and eventually kill the player if allowed to build too high.
Teams must coordinate Nuclear Core transfers and deposits to prevent Radiation from becoming overwhelming.
Desolation is the opening section of Deep Stone Crypt and introduces players to Europa’s frozen wastelands.
The objective is to escort a series of energy cores through a blizzard while navigating between safe zones and avoiding freezing to death.
Although often viewed as a traversal encounter, Desolation contains mechanics, enemy waves, and failure conditions that require coordination from the entire fireteam.
The encounter takes place across a massive frozen landscape outside the Deep Stone Crypt facility.
The route is divided into several checkpoints connected by snow-covered pathways.
Throughout the journey, players travel between protective bubbles generated by Fallen technology.
Outside these bubbles, the freezing storm quickly becomes deadly.
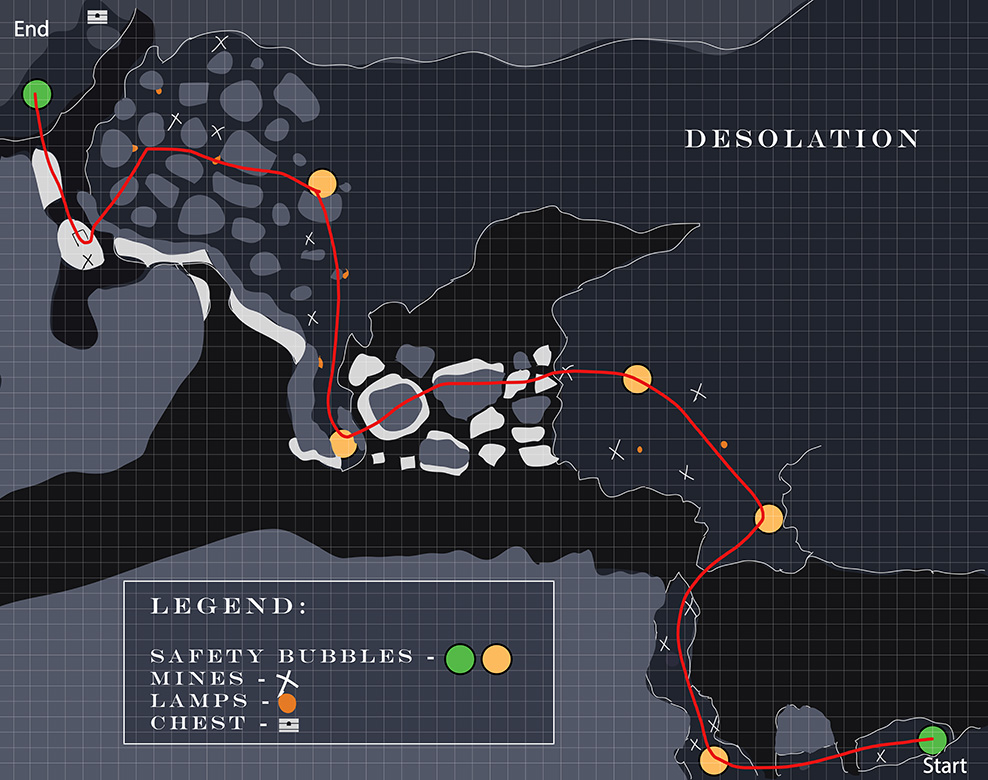
While outside of protective shelters, players accumulate Frostbite stacks.
If Frostbite reaches its maximum value, the player dies.
Returning to a protective bubble gradually removes Frostbite and allows safe progression.
Heat Bubbles provide protection from the blizzard.
Players should use these shelters to manage Frostbite while progressing through the encounter.
Because the route between bubbles becomes longer as the encounter continues, teams must move efficiently.
Fallen Brigs and enemies drop Energy Cores throughout the encounter.
These cores must be transported to the next shelter in order to progress.
Carrying a core slows movement and requires protection from the rest of the fireteam.
Begin by entering the first protective bubble and clearing the nearby enemies.
When the Energy Core becomes available, assign a player to carry it while the rest of the team clears the path ahead.
Move together between shelters and monitor Frostbite stacks carefully.
Upon reaching the next bubble, clear enemies and prepare for the following section.
Continue escorting the Energy Core through the blizzard while rotating carriers as necessary.
As the encounter progresses, enemy density increases and the distance between shelters becomes greater.
Maintain a steady pace and avoid lingering outside of safe zones longer than necessary.
Eventually, the fireteam reaches the Deep Stone Crypt entrance and gains access to the facility.
The most common cause of failure is remaining outside of shelters for too long.
Many groups also underestimate how quickly Frostbite can accumulate while reviving teammates or fighting enemies.
Finally, teams should avoid allowing a single player to carry the Energy Core for extended periods when safer handoffs are available.
Complete the Desolation section without allowing any pike to be destroyed.
At the start of Desolation, several Fallen pikes are available near the entrance. To complete this triumph, every pike must survive until the fireteam reaches the final shelter.
Players should move together and avoid abandoning pikes in areas with active enemies. If a pike is left behind near Fallen or Brigs, it can be destroyed even if no one is riding it.
The safest strategy is to have players drive the pikes from shelter to shelter as a group. Clear dangerous enemies before advancing, and avoid crashing the pikes into terrain or explosive hazards.
If a pike becomes heavily damaged, slow down and protect it rather than rushing ahead. The triumph is about safely delivering the vehicles, not finishing the section quickly.
Most failures occur because players leave pikes behind while moving to the next shelter.
Enemies can destroy unattended pikes, especially if they are parked near active combat areas.
Players can also fail the triumph by wrecking pikes during travel. Move carefully, avoid unnecessary boosts through tight terrain, and keep every vehicle intact until the end of Desolation.
Secret Chest #1 becomes available immediately after completing this encounter.
See the Secret Chest Guide for the full walkthrough.
Crypt Security is the first major encounter of Deep Stone Crypt and introduces the Scanner and Operator Augments.
The objective is to identify and destroy the correct security fuses hidden beneath the facility while preventing mistakes that can wipe the fireteam.
Strong communication between the Scanner and Operator is the key to success.
The encounter is divided between two identical rooms connected by Augment Terminals.
The upper level contains the Operator while the lower level contains the Scanner.
Security fuses are located beneath the floor and can only be identified by the Scanner.
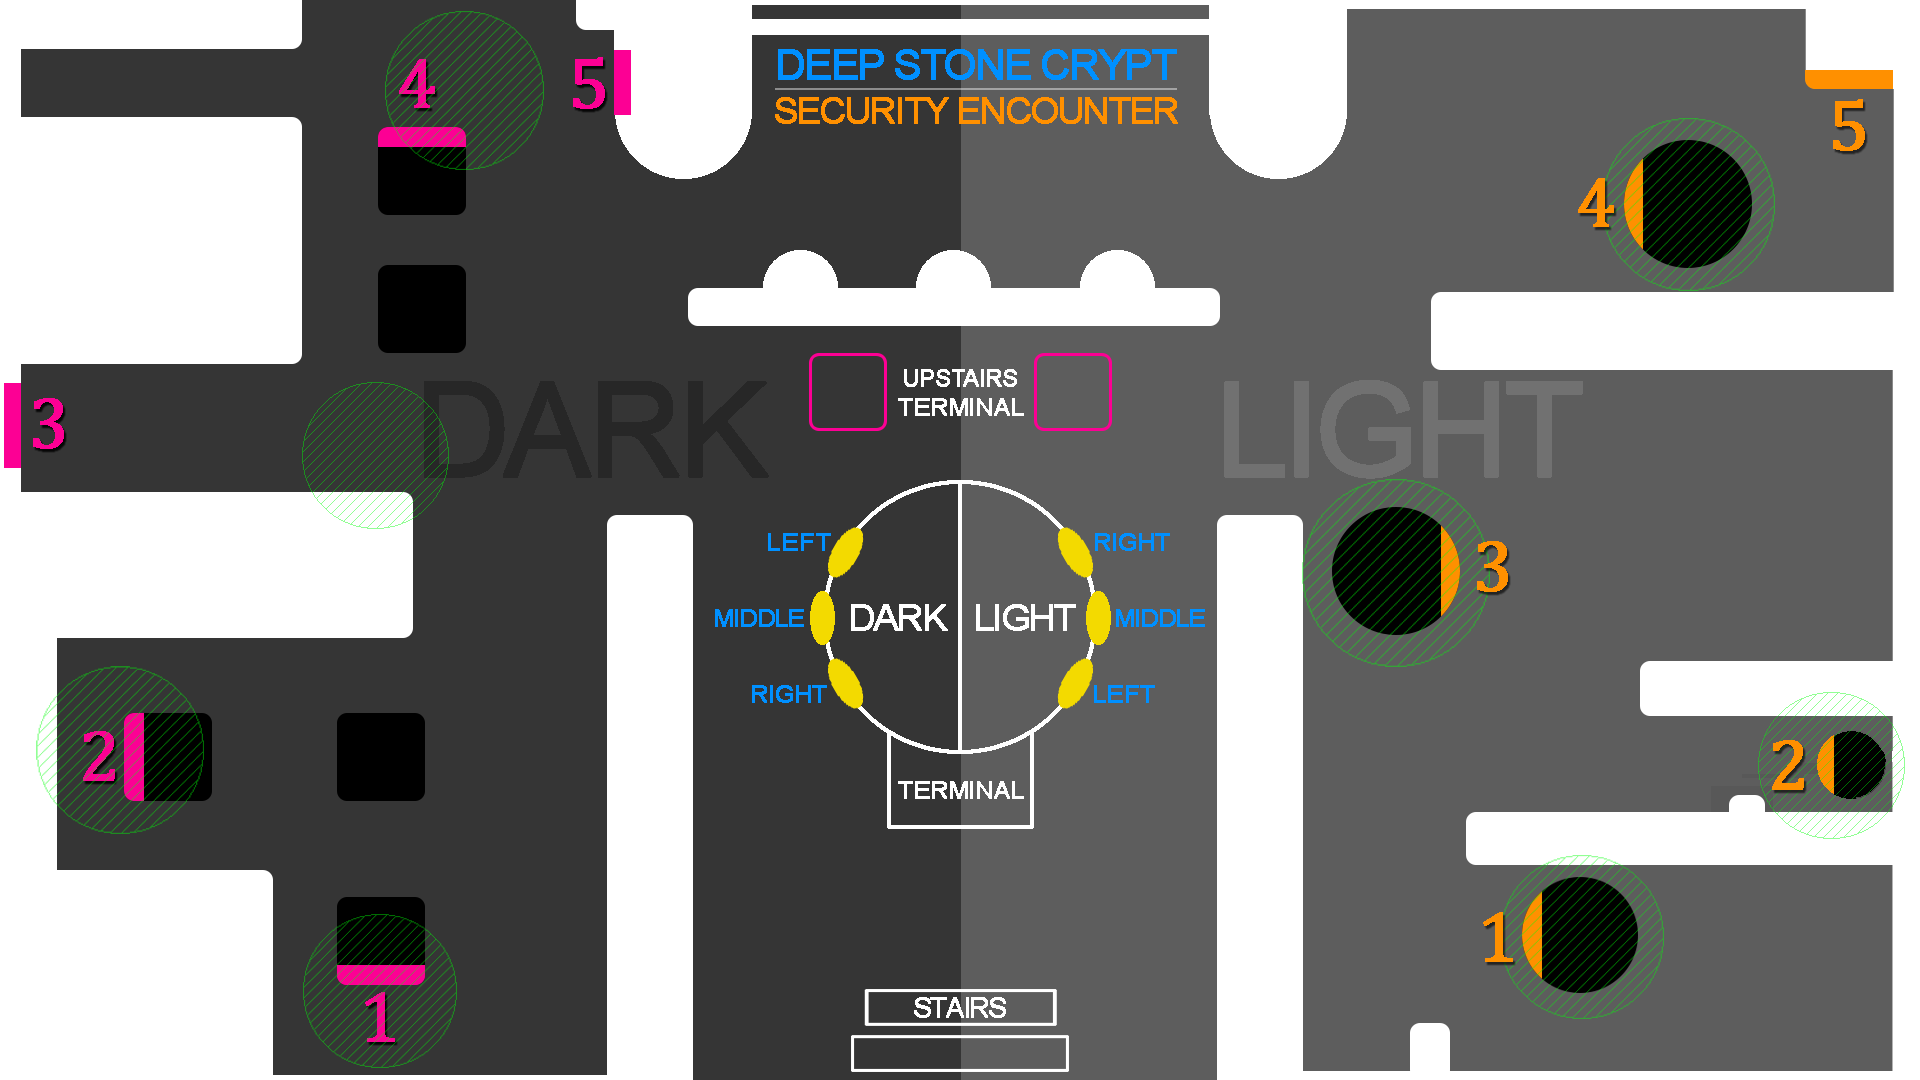
The Scanner identifies which fuses must be destroyed.
Only the Scanner can see the highlighted fuses required for each phase.
Correct callouts are essential because damaging the wrong fuse can quickly lead to failure.
The Operator shoots control panels throughout the encounter.
These panels open pathways and allow players to access different sections of the arena.
Without the Operator, the Scanner cannot provide the information needed to complete the encounter.
Several fuses are hidden beneath the floor.
The Scanner identifies which fuses should be damaged while the rest of the fireteam focuses their attacks accordingly.
Successfully destroying all required fuses completes the encounter.
Begin by defeating the Augment Vandals and assigning Scanner and Operator roles.
The Operator should activate the necessary panels to allow access to the lower level.
Once positioned, the Scanner identifies the correct fuses and communicates their locations to the team.
The fireteam then gathers beneath the floor and damages the designated fuse.
After each successful phase, repeat the process by updating Scanner information and preparing for the next damage cycle.
Continue coordinating Scanner callouts and fuse damage until all required fuses have been destroyed.
Once the final fuse is destroyed, the encounter is complete.
The most common cause of failure is incorrect Scanner callouts.
Teams should confirm fuse locations before beginning damage.
Many groups also waste damage by attacking multiple fuses simultaneously rather than focusing on the correct target.
Finally, Operators should pay close attention to panel activations, as missed panels can delay the encounter significantly.
All players must activate both sides of the airlock at least once before the encounter is completed.
Rotate airlock responsibilities throughout the encounter and keep track of which players have already participated.
The challenge is easiest when assignments are planned before the encounter begins.
Most failures occur because one or more players never interact with an airlock before the encounter ends.
Clear communication and role tracking prevent most mistakes.
Complete the Crypt Security encounter without any player using an Augment Terminal.
Assign the Scanner and Operator roles at the beginning of the encounter and avoid transferring either Augment for the remainder of the fight.
Because the encounter can be completed with the original role assignments, the primary objective is simply preventing anyone from interacting with an Augment Terminal.
The Scanner should remain focused on identifying the correct fuses throughout the encounter, while the Operator handles every required panel activation.
As long as both Augments remain with their original holders, the triumph can be completed naturally during a normal clear.
Most failures occur when players instinctively interact with an Augment Terminal out of habit.
Before beginning the encounter, remind the entire fireteam that no terminal transfers are allowed.
Teams should also avoid unnecessary interactions with terminals, as a single transfer immediately fails the triumph.
Barrier Champions appear throughout the encounter and significantly increase the difficulty of controlling the arena.
Because Crypt Security relies heavily on communication, mistakes become much more punishing when Champions are left alive.
Teams should prioritize Champion control, confirm Scanner callouts carefully, and avoid rushing damage phases.
Clean execution is far more valuable than speed on Master difficulty.
Atraks-1 is the second major encounter in Deep Stone Crypt and introduces the Replication mechanic.
The encounter takes place across two separate arenas connected by space pods, forcing the fireteam to split responsibilities between Europa and the Morning Star station.
Success depends on accurate Scanner callouts, efficient Replication management, and coordinated damage phases.
The encounter is divided between two identical combat zones.
One team operates on Europa while the other team fights aboard the Morning Star station.
Launch pods allow players to travel between the two locations throughout the encounter.
Both arenas contain Augment Terminals, enemy spawns, and copies of Atraks-1.
The Scanner identifies the correct Atraks-1 clone during each damage phase.
Only one clone can be damaged successfully.
Attacking the wrong clone wastes valuable time and can quickly lead to a wipe.
The Operator is responsible for removing Replication debuffs from players.
Without the Operator, Replication eventually causes a wipe.
After a successful damage phase, one or more players receive a Replication debuff.
This debuff must be removed and ejected into space using the airlock system.
Failure to remove Replication in time results in a wipe.
The Scanner identifies the active Atraks-1 clone.
The entire team must quickly damage the correct clone before Atraks teleports elsewhere.
Several successful damage phases are required to complete the encounter.
Once Atraks reaches low health, every remaining clone becomes active.
The fireteam must quickly move between clones and finish the encounter before Atraks wipes the team.
Begin by defeating the Augment Vandals and assigning Scanner and Operator responsibilities.
Split the fireteam between Europa and the Morning Star station.
As Atraks becomes vulnerable, the Scanner identifies the correct clone and communicates its location.
The team immediately damages the highlighted clone before Atraks relocates.
After each successful damage phase, players affected by Replication should move to the airlock area.
The Operator shoots the affected player to remove the debuff and then ejects the Replication into space.
Continue rotating between damage phases and Replication management until Atraks reaches final stand.
During final stand, follow Scanner callouts and rapidly eliminate each active clone before time expires.
The most common cause of failure is slow Replication management.
Teams should immediately identify who has the debuff and move toward the airlock without delay.
Many groups also lose damage opportunities because players hesitate during Scanner callouts.
The correct clone should always receive priority damage.
Finally, poor communication between the Europa and space teams often creates unnecessary confusion during final stand.
Do not eject any Replication debuffs into space.
Instead of ejecting Replication, players must continuously pass the debuff between teammates throughout the encounter.
Careful timing and communication are essential.
Before beginning, establish a rotation so everyone understands who will receive each Replication transfer.
Because the encounter already requires strong coordination, the challenge becomes significantly easier when the team follows a predetermined plan.
Most failures occur when a player accidentally ejects a Replication debuff through the airlock.
Another common issue is poor timing during debuff transfers, causing Replication to expire before it can be passed successfully.
Clear communication is critical throughout the encounter.
Complete the Atraks-1 encounter with every player entering a launch pod within five seconds of one another during each transition.
Before using any launch pod, gather the entire fireteam and count down together.
Players should enter their pods simultaneously rather than individually.
Maintaining synchronization throughout the encounter is far more important than moving quickly.
If everyone launches together during each transition, the triumph can be completed naturally.
Most failures occur because one player enters a launch pod early while another is still fighting enemies or managing mechanics.
Always regroup before using launch pods and verify that every player is ready before launching.
Secret Chest #2 can be obtained during this section.
See the Secret Chest Guide for the full walkthrough.
Descent is the traversal section that follows Atraks-1, Fallen Exo.
Often referred to by the community as the “Spacewalk” section, this portion of the raid takes players onto the exterior of the Morning Star station as it orbits Europa.
While there are no major encounter mechanics to complete, the section contains platforming, combat, and one of Deep Stone Crypt’s hidden chests.
The route follows the outer hull of the Morning Star.
Players travel across maintenance platforms, exterior walkways, and damaged sections of the station while making their way toward the lower levels.
The path is largely linear and eventually leads back inside the station.
After defeating Atraks-1, proceed through the airlock and onto the exterior of the Morning Star.
Follow the path across the station while navigating a series of jumps and maintenance structures.
Fallen enemies appear throughout the route, but the primary challenge comes from the platforming itself.
Continue progressing across the exterior until reaching the final airlock.
After re-entering the station, proceed toward the next encounter.
Most deaths occur when players rush platforming sections or become distracted by enemy fire while navigating narrow pathways.
Allow the fireteam to regroup between jumps and focus on safe movement rather than speed.
Taniks Reborn is the third encounter of Deep Stone Crypt and serves as the culmination of the raid’s Augment mechanics.
For the first time, Operator, Scanner, and Suppressor are all required simultaneously. The fireteam must work together to suppress Taniks, transport Nuclear Cores, and deposit them into the correct containers before Radiation becomes overwhelming.
Success depends on efficient Augment coordination and clear communication.
The encounter takes place inside the Morning Star station as it begins its descent toward Europa.
The arena consists of three primary levels connected by shafts and corridors.
Each level contains Augment Terminals, deposit boxes, and security drones used by the Suppressor.
Throughout the encounter, the fireteam descends through the station while completing Nuclear Core mechanics.
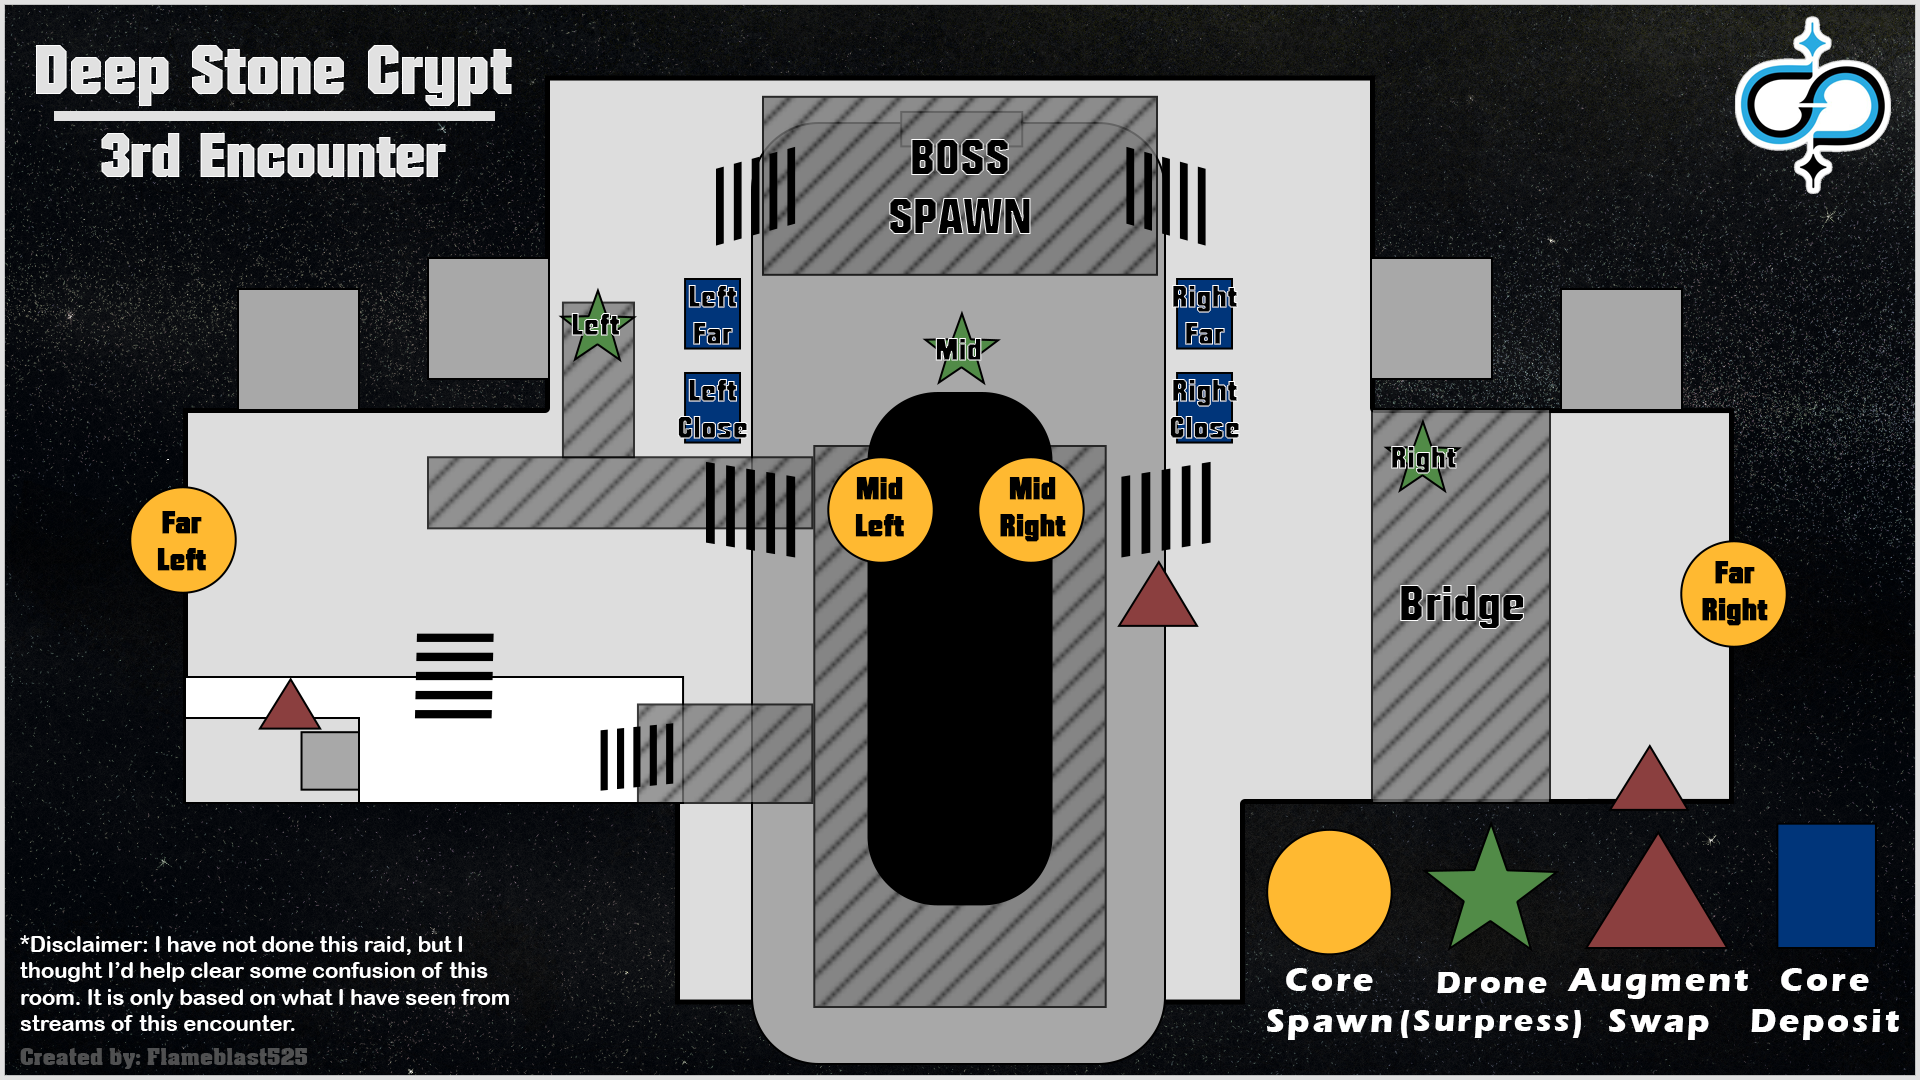
Nuclear Cores spawn throughout the encounter and must be deposited into specific containers.
Carrying a Nuclear Core causes Radiation stacks to build rapidly.
Teams often rotate carriers to prevent Radiation from reaching fatal levels.
The Scanner identifies which deposit boxes are active.
Only the highlighted boxes can receive Nuclear Cores.
Incorrect deposits waste valuable time and can lead to a wipe.
The Operator is responsible for freeing trapped players and assisting with encounter mechanics.
Without the Operator, Nuclear Core carriers can become immobilized and unable to complete their objectives.
The Suppressor must stand beneath three security drones and damage Taniks from each position.
After all three drones have been activated, Taniks becomes suppressed and the encounter can continue.
Radiation accumulates while carrying Nuclear Cores.
If a player reaches ten stacks, they die.
Teams must coordinate transfers carefully to keep Radiation under control.
Begin by defeating the Augment Vandals and assigning Scanner, Operator, and Suppressor responsibilities.
When Nuclear Cores spawn, designated carriers should collect them while the Scanner identifies the active deposit locations.
As carriers move through the station, the Suppressor should activate all three drones and suppress Taniks.
The Operator should remain alert for trapped teammates and free them whenever necessary.
After the Nuclear Cores have been deposited successfully, the fireteam advances to the next level of the station.
Repeat the process on each floor while managing Radiation and Augment responsibilities.
Once the final set of Nuclear Cores has been deposited, the Morning Star crashes into Europa and the encounter is completed.
The most common cause of failure is poor Radiation management.
Players often attempt to carry Nuclear Cores for too long and die before reaching a deposit location.
Many groups also struggle because the Suppressor delays activating drones, which slows progression and creates unnecessary pressure.
Finally, incorrect Scanner callouts can quickly derail an otherwise successful run.
Every player must perform the roles of Operator, Scanner, and Suppressor at least once before the encounter is completed.
Create an Augment rotation before beginning the encounter.
As the encounter progresses, transfer Augments through the terminals so every player performs all three roles during the run.
Tracking responsibilities is more important than speed.
Most failures occur when one player never receives a particular Augment before the encounter ends.
A designated caller should track Augment assignments throughout the encounter.
Complete the Taniks Reborn encounter by suppressing Taniks with only two of the three available drones during each suppression phase.
Before beginning the encounter, determine which two drone locations will be used for every suppression cycle.
The Suppressor should activate only those two drones and avoid the third entirely.
With proper planning, the triumph can be completed while performing the encounter normally.
Most failures occur because the Suppressor activates the third drone out of habit.
Clear communication and a consistent route are the easiest ways to avoid accidental activations.
Additional Champions appear throughout the encounter and significantly increase enemy pressure while transporting Nuclear Cores.
Radiation management becomes less forgiving due to the increased combat difficulty, making efficient transfers even more important.
Teams should prioritize Champion control, survivability, and clear Augment communication over speed.
Taniks, the Abomination is the final encounter of Deep Stone Crypt and serves as the culmination of every major mechanic introduced throughout the raid.
The fireteam must coordinate Scanner and Suppressor responsibilities, manage Radiation stacks, transport Nuclear Cores, and survive increasingly dangerous enemy waves while damaging Taniks.
Success depends on strong communication, efficient Nuclear Core management, and consistent execution during damage phases.
The encounter takes place within a large circular arena on Europa surrounding the wreckage of the Morning Star.
Most teams divide the arena into four primary locations: Spawn, Blue, Orange, and Green.
Each area contains deposit boxes that are used throughout the encounter.
Taniks moves around the arena while enemy waves continuously pressure the fireteam.
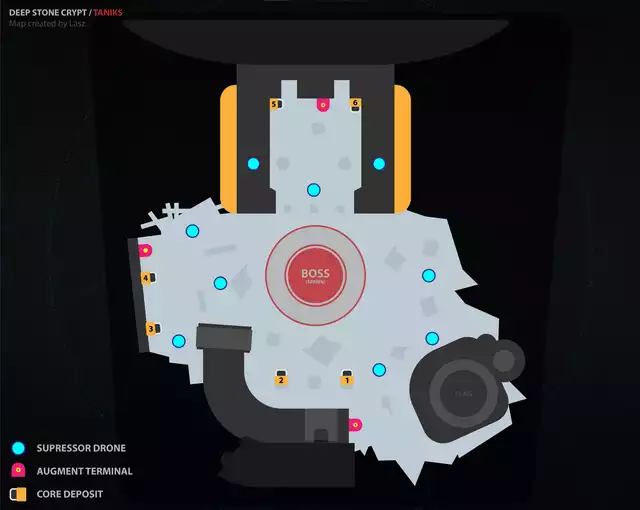
Damaging Taniks eventually causes Nuclear Cores to drop.
These cores must be collected and deposited into the correct containers before Radiation becomes fatal.
Depending on the encounter phase, multiple Nuclear Cores may need to be transported simultaneously.
The Scanner identifies which deposit boxes are active.
Only the highlighted boxes can accept Nuclear Cores.
Correct callouts are essential because depositing into the wrong location can quickly result in a wipe.
The Suppressor must stand beneath three security drones positioned around the arena and damage Taniks from each location.
After all three drones have been activated, Taniks becomes suppressed and the encounter can continue.
Radiation accumulates while carrying Nuclear Cores.
If Radiation reaches ten stacks, the affected player dies.
Teams must coordinate transfers carefully and avoid carrying Nuclear Cores for longer than necessary.
Once the Nuclear Cores have been deposited successfully, Taniks moves to the center of the arena and becomes vulnerable.
The fireteam should gather together and maximize damage before the phase ends.
Multiple damage phases are typically required.
When Taniks reaches low health, he enters a final stand phase.
The fireteam must continue dealing damage and defeat him before the wipe timer expires.
Begin by assigning Scanner and Suppressor roles and clearing the initial enemies.
Damage Taniks until Nuclear Cores are generated.
Once the cores appear, designated carriers should collect them while the Scanner identifies the active deposit boxes.
The Suppressor should activate all three security drones and suppress Taniks before the Nuclear Cores are deposited.
Successfully deposit the cores and prepare for damage.
When Taniks moves to the center of the arena, gather as a team and begin the damage phase.
After the damage phase ends, repeat the process by generating additional Nuclear Cores and completing another deposit cycle.
Continue rotating through mechanics and damage phases until Taniks enters final stand.
Defeat him before the wipe timer expires to complete Deep Stone Crypt.
The most common cause of failure is poor Nuclear Core management.
Players often accumulate excessive Radiation stacks or delay deposits while searching for the correct box.
Many groups also lose damage opportunities because the Suppressor is slow to complete drone activations.
Finally, teams should ensure Scanner callouts are clear and consistent throughout the encounter, as incorrect deposits can quickly derail an otherwise successful run.
Deposit all four Nuclear Cores within ten seconds of one another.
Before beginning the encounter, assign a carrier to each Nuclear Core and determine which deposit locations will be used.
Once the Scanner identifies the correct boxes, all carriers should move into position and wait until every player is ready.
When everyone is prepared, deposit all four Nuclear Cores at nearly the same time.
The challenge is significantly easier when the fireteam prioritizes synchronization over speed.
Most failures occur because one carrier deposits too early while another is still moving into position.
Clear communication and a coordinated countdown greatly improve consistency.
Teams should also monitor Radiation carefully while waiting to deposit, as excessive delays can create unnecessary pressure.
Complete the Taniks, the Abomination encounter with all six players carrying a Nuclear Core at least once during a single phase.
During a Nuclear Core phase, transfer the cores between players so every member of the fireteam handles a core before the final deposits occur.
Because only a limited number of Nuclear Cores spawn, careful planning is required to ensure everyone participates.
Establish a transfer order before beginning the encounter and communicate each handoff clearly.
Most failures occur because one or more players never receive a Nuclear Core before the deposits are completed.
Teams should track participation throughout the phase and avoid rushing deposits until every player has handled a core successfully.
Additional Champions appear throughout the encounter and significantly increase enemy pressure between damage phases.
Radiation management becomes less forgiving due to the increased combat difficulty, making efficient Nuclear Core transfers even more important.
Enemy damage output is substantially higher, which makes revives and recovery far more difficult than on Normal difficulty.
Successful Master teams typically prioritize survivability, Champion control, and consistent mechanics over maximizing damage output during any single phase.
Before beginning Deep Stone Crypt, it is important to understand the raid’s Augment system. Most encounters revolve around three specialized roles that provide unique abilities and responsibilities.
Throughout the raid, players can acquire Augments from special Vandal enemies.
Each Augment grants a specific role and can be transferred between players using Augment Terminals.
Most encounters require multiple Augments working together to complete mechanics successfully.
The Operator Augment is identified by a red icon.
Operators are responsible for interacting with the environment by shooting panels, opening pathways, releasing trapped teammates, and activating encounter mechanics.
Many encounters cannot progress without the Operator performing specific actions.
The Scanner Augment is identified by a yellow icon.
Scanners can identify important objectives that other players cannot see.
Depending on the encounter, the Scanner may identify the correct fuse, replication target, deposit location, or Nuclear Core container.
Accurate Scanner callouts are critical throughout the raid.
The Suppressor Augment is identified by a blue icon.
Suppressors disable enemies and bosses by standing beneath specific drones and applying damage to designated targets.
Many encounters require the Suppressor to stun enemies before other mechanics can continue.
Augment Terminals allow players to transfer Augments between teammates.
These terminals become increasingly important throughout the raid, especially when Augment roles must be rotated between players.
Teams should always know where the nearest terminal is located.
Several encounters feature Radiation.
Radiation stacks increase while carrying Nuclear Cores and eventually kill the player if allowed to build too high.
Teams must coordinate Nuclear Core transfers and deposits to prevent Radiation from becoming overwhelming.
Desolation is the opening section of Deep Stone Crypt and introduces players to Europa’s frozen wastelands.
The objective is to escort a series of energy cores through a blizzard while navigating between safe zones and avoiding freezing to death.
Although often viewed as a traversal encounter, Desolation contains mechanics, enemy waves, and failure conditions that require coordination from the entire fireteam.
The encounter takes place across a massive frozen landscape outside the Deep Stone Crypt facility.
The route is divided into several checkpoints connected by snow-covered pathways.
Throughout the journey, players travel between protective bubbles generated by Fallen technology.
Outside these bubbles, the freezing storm quickly becomes deadly.
While outside of protective shelters, players accumulate Frostbite stacks.
If Frostbite reaches its maximum value, the player dies.
Returning to a protective bubble gradually removes Frostbite and allows safe progression.
Heat Bubbles provide protection from the blizzard.
Players should use these shelters to manage Frostbite while progressing through the encounter.
Because the route between bubbles becomes longer as the encounter continues, teams must move efficiently.
Fallen Brigs and enemies drop Energy Cores throughout the encounter.
These cores must be transported to the next shelter in order to progress.
Carrying a core slows movement and requires protection from the rest of the fireteam.
Begin by entering the first protective bubble and clearing the nearby enemies.
When the Energy Core becomes available, assign a player to carry it while the rest of the team clears the path ahead.
Move together between shelters and monitor Frostbite stacks carefully.
Upon reaching the next bubble, clear enemies and prepare for the following section.
Continue escorting the Energy Core through the blizzard while rotating carriers as necessary.
As the encounter progresses, enemy density increases and the distance between shelters becomes greater.
Maintain a steady pace and avoid lingering outside of safe zones longer than necessary.
Eventually, the fireteam reaches the Deep Stone Crypt entrance and gains access to the facility.
The most common cause of failure is remaining outside of shelters for too long.
Many groups also underestimate how quickly Frostbite can accumulate while reviving teammates or fighting enemies.
Finally, teams should avoid allowing a single player to carry the Energy Core for extended periods when safer handoffs are available.
Complete the Desolation section without allowing any pike to be destroyed.
At the start of Desolation, several Fallen pikes are available near the entrance. To complete this triumph, every pike must survive until the fireteam reaches the final shelter.
Players should move together and avoid abandoning pikes in areas with active enemies. If a pike is left behind near Fallen or Brigs, it can be destroyed even if no one is riding it.
The safest strategy is to have players drive the pikes from shelter to shelter as a group. Clear dangerous enemies before advancing, and avoid crashing the pikes into terrain or explosive hazards.
If a pike becomes heavily damaged, slow down and protect it rather than rushing ahead. The triumph is about safely delivering the vehicles, not finishing the section quickly.
Most failures occur because players leave pikes behind while moving to the next shelter.
Enemies can destroy unattended pikes, especially if they are parked near active combat areas.
Players can also fail the triumph by wrecking pikes during travel. Move carefully, avoid unnecessary boosts through tight terrain, and keep every vehicle intact until the end of Desolation.
Secret Chest #1 becomes available immediately after completing this encounter.
See the Secret Chest Guide for the full walkthrough.
Crypt Security is the first major encounter of Deep Stone Crypt and introduces the Scanner and Operator Augments.
The objective is to identify and destroy the correct security fuses hidden beneath the facility while preventing mistakes that can wipe the fireteam.
Strong communication between the Scanner and Operator is the key to success.
The encounter is divided between two identical rooms connected by Augment Terminals.
The upper level contains the Operator while the lower level contains the Scanner.
Security fuses are located beneath the floor and can only be identified by the Scanner.
The Scanner identifies which fuses must be destroyed.
Only the Scanner can see the highlighted fuses required for each phase.
Correct callouts are essential because damaging the wrong fuse can quickly lead to failure.
The Operator shoots control panels throughout the encounter.
These panels open pathways and allow players to access different sections of the arena.
Without the Operator, the Scanner cannot provide the information needed to complete the encounter.
Several fuses are hidden beneath the floor.
The Scanner identifies which fuses should be damaged while the rest of the fireteam focuses their attacks accordingly.
Successfully destroying all required fuses completes the encounter.
Begin by defeating the Augment Vandals and assigning Scanner and Operator roles.
The Operator should activate the necessary panels to allow access to the lower level.
Once positioned, the Scanner identifies the correct fuses and communicates their locations to the team.
The fireteam then gathers beneath the floor and damages the designated fuse.
After each successful phase, repeat the process by updating Scanner information and preparing for the next damage cycle.
Continue coordinating Scanner callouts and fuse damage until all required fuses have been destroyed.
Once the final fuse is destroyed, the encounter is complete.
The most common cause of failure is incorrect Scanner callouts.
Teams should confirm fuse locations before beginning damage.
Many groups also waste damage by attacking multiple fuses simultaneously rather than focusing on the correct target.
Finally, Operators should pay close attention to panel activations, as missed panels can delay the encounter significantly.
All players must activate both sides of the airlock at least once before the encounter is completed.
Rotate airlock responsibilities throughout the encounter and keep track of which players have already participated.
The challenge is easiest when assignments are planned before the encounter begins.
Most failures occur because one or more players never interact with an airlock before the encounter ends.
Clear communication and role tracking prevent most mistakes.
Complete the Crypt Security encounter without any player using an Augment Terminal.
Assign the Scanner and Operator roles at the beginning of the encounter and avoid transferring either Augment for the remainder of the fight.
Because the encounter can be completed with the original role assignments, the primary objective is simply preventing anyone from interacting with an Augment Terminal.
The Scanner should remain focused on identifying the correct fuses throughout the encounter, while the Operator handles every required panel activation.
As long as both Augments remain with their original holders, the triumph can be completed naturally during a normal clear.
Most failures occur when players instinctively interact with an Augment Terminal out of habit.
Before beginning the encounter, remind the entire fireteam that no terminal transfers are allowed.
Teams should also avoid unnecessary interactions with terminals, as a single transfer immediately fails the triumph.
Barrier Champions appear throughout the encounter and significantly increase the difficulty of controlling the arena.
Because Crypt Security relies heavily on communication, mistakes become much more punishing when Champions are left alive.
Teams should prioritize Champion control, confirm Scanner callouts carefully, and avoid rushing damage phases.
Clean execution is far more valuable than speed on Master difficulty.
Atraks-1 is the second major encounter in Deep Stone Crypt and introduces the Replication mechanic.
The encounter takes place across two separate arenas connected by space pods, forcing the fireteam to split responsibilities between Europa and the Morning Star station.
Success depends on accurate Scanner callouts, efficient Replication management, and coordinated damage phases.
The encounter is divided between two identical combat zones.
One team operates on Europa while the other team fights aboard the Morning Star station.
Launch pods allow players to travel between the two locations throughout the encounter.
Both arenas contain Augment Terminals, enemy spawns, and copies of Atraks-1.
The Scanner identifies the correct Atraks-1 clone during each damage phase.
Only one clone can be damaged successfully.
Attacking the wrong clone wastes valuable time and can quickly lead to a wipe.
The Operator is responsible for removing Replication debuffs from players.
Without the Operator, Replication eventually causes a wipe.
After a successful damage phase, one or more players receive a Replication debuff.
This debuff must be removed and ejected into space using the airlock system.
Failure to remove Replication in time results in a wipe.
The Scanner identifies the active Atraks-1 clone.
The entire team must quickly damage the correct clone before Atraks teleports elsewhere.
Several successful damage phases are required to complete the encounter.
Once Atraks reaches low health, every remaining clone becomes active.
The fireteam must quickly move between clones and finish the encounter before Atraks wipes the team.
Begin by defeating the Augment Vandals and assigning Scanner and Operator responsibilities.
Split the fireteam between Europa and the Morning Star station.
As Atraks becomes vulnerable, the Scanner identifies the correct clone and communicates its location.
The team immediately damages the highlighted clone before Atraks relocates.
After each successful damage phase, players affected by Replication should move to the airlock area.
The Operator shoots the affected player to remove the debuff and then ejects the Replication into space.
Continue rotating between damage phases and Replication management until Atraks reaches final stand.
During final stand, follow Scanner callouts and rapidly eliminate each active clone before time expires.
The most common cause of failure is slow Replication management.
Teams should immediately identify who has the debuff and move toward the airlock without delay.
Many groups also lose damage opportunities because players hesitate during Scanner callouts.
The correct clone should always receive priority damage.
Finally, poor communication between the Europa and space teams often creates unnecessary confusion during final stand.
Do not eject any Replication debuffs into space.
Instead of ejecting Replication, players must continuously pass the debuff between teammates throughout the encounter.
Careful timing and communication are essential.
Before beginning, establish a rotation so everyone understands who will receive each Replication transfer.
Because the encounter already requires strong coordination, the challenge becomes significantly easier when the team follows a predetermined plan.
Most failures occur when a player accidentally ejects a Replication debuff through the airlock.
Another common issue is poor timing during debuff transfers, causing Replication to expire before it can be passed successfully.
Clear communication is critical throughout the encounter.
Complete the Atraks-1 encounter with every player entering a launch pod within five seconds of one another during each transition.
Before using any launch pod, gather the entire fireteam and count down together.
Players should enter their pods simultaneously rather than individually.
Maintaining synchronization throughout the encounter is far more important than moving quickly.
If everyone launches together during each transition, the triumph can be completed naturally.
Most failures occur because one player enters a launch pod early while another is still fighting enemies or managing mechanics.
Always regroup before using launch pods and verify that every player is ready before launching.
Secret Chest #2 can be obtained during this section.
See the Secret Chest Guide for the full walkthrough.
Descent is the traversal section that follows Atraks-1, Fallen Exo.
Often referred to by the community as the “Spacewalk” section, this portion of the raid takes players onto the exterior of the Morning Star station as it orbits Europa.
While there are no major encounter mechanics to complete, the section contains platforming, combat, and one of Deep Stone Crypt’s hidden chests.
The route follows the outer hull of the Morning Star.
Players travel across maintenance platforms, exterior walkways, and damaged sections of the station while making their way toward the lower levels.
The path is largely linear and eventually leads back inside the station.
After defeating Atraks-1, proceed through the airlock and onto the exterior of the Morning Star.
Follow the path across the station while navigating a series of jumps and maintenance structures.
Fallen enemies appear throughout the route, but the primary challenge comes from the platforming itself.
Continue progressing across the exterior until reaching the final airlock.
After re-entering the station, proceed toward the next encounter.
Most deaths occur when players rush platforming sections or become distracted by enemy fire while navigating narrow pathways.
Allow the fireteam to regroup between jumps and focus on safe movement rather than speed.
Taniks Reborn is the third encounter of Deep Stone Crypt and serves as the culmination of the raid’s Augment mechanics.
For the first time, Operator, Scanner, and Suppressor are all required simultaneously. The fireteam must work together to suppress Taniks, transport Nuclear Cores, and deposit them into the correct containers before Radiation becomes overwhelming.
Success depends on efficient Augment coordination and clear communication.
The encounter takes place inside the Morning Star station as it begins its descent toward Europa.
The arena consists of three primary levels connected by shafts and corridors.
Each level contains Augment Terminals, deposit boxes, and security drones used by the Suppressor.
Throughout the encounter, the fireteam descends through the station while completing Nuclear Core mechanics.
Nuclear Cores spawn throughout the encounter and must be deposited into specific containers.
Carrying a Nuclear Core causes Radiation stacks to build rapidly.
Teams often rotate carriers to prevent Radiation from reaching fatal levels.
The Scanner identifies which deposit boxes are active.
Only the highlighted boxes can receive Nuclear Cores.
Incorrect deposits waste valuable time and can lead to a wipe.
The Operator is responsible for freeing trapped players and assisting with encounter mechanics.
Without the Operator, Nuclear Core carriers can become immobilized and unable to complete their objectives.
The Suppressor must stand beneath three security drones and damage Taniks from each position.
After all three drones have been activated, Taniks becomes suppressed and the encounter can continue.
Radiation accumulates while carrying Nuclear Cores.
If a player reaches ten stacks, they die.
Teams must coordinate transfers carefully to keep Radiation under control.
Begin by defeating the Augment Vandals and assigning Scanner, Operator, and Suppressor responsibilities.
When Nuclear Cores spawn, designated carriers should collect them while the Scanner identifies the active deposit locations.
As carriers move through the station, the Suppressor should activate all three drones and suppress Taniks.
The Operator should remain alert for trapped teammates and free them whenever necessary.
After the Nuclear Cores have been deposited successfully, the fireteam advances to the next level of the station.
Repeat the process on each floor while managing Radiation and Augment responsibilities.
Once the final set of Nuclear Cores has been deposited, the Morning Star crashes into Europa and the encounter is completed.
The most common cause of failure is poor Radiation management.
Players often attempt to carry Nuclear Cores for too long and die before reaching a deposit location.
Many groups also struggle because the Suppressor delays activating drones, which slows progression and creates unnecessary pressure.
Finally, incorrect Scanner callouts can quickly derail an otherwise successful run.
Every player must perform the roles of Operator, Scanner, and Suppressor at least once before the encounter is completed.
Create an Augment rotation before beginning the encounter.
As the encounter progresses, transfer Augments through the terminals so every player performs all three roles during the run.
Tracking responsibilities is more important than speed.
Most failures occur when one player never receives a particular Augment before the encounter ends.
A designated caller should track Augment assignments throughout the encounter.
Complete the Taniks Reborn encounter by suppressing Taniks with only two of the three available drones during each suppression phase.
Before beginning the encounter, determine which two drone locations will be used for every suppression cycle.
The Suppressor should activate only those two drones and avoid the third entirely.
With proper planning, the triumph can be completed while performing the encounter normally.
Most failures occur because the Suppressor activates the third drone out of habit.
Clear communication and a consistent route are the easiest ways to avoid accidental activations.
Additional Champions appear throughout the encounter and significantly increase enemy pressure while transporting Nuclear Cores.
Radiation management becomes less forgiving due to the increased combat difficulty, making efficient transfers even more important.
Teams should prioritize Champion control, survivability, and clear Augment communication over speed.
Taniks, the Abomination is the final encounter of Deep Stone Crypt and serves as the culmination of every major mechanic introduced throughout the raid.
The fireteam must coordinate Scanner and Suppressor responsibilities, manage Radiation stacks, transport Nuclear Cores, and survive increasingly dangerous enemy waves while damaging Taniks.
Success depends on strong communication, efficient Nuclear Core management, and consistent execution during damage phases.
The encounter takes place within a large circular arena on Europa surrounding the wreckage of the Morning Star.
Most teams divide the arena into four primary locations: Spawn, Blue, Orange, and Green.
Each area contains deposit boxes that are used throughout the encounter.
Taniks moves around the arena while enemy waves continuously pressure the fireteam.
Damaging Taniks eventually causes Nuclear Cores to drop.
These cores must be collected and deposited into the correct containers before Radiation becomes fatal.
Depending on the encounter phase, multiple Nuclear Cores may need to be transported simultaneously.
The Scanner identifies which deposit boxes are active.
Only the highlighted boxes can accept Nuclear Cores.
Correct callouts are essential because depositing into the wrong location can quickly result in a wipe.
The Suppressor must stand beneath three security drones positioned around the arena and damage Taniks from each location.
After all three drones have been activated, Taniks becomes suppressed and the encounter can continue.
Radiation accumulates while carrying Nuclear Cores.
If Radiation reaches ten stacks, the affected player dies.
Teams must coordinate transfers carefully and avoid carrying Nuclear Cores for longer than necessary.
Once the Nuclear Cores have been deposited successfully, Taniks moves to the center of the arena and becomes vulnerable.
The fireteam should gather together and maximize damage before the phase ends.
Multiple damage phases are typically required.
When Taniks reaches low health, he enters a final stand phase.
The fireteam must continue dealing damage and defeat him before the wipe timer expires.
Begin by assigning Scanner and Suppressor roles and clearing the initial enemies.
Damage Taniks until Nuclear Cores are generated.
Once the cores appear, designated carriers should collect them while the Scanner identifies the active deposit boxes.
The Suppressor should activate all three security drones and suppress Taniks before the Nuclear Cores are deposited.
Successfully deposit the cores and prepare for damage.
When Taniks moves to the center of the arena, gather as a team and begin the damage phase.
After the damage phase ends, repeat the process by generating additional Nuclear Cores and completing another deposit cycle.
Continue rotating through mechanics and damage phases until Taniks enters final stand.
Defeat him before the wipe timer expires to complete Deep Stone Crypt.
The most common cause of failure is poor Nuclear Core management.
Players often accumulate excessive Radiation stacks or delay deposits while searching for the correct box.
Many groups also lose damage opportunities because the Suppressor is slow to complete drone activations.
Finally, teams should ensure Scanner callouts are clear and consistent throughout the encounter, as incorrect deposits can quickly derail an otherwise successful run.
Deposit all four Nuclear Cores within ten seconds of one another.
Before beginning the encounter, assign a carrier to each Nuclear Core and determine which deposit locations will be used.
Once the Scanner identifies the correct boxes, all carriers should move into position and wait until every player is ready.
When everyone is prepared, deposit all four Nuclear Cores at nearly the same time.
The challenge is significantly easier when the fireteam prioritizes synchronization over speed.
Most failures occur because one carrier deposits too early while another is still moving into position.
Clear communication and a coordinated countdown greatly improve consistency.
Teams should also monitor Radiation carefully while waiting to deposit, as excessive delays can create unnecessary pressure.
Complete the Taniks, the Abomination encounter with all six players carrying a Nuclear Core at least once during a single phase.
During a Nuclear Core phase, transfer the cores between players so every member of the fireteam handles a core before the final deposits occur.
Because only a limited number of Nuclear Cores spawn, careful planning is required to ensure everyone participates.
Establish a transfer order before beginning the encounter and communicate each handoff clearly.
Most failures occur because one or more players never receive a Nuclear Core before the deposits are completed.
Teams should track participation throughout the phase and avoid rushing deposits until every player has handled a core successfully.
Additional Champions appear throughout the encounter and significantly increase enemy pressure between damage phases.
Radiation management becomes less forgiving due to the increased combat difficulty, making efficient Nuclear Core transfers even more important.
Enemy damage output is substantially higher, which makes revives and recovery far more difficult than on Normal difficulty.
Successful Master teams typically prioritize survivability, Champion control, and consistent mechanics over maximizing damage output during any single phase.