
Before beginning Crota’s End, it is important to understand the raid’s core mechanics. Nearly every encounter revolves around the Chalice of Light and the Enlightened buff.
The Chalice of Light is a relic that can be carried by players throughout the raid.
While carrying the Chalice, the wielder gradually fills a meter known as the Presence of Light. Once the meter is full, the player can preserve the Chalice at a designated location and gain the Enlightened buff.
The Chalice can then be claimed by another player so the process can continue.
Managing the Chalice efficiently is one of the most important aspects of Crota’s End.
Enlightened is a temporary buff obtained after preserving the Chalice.
Several raid mechanics require players to become Enlightened before they can interact with specific objects or enemies.
Different encounters use Enlightened in different ways, but players should always be aware of who currently has the buff available.
Certain encounters feature Hive Swordbearers.
Defeating these enemies drops a Hive sword that can be used to interact with encounter mechanics or damage bosses.
Most sword phases are time-sensitive, making efficient execution important.
The Oversoul appears during the final encounter and acts as a wipe mechanic.
When active, players must destroy the Oversoul before its timer expires or the fireteam will be wiped.
Understanding when the Oversoul appears and who is responsible for destroying it is critical during the Crota encounter.
The Hellmouth serves as the opening encounter of Crota’s End and introduces the Chalice of Light mechanic that is used throughout the raid.
The objective is to build a bridge across the Hellmouth by repeatedly becoming Enlightened and depositing that energy into the bridge plate. While the mechanics are simple, this encounter teaches players how to manage the Chalice and rotate Enlightened buffs efficiently.
Once the bridge is complete, the fireteam can descend into the Hellmouth and begin The Abyss encounter.
The encounter takes place on a large platform overlooking the Hellmouth.
A bridge plate sits in the center of the arena and is used to construct the bridge leading deeper into the raid.
Most combat occurs around this plate while Hive enemies continuously spawn from the surrounding area.
The Chalice of Light is picked up at the start of the encounter.
While carrying the Chalice, the wielder gradually fills their Presence of Light meter. Once the meter is full, the player can pass the Chalice to another teammate and gain the Enlightened buff.
The Chalice must continue moving between players throughout the encounter.
Players who have fully charged the Chalice become Enlightened after passing it to another Guardian.
Enlightened players can interact with the bridge plate and contribute progress toward constructing the bridge.
Each Enlightened deposit advances the encounter.
The bridge progresses in stages.
The fireteam must continue rotating the Chalice and depositing Enlightened energy until the bridge is fully formed.
Once complete, the bridge remains active and allows the team to cross into the Hellmouth.
Begin by claiming the Chalice of Light and remaining near the bridge plate.
Allow the first player to fully charge their Presence of Light meter before passing the Chalice to another teammate. The original holder will become Enlightened.
The Enlightened player should immediately interact with the bridge plate to add progress toward constructing the bridge.
Continue rotating the Chalice between players and depositing Enlightened energy into the plate whenever it becomes available.
While performing these rotations, defeat incoming Hive enemies and keep the plate area under control.
Repeat this process until the bridge is fully constructed.
Once the bridge is complete, cross it and descend into the Hellmouth to begin The Abyss.
The most common mistake is holding the Chalice too long after the meter has filled.
Players should pass the Chalice as soon as they are ready so the next player can begin charging their meter.
Many groups also become distracted by enemy spawns and stop progressing the bridge. Enemy control is important, but completing the Chalice rotation should always remain the priority.
Finally, teams should remain grouped near the bridge plate whenever possible. Spreading out unnecessarily can slow progress and create confusion during Chalice transfers.
Secret Chest #1 can be obtained during this encounter.
See the Secret Chest Guide for the full walkthrough.
The Abyss is the first major encounter of Crota’s End and serves as an introduction to the raid’s Chalice of Light mechanics.
The objective is to navigate through the dark tunnels beneath the Hellmouth while managing Weight of Darkness, rotating the Chalice of Light, and surviving endless waves of Hive enemies.
Unlike many raid encounters, success is determined more by movement and teamwork than by combat.
The Abyss consists of a winding path through a dark maze illuminated by lanterns.
These lanterns act as temporary safe zones that help manage Weight of Darkness and provide locations to preserve the Chalice.
The route eventually leads to a large plate near the exit where the fireteam must make a final stand before progressing.
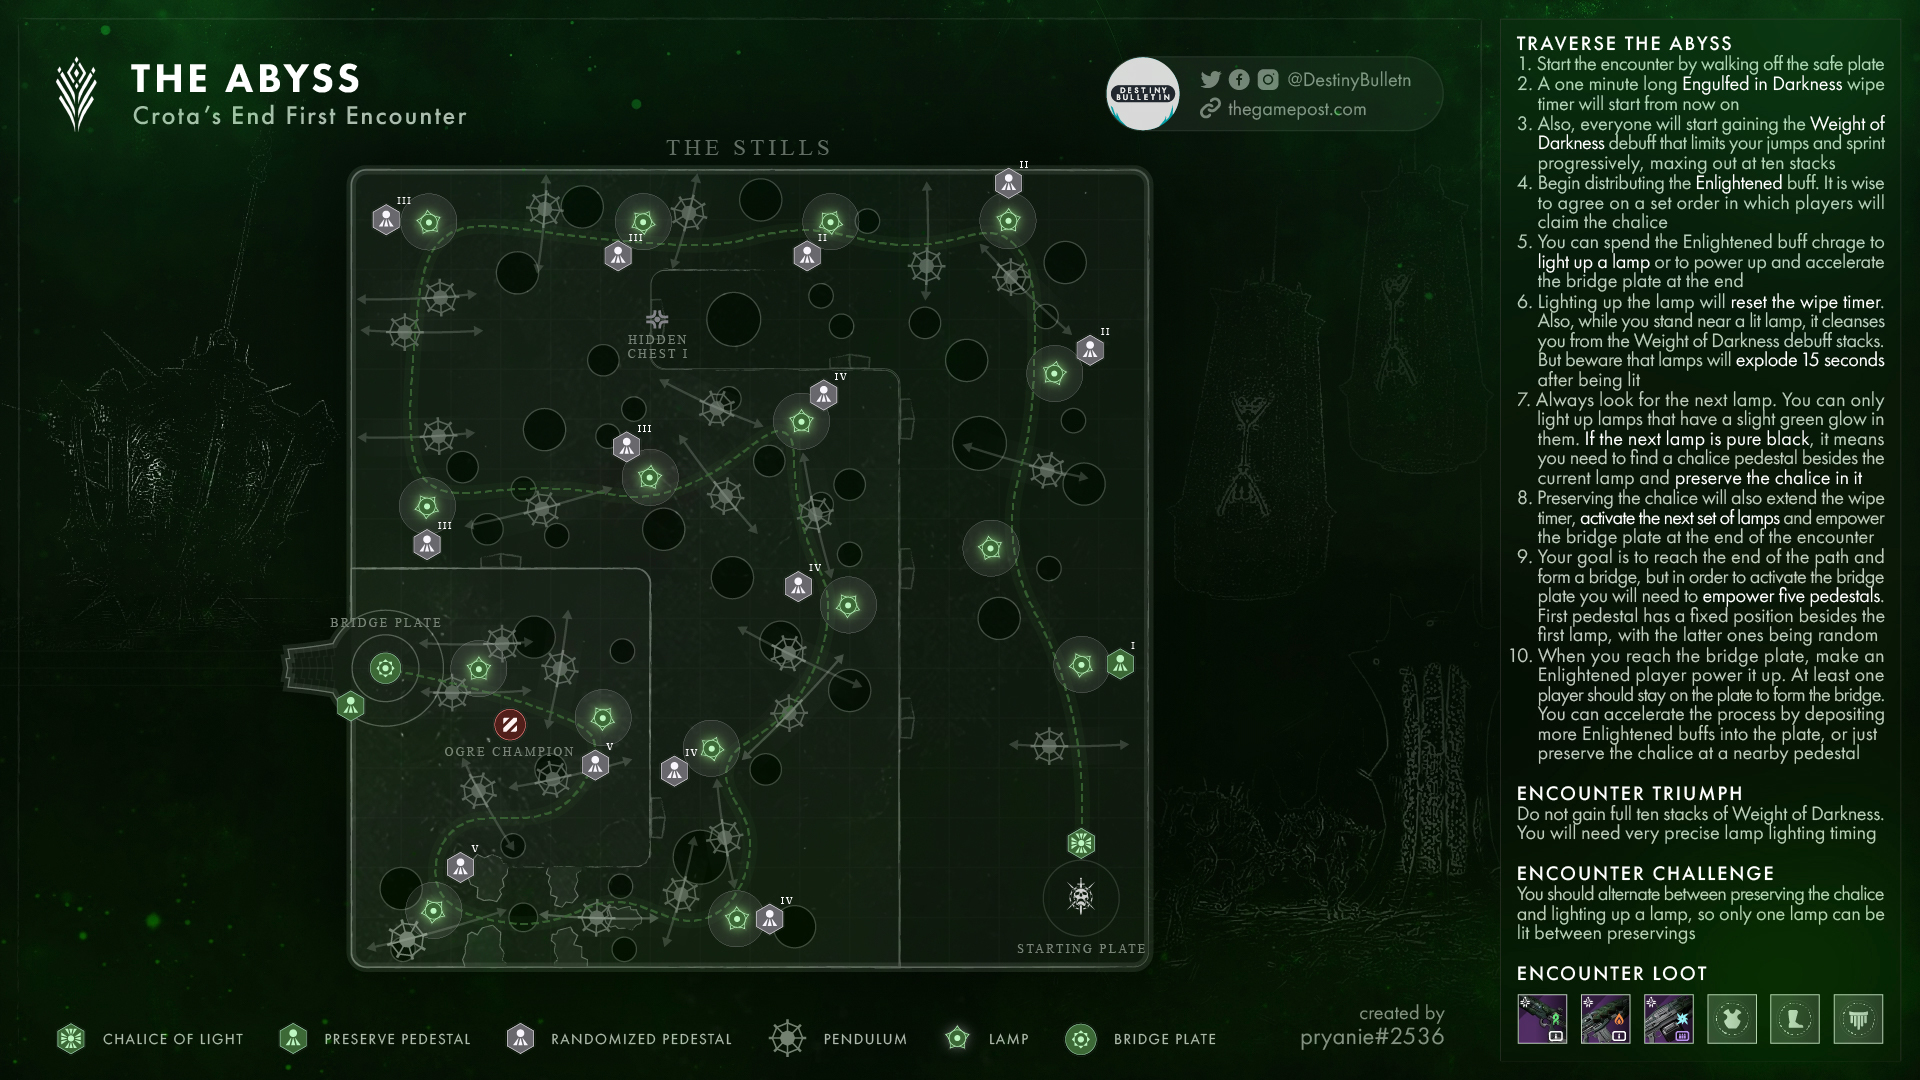
The Chalice of Light remains active throughout the encounter.
Players carrying the Chalice gradually fill their Presence of Light meter. Once full, they can preserve the Chalice at a lantern and become Enlightened.
The Chalice can then be claimed by another player.
Managing Chalice rotations efficiently is essential for completing the encounter smoothly.
Players who preserve the Chalice become Enlightened.
While Enlightened is not heavily utilized during most of the encounter, proper Chalice management ensures the fireteam can continue progressing without delays.
Weight of Darkness is the primary obstacle throughout the encounter.
As players move through the Abyss, stacks of Weight of Darkness accumulate and significantly reduce movement speed.
Standing near a lantern temporarily removes the debuff and allows the team to continue moving efficiently.
Lanterns are scattered throughout the maze and serve as checkpoints for the fireteam.
These locations allow players to recover from Weight of Darkness and preserve the Chalice before continuing deeper into the encounter.
At the end of the Abyss, players must gather on a plate and defend the area while the exit bridge forms.
Once the bridge is complete, the encounter ends.
Begin by claiming the Chalice of Light and moving toward the first lantern.
As the Chalice holder fills their Presence of Light meter, the rest of the fireteam should focus on clearing enemies and staying together.
When the team reaches a lantern, preserve the Chalice and allow another player to claim it. Continue rotating the Chalice as the group progresses deeper into the maze.
Move steadily from lantern to lantern while managing Weight of Darkness. Spending too much time in one location often causes enemy pressure to build rapidly.
As the team approaches the final section, additional Hive enemies and Ogres begin appearing near the exit.
Push toward the final plate and gather the entire fireteam before beginning the final stand.
Remain on the plate while defending against incoming enemies. Once the bridge is complete, cross it to finish the encounter.
The most common mistake is moving too slowly between lanterns.
The encounter becomes significantly harder when the fireteam allows enemy spawns to accumulate.
Many groups also struggle because they separate from one another while navigating the maze. Staying together makes Chalice rotations and revives far easier.
Finally, players often hold the Chalice longer than necessary. Consistent rotations help maintain momentum and prevent confusion later in the encounter.
Players may only preserve the Chalice of Light once during the encounter.
Every member of the fireteam must participate in the Chalice rotation before any player preserves the Chalice a second time.
Establish a preservation order before beginning the encounter.
As the team moves through the Abyss, each player should preserve the Chalice exactly once.
Because there are enough lanterns throughout the encounter, the challenge can be completed naturally as long as everyone follows the planned rotation.
Most failures occur when a player accidentally preserves the Chalice twice.
Keeping a designated caller responsible for tracking the preservation order makes the challenge much easier to manage.
Complete The Abyss without activating any lantern detonations.
Move efficiently from lantern to lantern and avoid remaining in one location longer than necessary.
The encounter rewards steady movement rather than defensive play. By continuing forward and maintaining momentum, the fireteam can avoid triggering lantern explosions.
Most failures occur because teams stop to fight enemies around a lantern for too long.
Prioritizing movement over combat is the key to completing this triumph successfully.
The Abyss becomes significantly more dangerous on Master difficulty.
Unstoppable Ogres and additional Hive enemies appear throughout the encounter, creating much greater pressure during movement sections.
Because Weight of Darkness limits mobility, Champion control becomes extremely important. Teams should coordinate anti-Champion weapons before beginning the encounter and focus heavily on survival while moving between lanterns.
Maintaining a consistent Chalice rotation and staying together as a group is even more important on Master difficulty than on Normal mode.
The Oversoul Throne Bridge encounter requires the fireteam to cross a massive chasm while managing the Chalice of Light, Enlightened buffs, Hive swords, and Gatekeepers.
Unlike The Abyss, this encounter forces the team to split between two sides of the bridge and coordinate their actions carefully. Success depends on maintaining control of both sides of the arena while gradually moving the entire fireteam across.
The encounter takes place around a large bridge spanning a deep chasm.
The starting side contains a central plate used to construct the bridge and several totems positioned around the arena.
The far side contains Gatekeepers and additional enemy spawns that must be defeated before the encounter can progress safely.
Throughout the encounter, players will be split between both sides of the bridge.
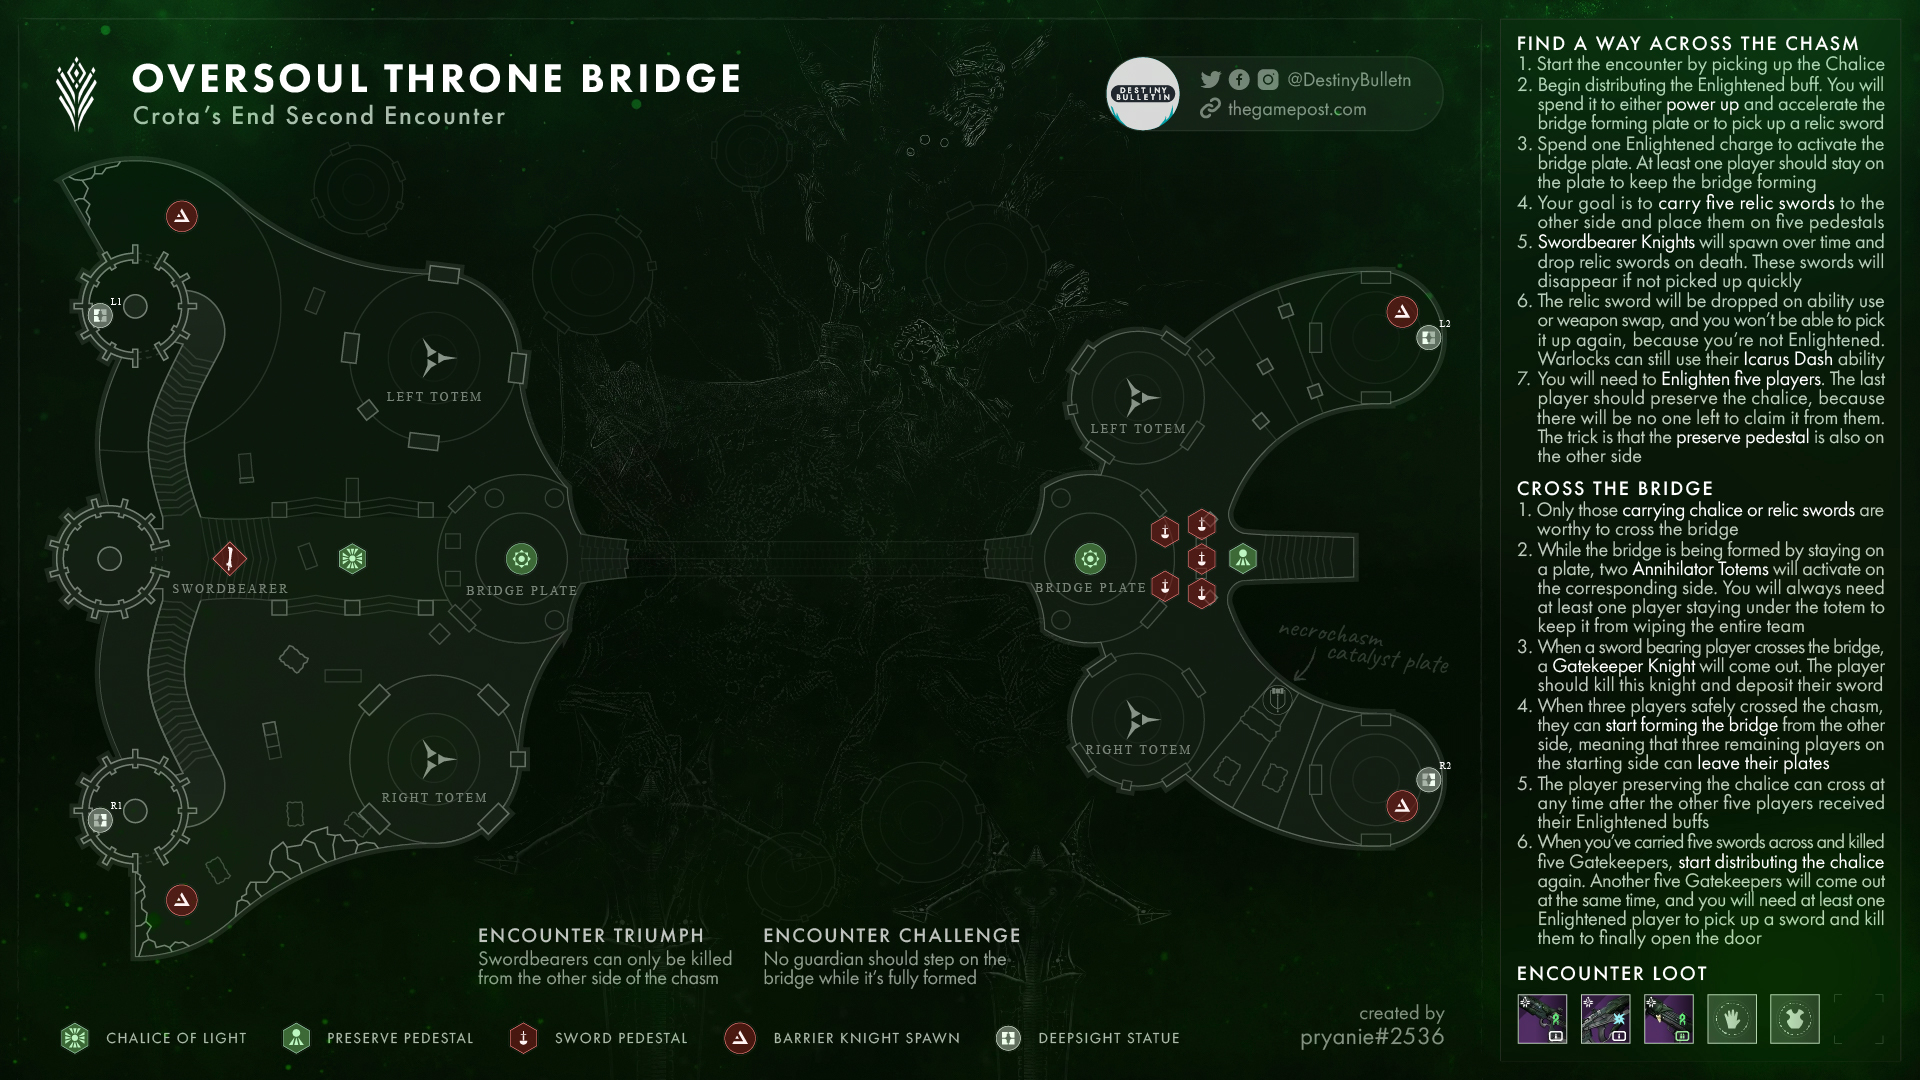
The Chalice functions similarly to previous encounters.
Players must rotate the Chalice and become Enlightened throughout the encounter.
Proper Chalice management is required to keep the bridge active and defeat Gatekeepers.
Players become Enlightened by charging and preserving the Chalice.
Only Enlightened players can damage Gatekeepers.
Because Gatekeepers appear repeatedly throughout the encounter, teams should always know who currently has Enlightened available.
Standing on the central plate constructs the bridge.
The plate must remain occupied to keep the bridge active.
If the plate becomes unattended for too long, progress can be lost and the encounter becomes significantly more difficult.
Swordbearers periodically spawn on the starting side of the bridge.
Defeating a Swordbearer drops a Hive sword.
These swords are used to defeat Gatekeepers on the opposite side.
Gatekeepers defend the far side of the bridge.
These enemies can only be damaged by Enlightened players wielding Hive swords.
Defeating Gatekeepers is the primary objective of the encounter.
Begin by claiming the Chalice of Light and assigning players to maintain control of the bridge plate and surrounding totems.
Rotate the Chalice until a player becomes Enlightened. Meanwhile, defeat incoming Hive enemies and prepare for the first Swordbearer.
When a Swordbearer appears, defeat it and allow the designated player to claim the Hive sword.
The Enlightened sword bearer should cross the bridge and defeat the Gatekeeper waiting on the opposite side.
After the Gatekeeper is defeated, that player remains on the far side to help establish control while another player prepares to cross.
Continue rotating the Chalice, defeating Swordbearers, and sending players across the bridge one at a time.
As more Guardians reach the far side, maintaining control becomes easier.
Repeat the process until all six players have crossed the bridge and the final Gatekeeper has been defeated.
Once the entire fireteam is assembled on the far side, the encounter is complete.
The most common cause of failure is poor Chalice management.
If players do not coordinate Enlightened rotations, Gatekeepers can remain alive for too long and overwhelm the team.
Many groups also struggle because they send players across the bridge too quickly. Losing control of the starting side often leads to unnecessary deaths and delayed progress.
Finally, players should avoid picking up Hive swords before the designated sword bearer is ready. Wasting a sword can significantly slow encounter completion.
Players may not use the same bridge crossing method twice in a row.
During the encounter, teams must alternate how players cross between sides of the bridge.
Establish a crossing order before beginning the encounter and ensure the team alternates responsibilities correctly throughout the fight.
Because the challenge revolves around maintaining balance between both sides of the arena, communication is far more important than speed.
Focus on executing normal mechanics cleanly while keeping track of the required rotation.
Most failures occur because players lose track of the crossing order and accidentally repeat the same method during consecutive transitions.
Having one player call out each crossing assignment helps prevent confusion.
Complete the Oversoul Throne Bridge encounter without allowing any player to die.
Maintain a steady pace throughout the encounter and prioritize survivability over speed.
Players crossing the bridge should wait until the far side is secure before attempting risky pushes. Teams should focus on eliminating high-priority threats immediately and avoid unnecessary exposure while carrying Hive swords.
Because a single death fails the triumph, defensive supers and healing abilities can greatly improve consistency.
Most failures occur when players rush bridge crossings before the far side has been stabilized.
Another common issue is losing a sword bearer while attempting to defeat a Gatekeeper. Teams should ensure the route is clear before committing to a crossing.
Playing patiently and prioritizing survival is the most reliable way to complete this triumph.
Barrier Champions appear throughout the encounter and create additional pressure on both sides of the bridge.
Gatekeepers are significantly more dangerous and can quickly eliminate players who are not prepared to engage them immediately.
Because deaths are much harder to recover from on Master difficulty, teams should focus heavily on survivability and Champion control.
Coordinated Chalice rotations become even more important, as losing access to Enlightened at the wrong time can quickly lead to a wipe.
Secret Chest #2 can be obtained during this traversal section.
See the Secret Chest Guide for the full walkthrough.
The Thrallway is the traversal section between the Oversoul Throne Bridge encounter and Ir Yût, the Deathsinger.
After crossing the bridge, the fireteam descends deeper into the Hellmouth through a series of Hive tunnels and chambers filled with endless Thrall.
Unlike most traversal sections, players are constantly under attack while progressing toward the next encounter.
The route is fairly linear, but several jumps and narrow pathways can make movement difficult when surrounded by enemies.
Continue pushing forward through the tunnels while eliminating threats that block the path. Avoid lingering too long in any one location, as Thrall will continue spawning throughout the section.
Eventually, the path opens into Ir Yût’s chamber, where the next encounter begins.
Ir Yût serves as the final encounter before Crota and tests the fireteam’s ability to manage Enlightened buffs, coordinate room clears, and defeat a boss before a wipe mechanic activates.
The encounter revolves around opening Wizard chambers, eliminating key targets, and damaging Ir Yût before her Deathsong is completed.
Strong communication and efficient execution are critical to success.
The encounter takes place inside a large circular chamber.
Ir Yût begins the encounter on an elevated balcony overlooking the arena.
Several side rooms surround the chamber and contain Wizards that must be defeated before damage can begin.
The Chalice of Light spawns near the center of the arena and remains active throughout the encounter.
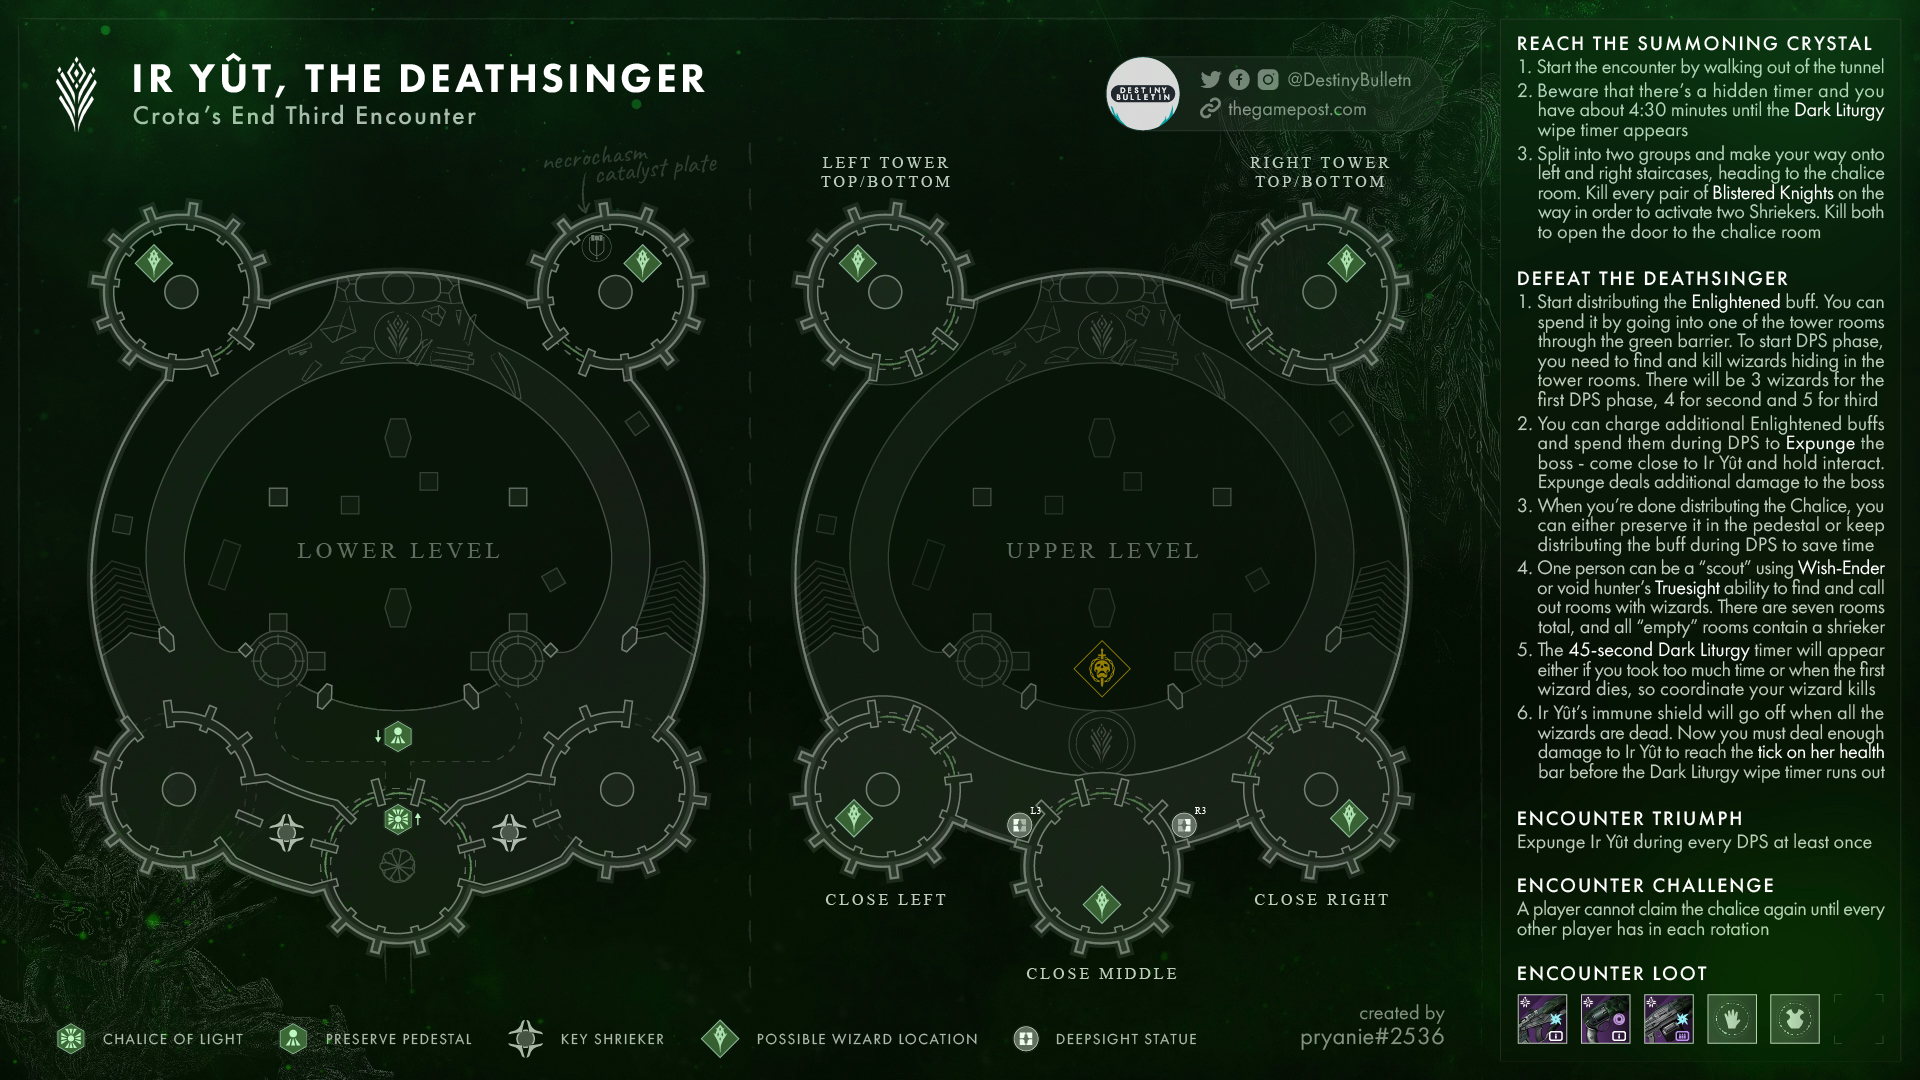
The Chalice must be rotated throughout the encounter.
Players carrying the Chalice build Presence of Light and eventually become Enlightened after passing it to another Guardian.
Proper Chalice management is essential for opening Wizard rooms and starting damage phases.
Players must be Enlightened to remove the barriers protecting the Wizard rooms.
Without Enlightened, the team cannot access or eliminate the Wizards required to progress the encounter.
Several Wizards spawn throughout the arena.
These Wizards must be defeated before Ir Yût becomes vulnerable.
Failure to clear the required Wizards prevents the damage phase from starting.
Ir Yût continuously channels her Deathsong throughout the encounter.
If the timer expires before enough damage is dealt, the fireteam is wiped.
Because of this, teams must move quickly and avoid unnecessary delays.
Once the required Wizards have been defeated, Ir Yût becomes vulnerable.
The fireteam can then gather and damage the boss before immunity returns.
Begin by claiming the Chalice of Light and establishing a rotation order.
As players become Enlightened, use the buff to remove the barriers protecting the Wizard rooms.
Split into teams and eliminate the Wizards as efficiently as possible.
Once the final Wizard has been defeated, regroup near Ir Yût and prepare for damage.
Use damage-enhancing abilities, supers, and heavy weapons to maximize damage output.
When Ir Yût becomes immune again, restart the Chalice rotation and prepare for another Wizard-clearing phase.
Continue repeating the process until Ir Yût is defeated.
The most common cause of failure is slow Wizard clears.
Teams that spend too much time setting up often allow the Deathsong timer to become a serious threat.
Many groups also struggle with Chalice management and fail to have enough Enlightened players available when Wizard rooms need to be opened.
Finally, players should regroup quickly once the final Wizard dies. Delayed damage phases often result in unnecessary extra cycles.
The Chalice of Light must be preserved by every member of the fireteam before any player preserves it a second time.
Establish a preservation order before starting the encounter.
As the Chalice rotates through the team, ensure every player preserves it once before restarting the cycle.
Because the encounter naturally requires multiple Chalice rotations, the challenge can be completed without significantly altering normal strategy.
Most failures occur when a player accidentally preserves the Chalice twice before the entire fireteam has participated.
Keeping a designated caller responsible for tracking the order makes the challenge significantly easier.
Complete the Ir Yût encounter without allowing any player to defeat more than one Wizard.
Assign specific Wizards to individual players before beginning the encounter.
Each player should defeat only their assigned Wizard and avoid contributing damage to additional Wizard kills.
Clear assignments and communication make the triumph straightforward to complete.
Most failures occur when multiple players damage the same Wizard and an unintended player secures the final blow.
Confirming assignments before opening the Wizard rooms helps prevent confusion.
Barrier Champions appear throughout the encounter on Master difficulty.
Enemy density is significantly increased, especially near the Wizard rooms and central arena.
Because clearing Wizards quickly is essential, many teams assign dedicated Champion-control roles before beginning the encounter.
Survivability becomes much more important on Master difficulty, and defensive supers are often used to secure damage phases safely.
Crota, Son of Oryx is the final encounter of Crota’s End and combines every major mechanic introduced throughout the raid.
The fireteam must manage the Chalice of Light, become Enlightened, defeat Swordbearers, use Hive swords to break Crota’s defenses, and destroy the Oversoul whenever it appears.
Success requires precise coordination and consistent execution throughout multiple damage phases.
The encounter takes place inside Crota’s throne room.
A large central platform serves as the primary combat area while towers and elevated positions surround the arena.
The Chalice of Light spawns near the center of the room and remains active throughout the encounter.
Hive enemies, Swordbearers, Ogres, Boomers, and Crota himself will continuously pressure the fireteam during the fight.
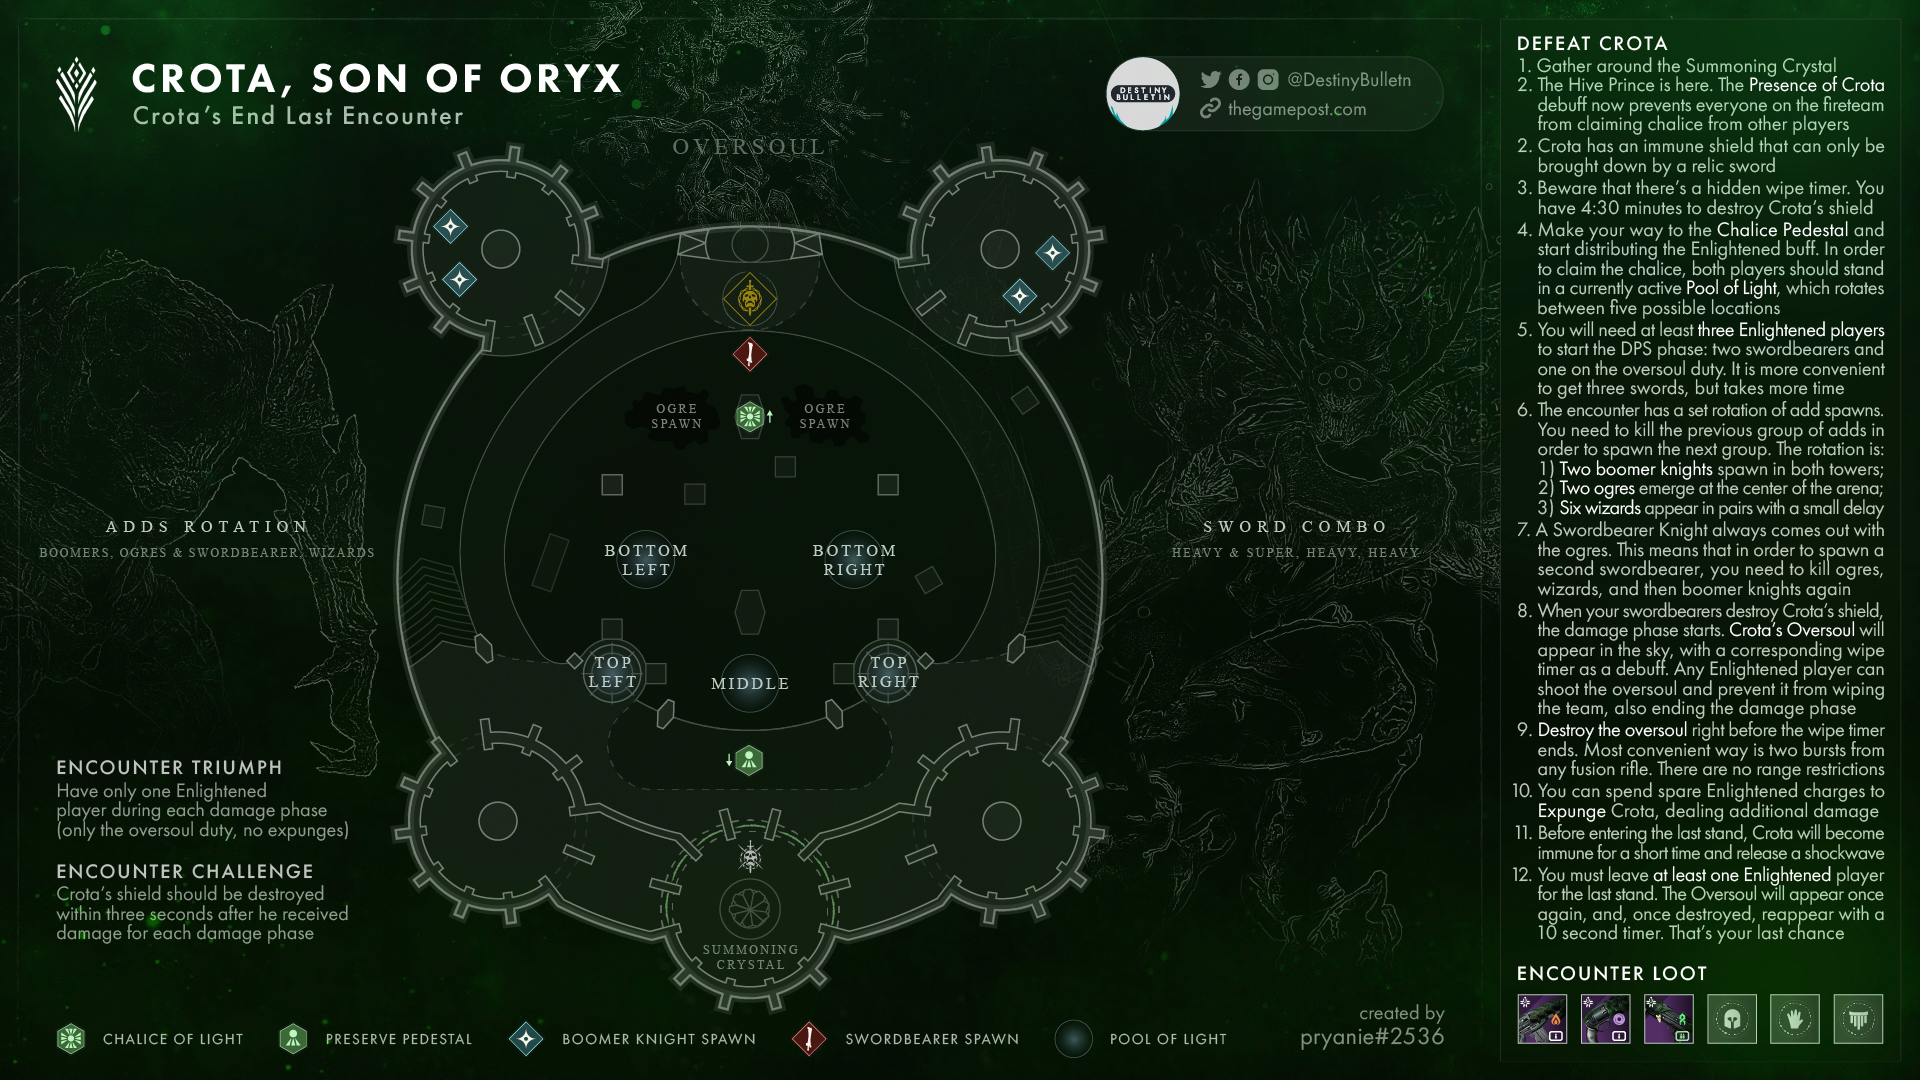
The Chalice remains active throughout the encounter.
Players must rotate the Chalice and become Enlightened in order to interact with several encounter mechanics.
Maintaining a consistent Chalice rotation is critical for keeping the encounter under control.
Enlightened players can interact with key objectives throughout the fight.
Most importantly, Enlightened players can remove Crota’s shield, allowing the sword bearer to stagger him and begin a damage phase.
Swordbearers periodically spawn in the arena.
Defeating a Swordbearer drops a Hive sword.
These swords are required to stagger Crota and deal meaningful damage during damage phases.
The Oversoul appears after damage phases and during specific portions of the encounter.
When active, the Oversoul must be destroyed before its timer expires.
Failure to destroy the Oversoul results in an immediate wipe.
After damage phases, Ogres spawn in the towers on either side of the arena.
These enemies should be eliminated quickly before they overwhelm the fireteam.
Once Crota’s shield has been removed, the sword bearer can stagger him.
This creates a short damage window where the entire fireteam can focus damage on the boss.
Multiple damage phases are usually required to complete the encounter.
Begin by claiming the Chalice of Light and establishing a rotation order.
Clear the initial enemies while building Enlightened buffs through Chalice rotations.
When the Swordbearer appears, defeat it and allow the designated player to claim the Hive sword.
As the sword bearer prepares for damage, an Enlightened player should remove Crota’s shield.
The sword bearer then staggers Crota and creates a damage opportunity for the fireteam.
Use heavy weapons, supers, and damage-enhancing abilities to maximize damage output during this window.
After the damage phase ends, destroy the Oversoul as quickly as possible.
Defeat any Ogres and additional enemies that spawn before preparing for the next cycle.
Repeat the process until Crota reaches final stand.
During final stand, continue staggering Crota, destroying Oversouls, and dealing damage until the boss is defeated.
The most common cause of failure is poor communication during damage phases.
The sword bearer, Enlightened players, and damage team must all coordinate their actions carefully to avoid wasting damage opportunities.
Many groups also struggle with Oversoul management. Delayed reactions can quickly result in a wipe.
Finally, teams should prioritize Ogre eliminations after damage phases. Allowing these enemies to remain alive often creates unnecessary pressure and reduces survivability.
Many groups fail because they focus entirely on damage and forget to prepare an Oversoul player.
Boomer Knights are another common source of deaths. Allowing them to remain active can quickly overwhelm the team and disrupt damage preparation.
Poor Chalice management also creates problems later in the encounter. If players are not becoming Enlightened consistently, the team may lack enough sword users or Oversoul shooters when needed.
Finally, some teams destroy the Oversoul too early. Doing so shortens the damage phase and often forces an additional cycle.
Every player must use a Hive sword to damage Crota at least once before the encounter is completed.
Rotate sword responsibilities throughout the fight.
Assign a different sword bearer for each damage phase and keep track of which players have already participated.
Most groups can complete the challenge naturally by using a new sword bearer during every phase.
Most failures occur when experienced sword players handle multiple damage phases while other players never receive an opportunity.
Tracking participation from the beginning of the encounter makes the challenge much easier to complete.
Defeat Crota without any player being hit by Crota’s sword attack.
Maintain proper positioning throughout the encounter and avoid standing near Crota outside of planned damage windows.
Sword bearers should perform their responsibilities efficiently and retreat as soon as their portion of the damage phase is complete.
The remainder of the fireteam should remain at safe distances whenever possible.
Most failures occur when players remain too close to Crota after a stagger phase ends.
Aggressive positioning often leads to unnecessary sword attacks and failed triumph attempts.
Patience and disciplined movement are the keys to success.
Unstoppable Champions appear throughout the encounter and significantly increase enemy pressure.
Ogres, Boomers, and other Hive enemies become much more dangerous, making arena control a constant priority.
The Oversoul remains the most important wipe mechanic, but recovering from mistakes becomes substantially more difficult on Master difficulty.
Most successful teams prioritize survivability, Champion control, and clean mechanical execution over maximizing damage output.
Defensive supers, healing effects, and coordinated Champion stuns are often the difference between a successful clear and a wipe.
Before beginning Crota’s End, it is important to understand the raid’s core mechanics. Nearly every encounter revolves around the Chalice of Light and the Enlightened buff.
The Chalice of Light is a relic that can be carried by players throughout the raid.
While carrying the Chalice, the wielder gradually fills a meter known as the Presence of Light. Once the meter is full, the player can preserve the Chalice at a designated location and gain the Enlightened buff.
The Chalice can then be claimed by another player so the process can continue.
Managing the Chalice efficiently is one of the most important aspects of Crota’s End.
Enlightened is a temporary buff obtained after preserving the Chalice.
Several raid mechanics require players to become Enlightened before they can interact with specific objects or enemies.
Different encounters use Enlightened in different ways, but players should always be aware of who currently has the buff available.
Certain encounters feature Hive Swordbearers.
Defeating these enemies drops a Hive sword that can be used to interact with encounter mechanics or damage bosses.
Most sword phases are time-sensitive, making efficient execution important.
The Oversoul appears during the final encounter and acts as a wipe mechanic.
When active, players must destroy the Oversoul before its timer expires or the fireteam will be wiped.
Understanding when the Oversoul appears and who is responsible for destroying it is critical during the Crota encounter.
The Hellmouth serves as the opening encounter of Crota’s End and introduces the Chalice of Light mechanic that is used throughout the raid.
The objective is to build a bridge across the Hellmouth by repeatedly becoming Enlightened and depositing that energy into the bridge plate. While the mechanics are simple, this encounter teaches players how to manage the Chalice and rotate Enlightened buffs efficiently.
Once the bridge is complete, the fireteam can descend into the Hellmouth and begin The Abyss encounter.
The encounter takes place on a large platform overlooking the Hellmouth.
A bridge plate sits in the center of the arena and is used to construct the bridge leading deeper into the raid.
Most combat occurs around this plate while Hive enemies continuously spawn from the surrounding area.
The Chalice of Light is picked up at the start of the encounter.
While carrying the Chalice, the wielder gradually fills their Presence of Light meter. Once the meter is full, the player can pass the Chalice to another teammate and gain the Enlightened buff.
The Chalice must continue moving between players throughout the encounter.
Players who have fully charged the Chalice become Enlightened after passing it to another Guardian.
Enlightened players can interact with the bridge plate and contribute progress toward constructing the bridge.
Each Enlightened deposit advances the encounter.
The bridge progresses in stages.
The fireteam must continue rotating the Chalice and depositing Enlightened energy until the bridge is fully formed.
Once complete, the bridge remains active and allows the team to cross into the Hellmouth.
Begin by claiming the Chalice of Light and remaining near the bridge plate.
Allow the first player to fully charge their Presence of Light meter before passing the Chalice to another teammate. The original holder will become Enlightened.
The Enlightened player should immediately interact with the bridge plate to add progress toward constructing the bridge.
Continue rotating the Chalice between players and depositing Enlightened energy into the plate whenever it becomes available.
While performing these rotations, defeat incoming Hive enemies and keep the plate area under control.
Repeat this process until the bridge is fully constructed.
Once the bridge is complete, cross it and descend into the Hellmouth to begin The Abyss.
The most common mistake is holding the Chalice too long after the meter has filled.
Players should pass the Chalice as soon as they are ready so the next player can begin charging their meter.
Many groups also become distracted by enemy spawns and stop progressing the bridge. Enemy control is important, but completing the Chalice rotation should always remain the priority.
Finally, teams should remain grouped near the bridge plate whenever possible. Spreading out unnecessarily can slow progress and create confusion during Chalice transfers.
Secret Chest #1 can be obtained during this encounter.
See the Secret Chest Guide for the full walkthrough.
The Abyss is the first major encounter of Crota’s End and serves as an introduction to the raid’s Chalice of Light mechanics.
The objective is to navigate through the dark tunnels beneath the Hellmouth while managing Weight of Darkness, rotating the Chalice of Light, and surviving endless waves of Hive enemies.
Unlike many raid encounters, success is determined more by movement and teamwork than by combat.
The Abyss consists of a winding path through a dark maze illuminated by lanterns.
These lanterns act as temporary safe zones that help manage Weight of Darkness and provide locations to preserve the Chalice.
The route eventually leads to a large plate near the exit where the fireteam must make a final stand before progressing.
The Chalice of Light remains active throughout the encounter.
Players carrying the Chalice gradually fill their Presence of Light meter. Once full, they can preserve the Chalice at a lantern and become Enlightened.
The Chalice can then be claimed by another player.
Managing Chalice rotations efficiently is essential for completing the encounter smoothly.
Players who preserve the Chalice become Enlightened.
While Enlightened is not heavily utilized during most of the encounter, proper Chalice management ensures the fireteam can continue progressing without delays.
Weight of Darkness is the primary obstacle throughout the encounter.
As players move through the Abyss, stacks of Weight of Darkness accumulate and significantly reduce movement speed.
Standing near a lantern temporarily removes the debuff and allows the team to continue moving efficiently.
Lanterns are scattered throughout the maze and serve as checkpoints for the fireteam.
These locations allow players to recover from Weight of Darkness and preserve the Chalice before continuing deeper into the encounter.
At the end of the Abyss, players must gather on a plate and defend the area while the exit bridge forms.
Once the bridge is complete, the encounter ends.
Begin by claiming the Chalice of Light and moving toward the first lantern.
As the Chalice holder fills their Presence of Light meter, the rest of the fireteam should focus on clearing enemies and staying together.
When the team reaches a lantern, preserve the Chalice and allow another player to claim it. Continue rotating the Chalice as the group progresses deeper into the maze.
Move steadily from lantern to lantern while managing Weight of Darkness. Spending too much time in one location often causes enemy pressure to build rapidly.
As the team approaches the final section, additional Hive enemies and Ogres begin appearing near the exit.
Push toward the final plate and gather the entire fireteam before beginning the final stand.
Remain on the plate while defending against incoming enemies. Once the bridge is complete, cross it to finish the encounter.
The most common mistake is moving too slowly between lanterns.
The encounter becomes significantly harder when the fireteam allows enemy spawns to accumulate.
Many groups also struggle because they separate from one another while navigating the maze. Staying together makes Chalice rotations and revives far easier.
Finally, players often hold the Chalice longer than necessary. Consistent rotations help maintain momentum and prevent confusion later in the encounter.
Players may only preserve the Chalice of Light once during the encounter.
Every member of the fireteam must participate in the Chalice rotation before any player preserves the Chalice a second time.
Establish a preservation order before beginning the encounter.
As the team moves through the Abyss, each player should preserve the Chalice exactly once.
Because there are enough lanterns throughout the encounter, the challenge can be completed naturally as long as everyone follows the planned rotation.
Most failures occur when a player accidentally preserves the Chalice twice.
Keeping a designated caller responsible for tracking the preservation order makes the challenge much easier to manage.
Complete The Abyss without activating any lantern detonations.
Move efficiently from lantern to lantern and avoid remaining in one location longer than necessary.
The encounter rewards steady movement rather than defensive play. By continuing forward and maintaining momentum, the fireteam can avoid triggering lantern explosions.
Most failures occur because teams stop to fight enemies around a lantern for too long.
Prioritizing movement over combat is the key to completing this triumph successfully.
The Abyss becomes significantly more dangerous on Master difficulty.
Unstoppable Ogres and additional Hive enemies appear throughout the encounter, creating much greater pressure during movement sections.
Because Weight of Darkness limits mobility, Champion control becomes extremely important. Teams should coordinate anti-Champion weapons before beginning the encounter and focus heavily on survival while moving between lanterns.
Maintaining a consistent Chalice rotation and staying together as a group is even more important on Master difficulty than on Normal mode.
The Oversoul Throne Bridge encounter requires the fireteam to cross a massive chasm while managing the Chalice of Light, Enlightened buffs, Hive swords, and Gatekeepers.
Unlike The Abyss, this encounter forces the team to split between two sides of the bridge and coordinate their actions carefully. Success depends on maintaining control of both sides of the arena while gradually moving the entire fireteam across.
The encounter takes place around a large bridge spanning a deep chasm.
The starting side contains a central plate used to construct the bridge and several totems positioned around the arena.
The far side contains Gatekeepers and additional enemy spawns that must be defeated before the encounter can progress safely.
Throughout the encounter, players will be split between both sides of the bridge.
The Chalice functions similarly to previous encounters.
Players must rotate the Chalice and become Enlightened throughout the encounter.
Proper Chalice management is required to keep the bridge active and defeat Gatekeepers.
Players become Enlightened by charging and preserving the Chalice.
Only Enlightened players can damage Gatekeepers.
Because Gatekeepers appear repeatedly throughout the encounter, teams should always know who currently has Enlightened available.
Standing on the central plate constructs the bridge.
The plate must remain occupied to keep the bridge active.
If the plate becomes unattended for too long, progress can be lost and the encounter becomes significantly more difficult.
Swordbearers periodically spawn on the starting side of the bridge.
Defeating a Swordbearer drops a Hive sword.
These swords are used to defeat Gatekeepers on the opposite side.
Gatekeepers defend the far side of the bridge.
These enemies can only be damaged by Enlightened players wielding Hive swords.
Defeating Gatekeepers is the primary objective of the encounter.
Begin by claiming the Chalice of Light and assigning players to maintain control of the bridge plate and surrounding totems.
Rotate the Chalice until a player becomes Enlightened. Meanwhile, defeat incoming Hive enemies and prepare for the first Swordbearer.
When a Swordbearer appears, defeat it and allow the designated player to claim the Hive sword.
The Enlightened sword bearer should cross the bridge and defeat the Gatekeeper waiting on the opposite side.
After the Gatekeeper is defeated, that player remains on the far side to help establish control while another player prepares to cross.
Continue rotating the Chalice, defeating Swordbearers, and sending players across the bridge one at a time.
As more Guardians reach the far side, maintaining control becomes easier.
Repeat the process until all six players have crossed the bridge and the final Gatekeeper has been defeated.
Once the entire fireteam is assembled on the far side, the encounter is complete.
The most common cause of failure is poor Chalice management.
If players do not coordinate Enlightened rotations, Gatekeepers can remain alive for too long and overwhelm the team.
Many groups also struggle because they send players across the bridge too quickly. Losing control of the starting side often leads to unnecessary deaths and delayed progress.
Finally, players should avoid picking up Hive swords before the designated sword bearer is ready. Wasting a sword can significantly slow encounter completion.
Players may not use the same bridge crossing method twice in a row.
During the encounter, teams must alternate how players cross between sides of the bridge.
Establish a crossing order before beginning the encounter and ensure the team alternates responsibilities correctly throughout the fight.
Because the challenge revolves around maintaining balance between both sides of the arena, communication is far more important than speed.
Focus on executing normal mechanics cleanly while keeping track of the required rotation.
Most failures occur because players lose track of the crossing order and accidentally repeat the same method during consecutive transitions.
Having one player call out each crossing assignment helps prevent confusion.
Complete the Oversoul Throne Bridge encounter without allowing any player to die.
Maintain a steady pace throughout the encounter and prioritize survivability over speed.
Players crossing the bridge should wait until the far side is secure before attempting risky pushes. Teams should focus on eliminating high-priority threats immediately and avoid unnecessary exposure while carrying Hive swords.
Because a single death fails the triumph, defensive supers and healing abilities can greatly improve consistency.
Most failures occur when players rush bridge crossings before the far side has been stabilized.
Another common issue is losing a sword bearer while attempting to defeat a Gatekeeper. Teams should ensure the route is clear before committing to a crossing.
Playing patiently and prioritizing survival is the most reliable way to complete this triumph.
Barrier Champions appear throughout the encounter and create additional pressure on both sides of the bridge.
Gatekeepers are significantly more dangerous and can quickly eliminate players who are not prepared to engage them immediately.
Because deaths are much harder to recover from on Master difficulty, teams should focus heavily on survivability and Champion control.
Coordinated Chalice rotations become even more important, as losing access to Enlightened at the wrong time can quickly lead to a wipe.
Secret Chest #2 can be obtained during this traversal section.
See the Secret Chest Guide for the full walkthrough.
The Thrallway is the traversal section between the Oversoul Throne Bridge encounter and Ir Yût, the Deathsinger.
After crossing the bridge, the fireteam descends deeper into the Hellmouth through a series of Hive tunnels and chambers filled with endless Thrall.
Unlike most traversal sections, players are constantly under attack while progressing toward the next encounter.
The route is fairly linear, but several jumps and narrow pathways can make movement difficult when surrounded by enemies.
Continue pushing forward through the tunnels while eliminating threats that block the path. Avoid lingering too long in any one location, as Thrall will continue spawning throughout the section.
Eventually, the path opens into Ir Yût’s chamber, where the next encounter begins.
Ir Yût serves as the final encounter before Crota and tests the fireteam’s ability to manage Enlightened buffs, coordinate room clears, and defeat a boss before a wipe mechanic activates.
The encounter revolves around opening Wizard chambers, eliminating key targets, and damaging Ir Yût before her Deathsong is completed.
Strong communication and efficient execution are critical to success.
The encounter takes place inside a large circular chamber.
Ir Yût begins the encounter on an elevated balcony overlooking the arena.
Several side rooms surround the chamber and contain Wizards that must be defeated before damage can begin.
The Chalice of Light spawns near the center of the arena and remains active throughout the encounter.
The Chalice must be rotated throughout the encounter.
Players carrying the Chalice build Presence of Light and eventually become Enlightened after passing it to another Guardian.
Proper Chalice management is essential for opening Wizard rooms and starting damage phases.
Players must be Enlightened to remove the barriers protecting the Wizard rooms.
Without Enlightened, the team cannot access or eliminate the Wizards required to progress the encounter.
Several Wizards spawn throughout the arena.
These Wizards must be defeated before Ir Yût becomes vulnerable.
Failure to clear the required Wizards prevents the damage phase from starting.
Ir Yût continuously channels her Deathsong throughout the encounter.
If the timer expires before enough damage is dealt, the fireteam is wiped.
Because of this, teams must move quickly and avoid unnecessary delays.
Once the required Wizards have been defeated, Ir Yût becomes vulnerable.
The fireteam can then gather and damage the boss before immunity returns.
Begin by claiming the Chalice of Light and establishing a rotation order.
As players become Enlightened, use the buff to remove the barriers protecting the Wizard rooms.
Split into teams and eliminate the Wizards as efficiently as possible.
Once the final Wizard has been defeated, regroup near Ir Yût and prepare for damage.
Use damage-enhancing abilities, supers, and heavy weapons to maximize damage output.
When Ir Yût becomes immune again, restart the Chalice rotation and prepare for another Wizard-clearing phase.
Continue repeating the process until Ir Yût is defeated.
The most common cause of failure is slow Wizard clears.
Teams that spend too much time setting up often allow the Deathsong timer to become a serious threat.
Many groups also struggle with Chalice management and fail to have enough Enlightened players available when Wizard rooms need to be opened.
Finally, players should regroup quickly once the final Wizard dies. Delayed damage phases often result in unnecessary extra cycles.
The Chalice of Light must be preserved by every member of the fireteam before any player preserves it a second time.
Establish a preservation order before starting the encounter.
As the Chalice rotates through the team, ensure every player preserves it once before restarting the cycle.
Because the encounter naturally requires multiple Chalice rotations, the challenge can be completed without significantly altering normal strategy.
Most failures occur when a player accidentally preserves the Chalice twice before the entire fireteam has participated.
Keeping a designated caller responsible for tracking the order makes the challenge significantly easier.
Complete the Ir Yût encounter without allowing any player to defeat more than one Wizard.
Assign specific Wizards to individual players before beginning the encounter.
Each player should defeat only their assigned Wizard and avoid contributing damage to additional Wizard kills.
Clear assignments and communication make the triumph straightforward to complete.
Most failures occur when multiple players damage the same Wizard and an unintended player secures the final blow.
Confirming assignments before opening the Wizard rooms helps prevent confusion.
Barrier Champions appear throughout the encounter on Master difficulty.
Enemy density is significantly increased, especially near the Wizard rooms and central arena.
Because clearing Wizards quickly is essential, many teams assign dedicated Champion-control roles before beginning the encounter.
Survivability becomes much more important on Master difficulty, and defensive supers are often used to secure damage phases safely.
Crota, Son of Oryx is the final encounter of Crota’s End and combines every major mechanic introduced throughout the raid.
The fireteam must manage the Chalice of Light, become Enlightened, defeat Swordbearers, use Hive swords to break Crota’s defenses, and destroy the Oversoul whenever it appears.
Success requires precise coordination and consistent execution throughout multiple damage phases.
The encounter takes place inside Crota’s throne room.
A large central platform serves as the primary combat area while towers and elevated positions surround the arena.
The Chalice of Light spawns near the center of the room and remains active throughout the encounter.
Hive enemies, Swordbearers, Ogres, Boomers, and Crota himself will continuously pressure the fireteam during the fight.
The Chalice remains active throughout the encounter.
Players must rotate the Chalice and become Enlightened in order to interact with several encounter mechanics.
Maintaining a consistent Chalice rotation is critical for keeping the encounter under control.
Enlightened players can interact with key objectives throughout the fight.
Most importantly, Enlightened players can remove Crota’s shield, allowing the sword bearer to stagger him and begin a damage phase.
Swordbearers periodically spawn in the arena.
Defeating a Swordbearer drops a Hive sword.
These swords are required to stagger Crota and deal meaningful damage during damage phases.
The Oversoul appears after damage phases and during specific portions of the encounter.
When active, the Oversoul must be destroyed before its timer expires.
Failure to destroy the Oversoul results in an immediate wipe.
After damage phases, Ogres spawn in the towers on either side of the arena.
These enemies should be eliminated quickly before they overwhelm the fireteam.
Once Crota’s shield has been removed, the sword bearer can stagger him.
This creates a short damage window where the entire fireteam can focus damage on the boss.
Multiple damage phases are usually required to complete the encounter.
Begin by claiming the Chalice of Light and establishing a rotation order.
Clear the initial enemies while building Enlightened buffs through Chalice rotations.
When the Swordbearer appears, defeat it and allow the designated player to claim the Hive sword.
As the sword bearer prepares for damage, an Enlightened player should remove Crota’s shield.
The sword bearer then staggers Crota and creates a damage opportunity for the fireteam.
Use heavy weapons, supers, and damage-enhancing abilities to maximize damage output during this window.
After the damage phase ends, destroy the Oversoul as quickly as possible.
Defeat any Ogres and additional enemies that spawn before preparing for the next cycle.
Repeat the process until Crota reaches final stand.
During final stand, continue staggering Crota, destroying Oversouls, and dealing damage until the boss is defeated.
The most common cause of failure is poor communication during damage phases.
The sword bearer, Enlightened players, and damage team must all coordinate their actions carefully to avoid wasting damage opportunities.
Many groups also struggle with Oversoul management. Delayed reactions can quickly result in a wipe.
Finally, teams should prioritize Ogre eliminations after damage phases. Allowing these enemies to remain alive often creates unnecessary pressure and reduces survivability.
Many groups fail because they focus entirely on damage and forget to prepare an Oversoul player.
Boomer Knights are another common source of deaths. Allowing them to remain active can quickly overwhelm the team and disrupt damage preparation.
Poor Chalice management also creates problems later in the encounter. If players are not becoming Enlightened consistently, the team may lack enough sword users or Oversoul shooters when needed.
Finally, some teams destroy the Oversoul too early. Doing so shortens the damage phase and often forces an additional cycle.
Every player must use a Hive sword to damage Crota at least once before the encounter is completed.
Rotate sword responsibilities throughout the fight.
Assign a different sword bearer for each damage phase and keep track of which players have already participated.
Most groups can complete the challenge naturally by using a new sword bearer during every phase.
Most failures occur when experienced sword players handle multiple damage phases while other players never receive an opportunity.
Tracking participation from the beginning of the encounter makes the challenge much easier to complete.
Defeat Crota without any player being hit by Crota’s sword attack.
Maintain proper positioning throughout the encounter and avoid standing near Crota outside of planned damage windows.
Sword bearers should perform their responsibilities efficiently and retreat as soon as their portion of the damage phase is complete.
The remainder of the fireteam should remain at safe distances whenever possible.
Most failures occur when players remain too close to Crota after a stagger phase ends.
Aggressive positioning often leads to unnecessary sword attacks and failed triumph attempts.
Patience and disciplined movement are the keys to success.
Unstoppable Champions appear throughout the encounter and significantly increase enemy pressure.
Ogres, Boomers, and other Hive enemies become much more dangerous, making arena control a constant priority.
The Oversoul remains the most important wipe mechanic, but recovering from mistakes becomes substantially more difficult on Master difficulty.
Most successful teams prioritize survivability, Champion control, and clean mechanical execution over maximizing damage output.
Defensive supers, healing effects, and coordinated Champion stuns are often the difference between a successful clear and a wipe.