Deep Stone Crypt takes Guardians to Europa and into the birthplace of the Exos. Hidden beneath the frozen surface lies a BrayTech facility now occupied by the Fallen House of Salvation.
Throughout the raid, players will make use of specialized augment roles that grant unique abilities. These augments are required to progress through nearly every encounter and form the foundation of Deep Stone Crypt’s mechanics.
The raid consists of four major encounters. Guardians must disable the Crypt Security system, defeat Atraks-1, survive a catastrophic orbital descent aboard the Morning Star station, and ultimately confront Taniks, the Abomination.
Understanding the augment system is the most important step toward mastering Deep Stone Crypt.
Deep Stone Crypt revolves around three augments: Operator, Scanner, and Suppressor.
The Operator augment allows players to interact with special objects throughout the raid.
Operators are typically responsible for activating terminals, shooting control panels, opening pathways, and freeing trapped teammates. Whenever an encounter requires interaction with the environment, the Operator is usually responsible.
The Operator augment is represented by a red icon.
The Scanner augment allows players to identify important objectives.
Scanners can see information that other players cannot, including which targets should be destroyed, which objects must be interacted with, and where players should deposit encounter mechanics.
The Scanner augment is represented by a yellow icon.
The Suppressor augment allows players to disable powerful enemies.
By standing beneath specific drones and attacking designated targets, Suppressors can temporarily stun bosses and activate encounter mechanics that would otherwise remain inaccessible.
The Suppressor augment is represented by a blue icon.
Throughout the raid, players can transfer augments using BrayTech terminals.
These terminals allow one player to deposit an augment so that another player can claim it.
Teams should become familiar with these terminals early, as later encounters often require augments to be passed between players.
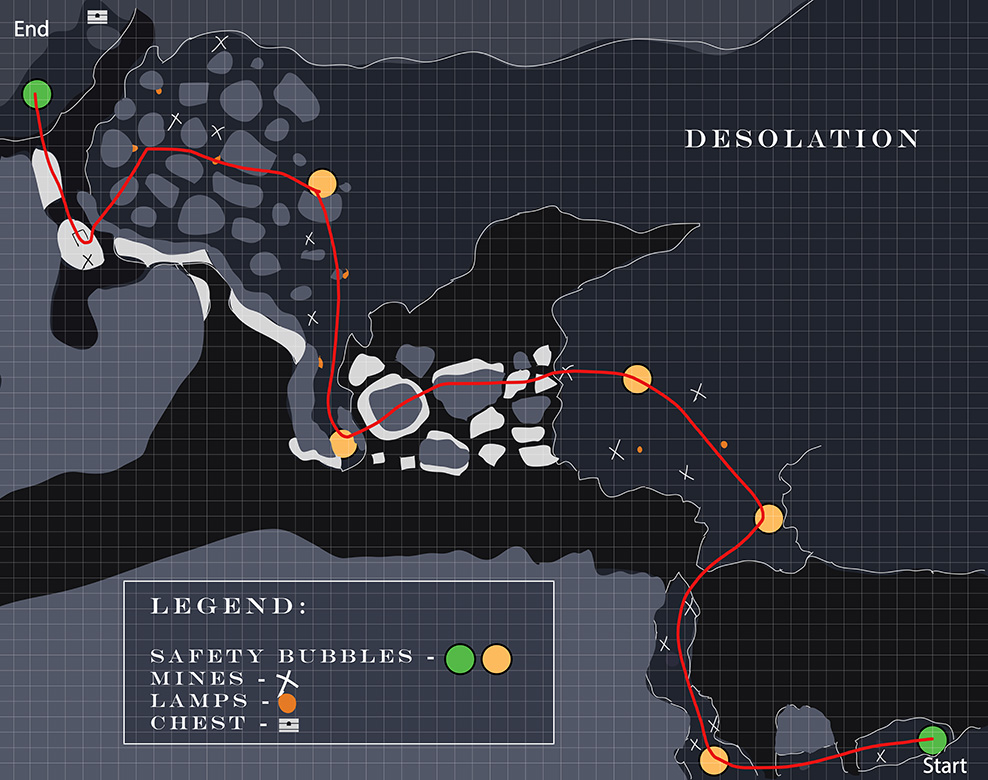
Desolation is the opening traversal section of Deep Stone Crypt. This section begins after entering Europa’s storm-covered surface and serves as the path toward the Crypt itself.
The main threat in this area is the blizzard. While outside, players gain Frostbite stacks. If Frostbite reaches its limit, the player dies. To survive, the fireteam must move between heat bubbles scattered throughout the snowfield.
Players can use Sparrows or Fallen Pikes to travel between safe zones. The goal is to move from bubble to bubble, clear enemies when necessary, and continue deeper into the storm until reaching the entrance to the facility.
Each heat bubble removes Frostbite stacks and gives the team a moment to regroup. Players should avoid rushing too far ahead, because getting lost in the storm usually results in death.
The safest strategy is to have one player lead the route while the rest of the fireteam follows closely. If someone falls behind, wait at the next heat bubble rather than continuing forward alone.
After reaching the final shelter, continue into the facility to begin the first major encounter, Crypt Security.
Complete the Desolation sparrow encounter without losing any pikes.
Every pike that spawns during the encounter must survive until the fireteam reaches the end of the section.
This triumph is significantly easier when the entire fireteam slows down and prioritizes protecting the pikes rather than racing through the storm.
Avoid unnecessary combat whenever possible. Fallen enemies can quickly destroy unattended vehicles, especially if players abandon them for extended periods of time.
When moving between heat bubbles, ensure that all pikes are brought into the safe area before continuing. If a vehicle becomes heavily damaged, have a player remain nearby to eliminate enemies threatening it while the rest of the team clears the path ahead.
Many groups find success by assigning players to specific pikes at the start of the encounter and ensuring those vehicles remain protected throughout the entire run.
Most failures occur because players leave pikes behind while moving to the next heat bubble.
Enemy fire can also destroy parked pikes if they are left exposed for too long.
Finally, many teams mistakenly assume that only occupied pikes matter. Every pike must survive, whether or not someone is actively riding it.
The first secret chest can be obtained before reaching Crypt Security.
After entering the raid and progressing through the opening sparrow section, continue toward the large facility entrance. Before advancing to the first encounter, explore the side pathways leading through the exterior structure.
A hidden route leads to a chest containing previously acquired Deep Stone Crypt rewards.
This chest can be collected once per character each week and is often used by players seeking additional chances at raid weapons and armor.
Crypt Security serves as the opening encounter of Deep Stone Crypt and introduces players to the Scanner and Operator augments.
The encounter requires the fireteam to identify vulnerable fuse locations while coordinating actions between two separate rooms.
Strong communication is far more important than damage output during this encounter.
The encounter is divided into two identical rooms.
One room is located above ground while the second is located beneath the facility. Players must split between both areas and communicate information back and forth throughout the encounter.
Each room contains multiple fuse locations, augment terminals, and security panels that play important roles in the encounter.

At the start of the encounter, the Scanner and Operator augments become available.
The Scanner identifies which fuse locations are vulnerable while the Operator interacts with control panels that expose those fuses.
Neither role can complete the encounter alone. Success requires constant communication between both groups.
Whenever the correct panels are activated, vulnerable fuses become exposed and can be damaged.
Destroying every required fuse completes the encounter.
Begin by splitting the fireteam into two groups.
One group remains in the upper room while the second group travels below.
The Scanner should immediately identify the highlighted objectives visible only to them. These locations must be communicated clearly to the rest of the team.
Once the Scanner has identified the correct target, the Operator activates the corresponding control panels. Successfully activating the proper panels exposes vulnerable fuses in the opposite room.
The team should then focus fire on the exposed fuse until it is destroyed.
After each damage cycle, repeat the process by identifying the next correct target and exposing additional fuses.
As the encounter progresses, Fallen enemies continuously spawn throughout both rooms. While communication remains the priority, players should clear enemies quickly to avoid becoming overwhelmed.
Continue destroying fuses until every required fuse has been eliminated.
Many teams struggle because communication becomes unclear between the upper and lower rooms.
Scanner callouts should remain simple and consistent throughout the encounter. Overcomplicating callouts often leads to unnecessary confusion.
Players should also avoid damaging incorrect fuses. Attacking the wrong target wastes valuable time and can cause the encounter to spiral out of control.
Finally, Operators should carefully verify panel callouts before activating them. A single mistake can force the team to repeat an entire damage cycle.
Every player must enter both the upper and lower rooms before the encounter is completed.
No player may remain in only one section of the encounter for the entire fight.
The easiest way to complete this challenge is by establishing a rotation schedule before the encounter begins.
After each successful fuse phase, swap players between the upper and lower rooms. Continue rotating until every member of the fireteam has spent time in both locations.
Because the challenge focuses entirely on player positioning, the encounter mechanics themselves remain unchanged.
Maintaining clear communication and sticking to a predetermined rotation makes this challenge significantly easier.
Most failures occur when teams lose track of which players have already swapped rooms.
Assigning simple rotations before the encounter begins helps prevent confusion and reduces the likelihood of accidental challenge failures.
Another common mistake occurs when players become overly focused on completing the encounter quickly and forget to perform the required rotations.
Verifying everyone’s position before destroying the final fuse ensures the challenge remains active through completion.
Complete Crypt Security without any player using an augment terminal more than once.
Each player may interact with a terminal a single time during the encounter.
Before starting the encounter, assign a terminal usage plan to the entire fireteam.
Because every player is limited to a single terminal interaction, augment transfers must be carefully planned. Teams should determine exactly who will receive each augment and when those transfers will occur.
The encounter mechanics themselves remain unchanged. The primary challenge comes from ensuring nobody accidentally interacts with a terminal more than their allotted time.
Clear communication and role planning make this triumph considerably easier.
Most failures occur because a player instinctively interacts with a terminal a second time.
Confusion during augment transfers can also lead to unnecessary terminal usage.
Before every transfer, verify who is depositing the augment and who is collecting it to avoid accidental triumph failures.
The second secret chest can be obtained during the jumping puzzle that follows the Atraks-1 encounter.
After defeating Atraks-1, continue progressing through the exterior spacewalk section. As the fireteam navigates the station’s outer hull, a hidden pathway branches away from the main route.
Before entering the final airlock, follow the alternate route through the structure and continue toward the hidden platform containing the chest.
Unlike the first chest, this one is often missed by players focused on completing the jumping puzzle as quickly as possible.
The chest can reward previously acquired Deep Stone Crypt loot and can be collected once per character each week.
Atraks-1 serves as the second encounter of Deep Stone Crypt and introduces the replication mechanic that remains central throughout the fight.
The encounter takes place across two separate levels of the Morning Star station. Half of the fireteam operates in space while the remaining players stay on Europa below. Teams must coordinate augment usage, identify the correct Atraks clone, and safely dispose of dangerous replication debuffs.
Success depends on communication, quick reactions, and efficient damage phases.
The encounter is divided between two locations.
The lower level takes place inside the station’s Europa-side laboratory. The upper level takes place in orbit aboard the Morning Star.
Launch pods connect both levels and allow players to travel between them throughout the encounter.
Both areas contain augment terminals, enemy spawns, and multiple Atraks clones.
The Scanner identifies the correct Atraks clone during each damage phase.
Only one clone is vulnerable during a cycle. Attacking the wrong clone wastes valuable time and can cause a wipe.
Because only the Scanner can identify the correct target, clear communication is critical.
The Operator manages the replication debuff.
After damaging the correct Atraks clone, a player receives Atraks Replication. If left unattended, this debuff eventually wipes the fireteam.
The Operator removes the debuff by shooting the affected player’s replication orb, causing it to drop to the ground.
Once removed, replication must be carried to an airlock and ejected into space.
Failing to dispose of replication properly eventually overwhelms the fireteam and leads to a wipe.
Throughout the encounter, multiple replication debuffs may need to be managed simultaneously.
Servitors periodically spawn throughout both levels.
These enemies lock augment terminals while alive.
Servitors should always be prioritized, as eliminating them is often required before augments can be transferred between players.
At the start of the encounter, split the fireteam evenly between the lower and upper levels.
Defeat enemies and collect the Scanner and Operator augments.
When damage begins, the Scanner identifies the correct Atraks clone and communicates its location. The entire team should immediately focus their damage on that clone.
After enough damage is dealt, one or more players receive Atraks Replication.
The Operator must shoot the replication orb from affected players. Once removed, those players should transport the replication to an available airlock and eject it into space.
After each damage cycle, additional clones appear across both levels.
Players may need to transfer augments through terminals and move between floors using launch pods. Continue eliminating Servitors, managing replication, and identifying the correct clone during each phase.
As Atraks loses health, additional clones become active and the encounter grows increasingly chaotic.
Maintain communication, continue disposing of replication safely, and repeat the process until Atraks reaches final stand.
When Atraks reaches critical health, every clone becomes active.
The Scanner must rapidly identify each vulnerable clone while the fireteam moves between locations dealing damage.
Time is extremely limited during this phase.
Focus entirely on the highlighted clone, eliminate it, and immediately move to the next target.
Continue following Scanner callouts until the final clone is destroyed.
Defeating the last clone completes the encounter.
Many teams fail because replication is not removed quickly enough.
Players should immediately communicate when they receive the debuff so the Operator can respond before it becomes dangerous.
Servitors are another common issue. Leaving them alive prevents augment transfers and can completely halt encounter progress.
During final stand, teams often lose valuable time attacking the wrong clone. The Scanner’s callouts should always take priority over individual assumptions.
Finally, players should avoid holding replication while searching for an airlock. The safest approach is to immediately move toward a disposal location whenever the debuff appears.
No airlock may be used to eject replication more than once during the encounter.
Each airlock can only be used a single time for the entire fight.
Before starting the encounter, assign a numbering system to the airlocks.
Whenever replication must be disposed of, use an airlock that has not previously been activated. Track which airlocks have already been used and communicate the next available location clearly.
Because the encounter provides a limited number of airlocks, teams must carefully plan every disposal throughout the fight.
Maintaining a designated caller responsible for tracking used airlocks greatly reduces confusion.
The most common failure occurs when players accidentally reuse an airlock that was activated earlier in the encounter.
Teams also struggle when replication carriers panic and rush toward the nearest available airlock without confirming whether it has already been used.
Clear callouts and careful tracking are the keys to completing this challenge successfully.
Complete the Atraks-1 encounter without allowing any Atraks Replication debuff to remain active for longer than five seconds after it becomes removable.
Communication is critical for this triumph.
Whenever a player receives Atraks Replication, they should immediately announce it. The Operator should already be positioned and prepared to shoot the replication orb as soon as it becomes available.
The moment the debuff can be removed, the Operator should destroy it and allow the carrier to move toward an airlock for disposal.
The faster the team reacts to replication, the easier this triumph becomes.
Many groups assign a dedicated Operator whose only responsibility is monitoring replication carriers throughout the encounter.
Most failures occur when replication carriers do not immediately communicate that they have received the debuff.
Operators who become distracted by damage phases or enemy control can also miss the removal window.
During final stand, players often focus entirely on damage and forget to monitor replication timers, resulting in unexpected failures.
Descent is the traversal section that takes place after Atraks-1 and before Taniks, Reborn.
This section is the famous Deep Stone Crypt spacewalk. Players exit the station interior and travel across the exterior of the Morning Star while looking down at Europa below.
There are no major raid mechanics in this section. The challenge is mostly platforming, timing, and staying aware of the route.
Move carefully from platform to platform across the outside of the station. Some jumps are narrow, and players can easily fall if they rush. Take time to watch the path ahead before committing to each jump.
This traversal also contains one of Deep Stone Crypt’s secret chests. While moving through the spacewalk, look for a side path branching away from the main route. Following the hidden path leads to the chest before continuing toward the next encounter.
After the spacewalk, the fireteam re-enters the station and proceeds toward Taniks, Reborn.
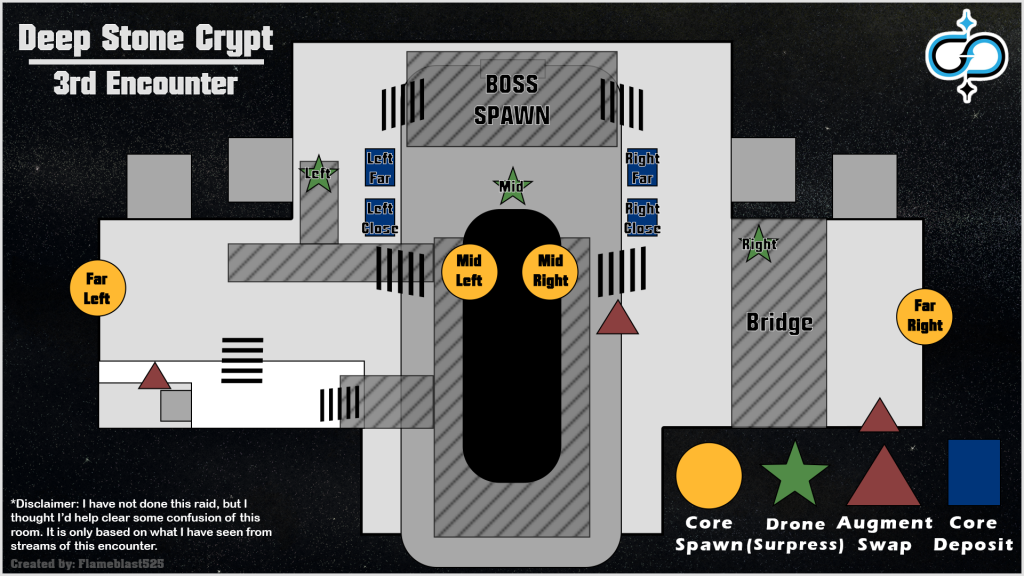
Taniks, Reborn is the third major encounter of Deep Stone Crypt. This encounter takes place aboard the Morning Star as the station begins falling toward Europa.
The fireteam must disarm the station’s nuclear descent protocol by using Nuclear Cores, deposit stations, and all three raid augments. Scanner, Operator, and Suppressor are all active during this encounter.
The arena is divided into several areas with deposit stations positioned around the room.
Augment terminals are available so players can pass Scanner, Operator, and Suppressor between teammates when needed.
Nuclear Cores appear during each phase and must be carried to the correct deposit stations before they become dangerous.
During each cycle, Nuclear Cores become available and must be picked up by players.
Core carriers gain Radiation stacks while holding a core. If a player reaches ten stacks, they die.
Because of this, core carriers must move quickly and communicate if they need someone to take the core from them.
The Scanner identifies which deposit stations are active.
Only the Scanner can see the correct stations, so this player must clearly call out where each Nuclear Core should be deposited.
Incorrect deposits can waste time and cause the team to fall behind.
The Operator helps control the Nuclear Core phase and is responsible for shooting panels when required.
This role is especially important because the Operator can help manage situations where players become trapped or where the encounter requires specific objects to be activated.
The Suppressor disables Taniks during the encounter.
To do this, the Suppressor stands under the active security drones and shoots Taniks from each required position. Once Taniks is successfully suppressed, the correct deposit stations become available and the core carriers can safely deposit their Nuclear Cores.
Begin the encounter by collecting Scanner, Operator, and Suppressor.
When the phase starts, the Scanner identifies the active deposit stations and prepares to call them out.
Nuclear Cores will activate in the arena. Assigned players should pick them up and move toward the correct deposit locations.
While this happens, the Suppressor moves between the active drone positions and shoots Taniks from each one. Once Taniks is suppressed, the deposit stations become usable.
Core carriers should deposit their Nuclear Cores into the stations called out by the Scanner.
After the cores are deposited, one augment will usually become disabled. The player with the disabled augment must place it into a terminal so another teammate can pick it up and continue the role.
Repeat this process until the encounter is complete.
The most common mistake is unclear Scanner callouts. Core carriers need to know exactly where to deposit before their Radiation stacks become dangerous.
Another common issue is slow suppression. If the Suppressor does not stun Taniks quickly enough, the deposit stations may not become available in time.
Players also need to pay attention when an augment becomes disabled. If the disabled augment is not placed into a terminal quickly, the team can lose control of the encounter.
Core carriers should never wait until their Radiation stacks are dangerously high before asking for help. Calling for a swap early prevents unnecessary deaths.
Every player must perform all three augment roles during the encounter.
By the end of the encounter, every member of the fireteam must have used Scanner, Operator, and Suppressor at least once.
Before beginning the encounter, establish a rotation plan that allows all six players to cycle through every augment.
The easiest approach is to rotate augments whenever one becomes disabled. Each player should keep track of which roles they have already completed and which roles they still need.
Because the encounter already requires augment transfers, the challenge naturally fits into the existing mechanics when planned correctly.
Strong communication is essential. Players should announce which roles they have completed so the team can make informed decisions during future transfers.
Most failures occur because teams lose track of who has completed each role.
Players often assume they have already performed a role when they have not, resulting in challenge failure near the end of the encounter.
Another common issue occurs when the encounter is completed too quickly. If the final Nuclear Core is deposited before every player has used all three augments, the challenge will fail.
Verifying everyone’s progress before completing the final phase helps prevent unnecessary mistakes.
Complete Taniks, Reborn without allowing any player to gain the same augment twice.
Once a player has used Scanner, Operator, or Suppressor, they may not receive that same augment again during the encounter.
Track augment assignments from the very beginning of the encounter.
Whenever an augment becomes disabled and must be transferred, ensure it goes to a player who has not previously held that role.
Most teams benefit from maintaining a simple chart or callout system to track which augments each player has already completed.
Because the encounter naturally requires augment transfers, careful planning makes this triumph relatively straightforward.
The most common failure occurs when a team loses track of previous augment assignments.
Many groups accidentally reassign Scanner or Suppressor to the same player later in the encounter without realizing it.
Before every transfer, confirm the recipient has not already used that augment.
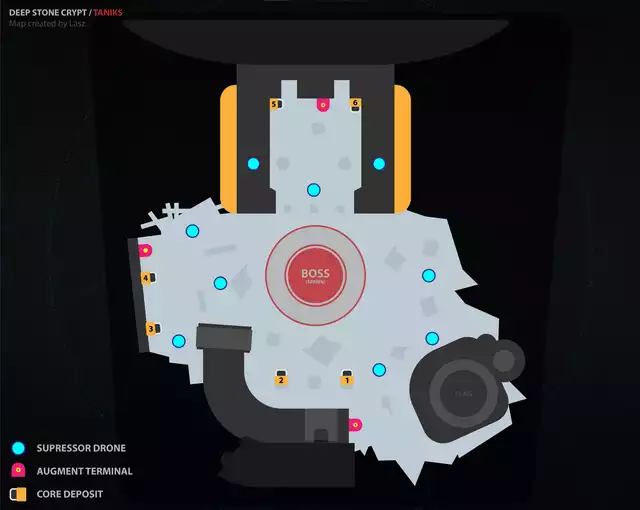
Taniks, the Abomination serves as the final encounter of Deep Stone Crypt and combines every major mechanic introduced throughout the raid. Scanner, Operator, and Suppressor all play important roles while the fireteam manages Nuclear Cores, Radiation stacks, and multiple damage phases.
The encounter takes place within the wreckage of the Morning Star after the station crashes into Europa.
The arena is divided into three primary locations.
The area near the rally flag is commonly referred to as Spawn or White. The blue-lit section of the arena is known as Blue. The orange-lit section is known as Orange.
Each area contains two Nuclear Core deposit bins and an augment terminal. Most teams assign simple callouts to each deposit location before starting the encounter.
The six deposit bins can be numbered one through six or identified using location-based callouts such as Blue Left, Blue Right, Orange Left, Orange Right, White Left, and White Right.
During each cycle, Taniks ejects Nuclear Cores that must be collected and deposited.
Players carrying a Nuclear Core gain Radiation stacks over time. Reaching ten stacks results in death, making efficient movement and communication critical.
Core carriers may need to swap with another player if their Radiation stacks become too high before reaching the deposit location.
The Scanner identifies which deposit bins are active.
Only two bins are active during each cycle. The Scanner must communicate these locations to the team so the Nuclear Cores can be deposited correctly.
The Operator is responsible for freeing trapped players.
Throughout the encounter, Taniks places a purple detainment bubble on random players. Anyone trapped inside becomes unable to move or deposit a Nuclear Core.
The Operator must shoot the bubble immediately to free the affected player.
The Suppressor prevents Taniks from remaining immune.
Three drones float above the arena during each cycle. The Suppressor must stand beneath each drone and shoot Taniks from all three locations.
Once this process is completed, Taniks becomes suppressed and the deposit bins become available.
After each cycle, one augment becomes disabled.
The affected player must deposit their augment into a terminal so another player can claim it.
This forces the team to rotate responsibilities throughout the encounter.
Begin by defeating enemies and collecting the Scanner, Operator, and Suppressor augments.
Shortly afterward, Taniks moves to the center of the arena and begins the first cycle.
Destroy the engines attached to Taniks to release Nuclear Cores. Players should immediately collect the cores and begin moving toward the deposit locations.
While the carriers are moving, the Scanner identifies the correct bins and communicates their locations.
At the same time, the Suppressor moves between all three drones and shoots Taniks from each position. Once Taniks has been successfully suppressed, the active deposit bins become available.
The Operator should watch for any detainment bubbles and free trapped players immediately.
Deposit both Nuclear Cores into the correct bins.
After a successful deposit, the encounter resets and another cycle begins.
Repeat this process until all required deposits have been completed.
After enough successful deposits, Taniks moves to the center of the arena and becomes vulnerable.
The fireteam should gather near Taniks and begin dealing damage.
As damage progresses, Taniks creates a series of rotating debris fields around himself. Players should carefully reposition to avoid being knocked away while maintaining damage.
Once Taniks becomes immune, the encounter returns to the Nuclear Core phase.
Repeat the process until Taniks reaches final stand.
When Taniks reaches critical health, he enters a final damage phase.
There are no additional mechanics to complete during this phase.
The fireteam should immediately use all remaining supers, heavy ammunition, and abilities to defeat Taniks before the encounter can continue.
Defeating Taniks completes Deep Stone Crypt.
The most common cause of wipes is delayed suppression. If the Suppressor does not complete their role quickly enough, the deposit bins remain inaccessible and core carriers accumulate dangerous Radiation stacks.
Many teams also lose players because detainment bubbles are not destroyed immediately. Operators should remain focused on freeing trapped teammates throughout the encounter.
Scanner callouts should always be short and consistent. Confusing deposit locations often results in cores being deposited incorrectly or carriers running out of time.
Finally, players should avoid standing too close to Taniks during damage phases. The rotating debris fields can easily kill inattentive Guardians.
The fireteam may only deposit four Nuclear Cores during each Nuclear Core phase.
Depositing fewer or more than four cores causes the challenge to fail.
The challenge requires the team to intentionally preserve four active Nuclear Cores before completing each deposit cycle.
Assign dedicated carriers before starting the encounter and ensure everyone understands which core they are responsible for collecting.
Because additional Radiation stacks will accumulate while carrying the cores, players should be prepared to swap carriers when necessary.
Clear communication is essential. Every carrier should know exactly where they are depositing and when the deposit should occur.
Most failures occur because a core is deposited too early.
Teams also frequently struggle with Radiation management while attempting to hold all four cores simultaneously.
Planning carrier assignments before the encounter begins greatly improves consistency.
Complete the final Taniks encounter by depositing all Nuclear Cores within a short time window during each deposit phase.
The deposits must occur almost simultaneously.
Assign carriers and deposit locations before the encounter begins.
Rather than depositing immediately upon reaching a bin, carriers should wait until every player is in position. Once all carriers are ready, perform a countdown and deposit the cores together.
This synchronization is required for every deposit phase throughout the encounter.
Strong communication is far more important than speed. A slightly slower setup phase is preferable to an early deposit that causes the triumph to fail.
The most common failure occurs when a carrier deposits their core immediately upon arriving at the bin.
Radiation pressure can also cause players to panic and deposit early rather than waiting for the team.
Clear countdowns and designated deposit callers help ensure all cores are deposited within the required window.
Master Deep Stone Crypt increases enemy difficulty and introduces a significantly greater emphasis on survivability and execution.
Enemies are more aggressive, deal increased damage, and are less forgiving of mistakes. Communication errors that may be recoverable on Normal difficulty often result in immediate wipes.
Master challenges rotate weekly and reward Adept versions of Deep Stone Crypt weapons.
Teams attempting Master difficulty should prioritize consistency and survivability over aggressive strategies.
Completing Master Deep Stone Crypt and its associated challenges contributes toward several raid triumphs and cosmetic rewards.
Eyes of Tomorrow is the Exotic Rocket Launcher associated with Deep Stone Crypt.
Unlike quest-based raid exotics, Eyes of Tomorrow has a chance to drop from the final encounter after defeating Taniks, the Abomination.
Each successful clear provides an opportunity for the weapon to drop.
The launcher fires multiple tracking rockets that seek separate targets, making it particularly effective against groups of enemies and certain burst damage situations.
Obtaining Eyes of Tomorrow is often one of the final goals for players completing Deep Stone Crypt repeatedly.