Crota’s End is a raid located beneath the Hellmouth on the Moon. Guardians descend into the depths of the Hive kingdom and fight their way through the Abyss, cross the Oversoul Throne, silence Ir Yût, and ultimately challenge Crota, Son of Oryx.
The raid centers around a single mechanic known as the Chalice of Light. Nearly every encounter requires players to pass the Chalice between one another in order to gain the Enlightened buff and complete objectives. Teams that manage the Chalice efficiently will find the raid significantly easier than those focused solely on damage output.
Crota’s End contains four main encounters: The Abyss, The Bridge, Ir Yût, the Deathsinger, and Crota, Son of Oryx.
The Chalice of Light can only be carried by one player at a time. While carrying it, the Chalice gradually charges. Once fully charged, another player must take the Chalice before the current holder becomes overwhelmed.
Successfully passing the Chalice grants the previous holder the Enlightened buff. Throughout the raid, Enlightened is used to activate mechanics, build structures, interact with objectives, wield Hive relics, and damage certain enemies.
After using Enlightened, players receive Drained of Light and must wait before interacting with the Chalice again. Because of this restriction, teams must continuously rotate the Chalice between players.
Understanding how to manage the Chalice is the most important skill in Crota’s End.
Crota’s End features large numbers of Hive enemies and several encounters that require strong burst damage. Weapons capable of quickly clearing groups of enemies are valuable throughout the raid, while high-damage heavy weapons become increasingly important during later encounters.
Support supers such as Well of Radiance remain extremely effective, while debuffs and damage-enhancing abilities can significantly reduce the number of damage phases required during boss encounters.
Completing Crota’s End grants access to the quest for Necrochasm, an Exotic Auto Rifle originally introduced in Destiny. Throughout the raid, players can earn Essence of the Oversoul, a special currency required for progressing the weapon quest and unlocking its catalyst.
The Hellmouth serves as the opening encounter of Crota’s End and introduces players to the raid’s core mechanic: the Chalice of Light and the Enlightened buff. While simple compared to the encounters that follow, it provides a safe environment for the fireteam to learn the Chalice rotation that will be used throughout the raid.
When the encounter begins, a Chalice of Light will appear near a circular plate overlooking the Abyss. One player should pick up the Chalice and allow its meter to charge completely. Once the meter is full, another player must take the Chalice, granting the original holder the Enlightened buff.
Players who become Enlightened can deposit their buff into the nearby plate. Each deposit contributes energy toward constructing a bridge across the chasm ahead. While the bridge is being built, waves of Thrall and occasional Knights will emerge from the surrounding area. These enemies pose little threat to a coordinated fireteam and can be cleared while players continue passing the Chalice and depositing Enlightened into the plate.
The encounter follows a simple cycle. A player charges the Chalice, passes it to another Guardian, deposits their Enlightened buff into the plate, and then waits for Drained of Light to expire before rejoining the rotation. Repeating this process gradually fills the plate with enough energy to complete the bridge.
Once the bridge is fully formed, enemy spawns cease and the path forward opens. Cross the bridge, make your way to the far side of the Abyss, and descend into the darkness below to begin the first major encounter of the raid: The Abyss.
The first hidden chest can be found shortly after entering the Abyss.
After dropping into the encounter area, turn toward the far-left wall instead of following the main path. Continue hugging the wall as a series of Hive doorways open ahead of you. Follow this route until reaching a small alcove hidden behind the final doorway.
Opening this chest can award previously acquired Crota’s End loot and contributes toward raid triumphs tied to collecting hidden chests.
The Abyss serves as the opening encounter of Crota’s End. Rather than focusing on boss damage, this encounter tests movement, coordination, and Chalice management.
Players must navigate a dark labyrinth while managing dangerous debuffs, activating Hive lanterns, and surviving constant waves of Hive enemies. Reaching the end of the path and constructing the final bridge completes the encounter.
The encounter takes place within a vast underground cavern illuminated by Hive lanterns. A winding path stretches through the darkness, leading from lantern to lantern until reaching a final bridge-building area.
Along the route are Preservation Nodes that interact with the Chalice of Light and provide safe opportunities to reset encounter timers.

As players travel through the Abyss they accumulate stacks of Weight of Darkness. This debuff slows movement and eventually makes sprinting and jumping extremely difficult.
Standing near an active lantern gradually removes these stacks. While the debuff itself is not lethal, allowing it to build too high can make progression significantly more difficult.
Throughout the encounter, every player is affected by a timer known as Engulfed in Darkness.
If the timer reaches zero, that player dies.
The timer can be refreshed by activating lanterns or preserving the Chalice at a Preservation Node. Managing this timer is the primary objective of the encounter.
Lanterns can only be activated by players who are Enlightened.
Activating a lantern refreshes the Engulfed in Darkness timer for the entire team while also providing a safe location to reduce Weight of Darkness stacks.
However, lanterns eventually explode after activation and can no longer be used, forcing the fireteam to continue moving forward.
Certain lantern locations contain Preservation Nodes.
Depositing the Chalice into one of these nodes refreshes the team’s Darkness timer and temporarily stores the Chalice. Players can immediately retrieve it and continue progressing.
Preservation Nodes act as checkpoints throughout the encounter and provide valuable opportunities to reset timers without relying solely on lanterns.
At the start of the encounter, one player picks up the Chalice of Light while the team begins moving through the Abyss.
As the Chalice charges, it should be passed between players so multiple Guardians can become Enlightened. The team should remain together while clearing Thrall, Cursed Thrall, and other Hive enemies encountered along the path.
Whenever a Preservation Node appears, deposit the Chalice before continuing. This refreshes the Darkness timer and helps maintain control of the encounter.
Enlightened players should activate lanterns as needed to refresh timers and reduce Weight of Darkness. Teams should avoid activating lanterns unnecessarily, as each lantern can only be used once before exploding.
Continue advancing through the cavern while rotating the Chalice and preserving it whenever possible.
Eventually the team will reach the final bridge-building area. Enlightened players must use their buff on the bridge plate to charge it. Multiple activations are required before the bridge fully forms.
During this phase, large waves of Hive enemies attack from all directions. Ogres eventually appear and should be eliminated immediately before overwhelming the team.
Once the bridge has been completed, cross through the doorway of Light to finish the encounter.
The most common cause of failure is poor Chalice management. When players hold the Chalice too long or fail to rotate it efficiently, the encounter quickly spirals out of control.
Many teams also waste lanterns by activating them too early. Since lanterns explode shortly after activation, using them unnecessarily can leave the team without a safe location later in the encounter.
Finally, players who separate from the group often become trapped by Weight of Darkness or overwhelmed by Hive enemies. Staying together makes the encounter considerably easier.
Lanterns may only be activated after the Chalice has been preserved at the nearby Preservation Node.
Activating a lantern before preserving the Chalice causes the challenge to fail.
Before activating any lantern, verify that the Chalice has been deposited at the associated Preservation Node. Once the Chalice has been preserved, an Enlightened player may safely activate the lantern.
Because the challenge limits how many lanterns can be used, movement efficiency becomes far more important than in a standard run. Teams often rely on movement abilities, Strand Grapples, and mobility-focused builds to cover large portions of the encounter without stopping.
Maintaining a steady pace is more important than clearing every enemy. Focus on preserving the Chalice whenever possible, activating only approved lanterns, and continuing forward as a group.
Most failures occur when a player instinctively activates a lantern before checking for a Preservation Node.
Other groups struggle by moving too slowly between approved lanterns, causing Darkness timers to become difficult to manage.
Strong communication and deliberate Chalice management are the keys to completing this challenge successfully.
The Bridge encounter introduces players to the Oversoul Throne and serves as the first major coordination check of the raid. Success requires careful management of the Chalice of Light, coordinated bridge construction, and efficient use of Hive Swords.
Unlike The Abyss, where movement is the primary challenge, The Bridge focuses on splitting responsibilities between multiple players while simultaneously maintaining control of enemy spawns.
The encounter takes place on opposite sides of a large chasm.
A central bridge must be constructed to connect both sides. An Annihilator Totem sits on each side of the arena and must remain occupied to prevent a wipe. Hive enemies continuously attack from multiple directions while Swordbearer Knights periodically spawn throughout the encounter.
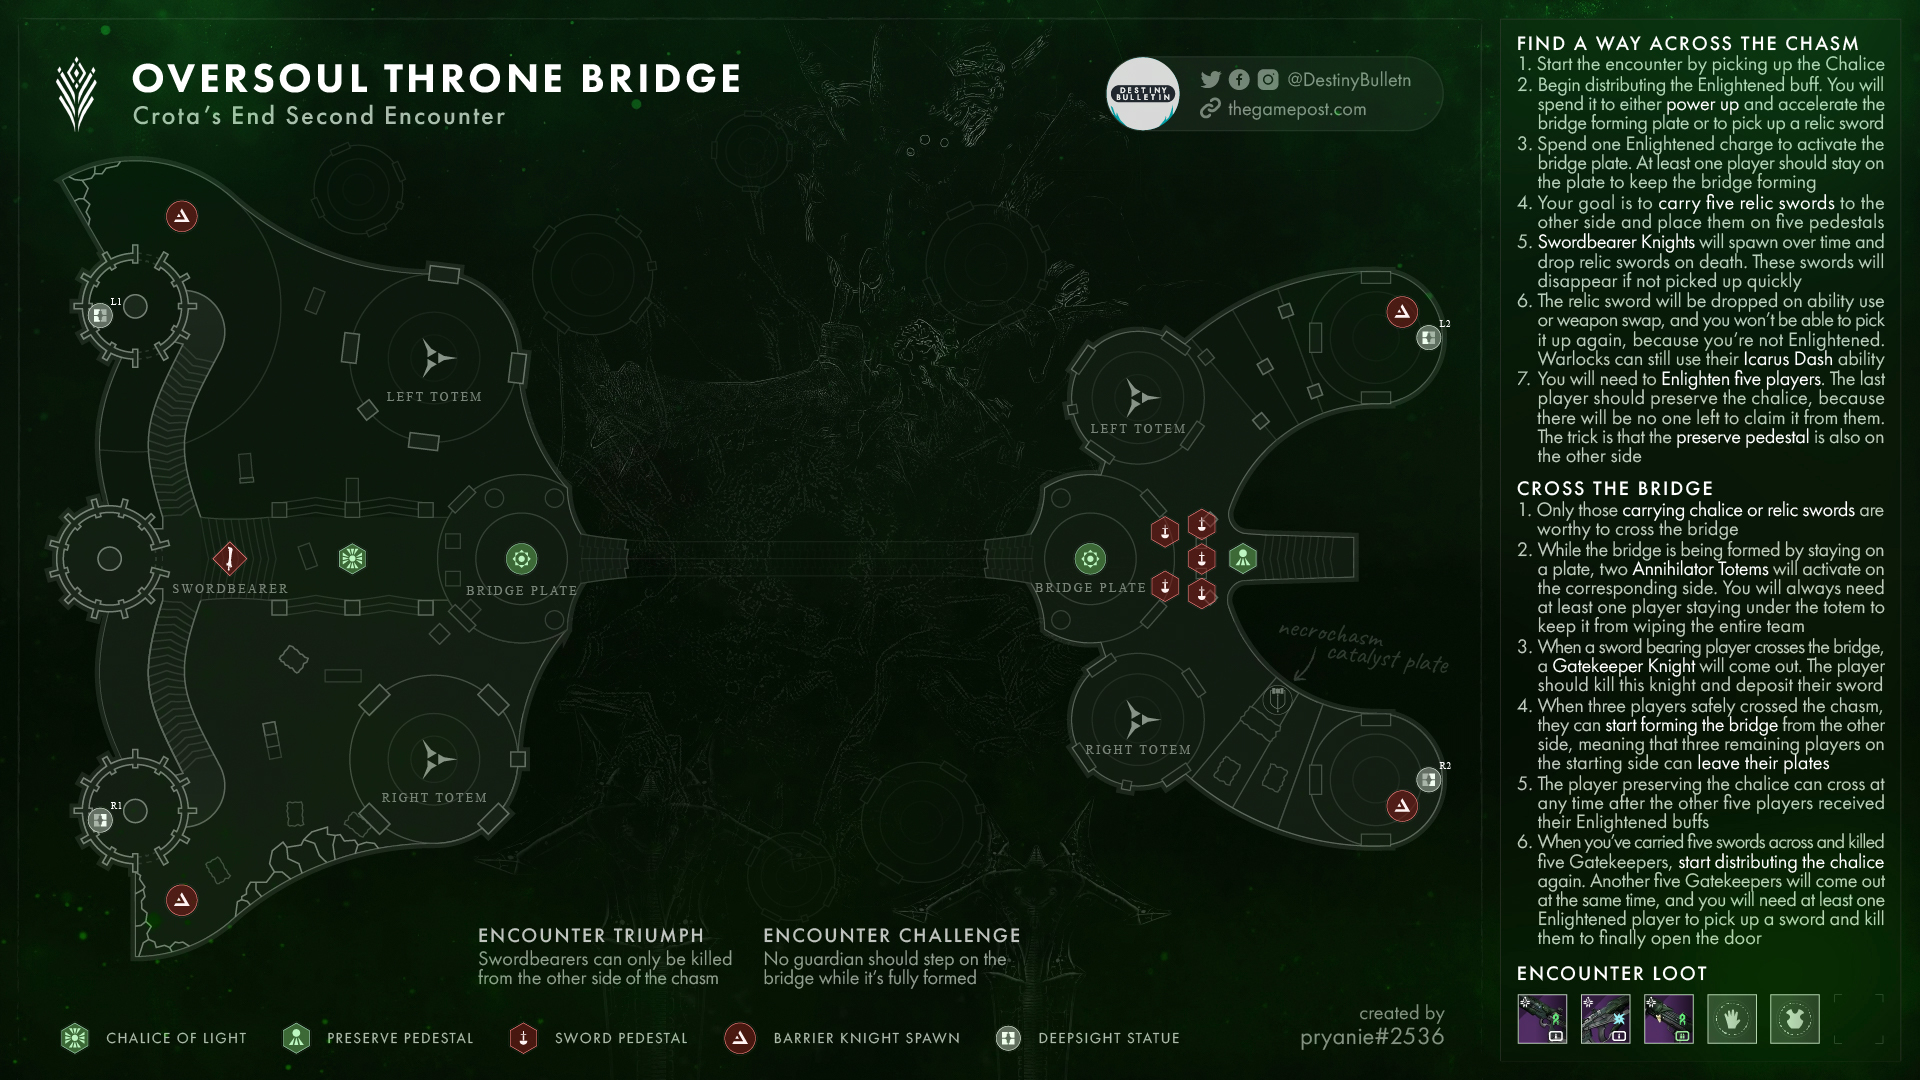
The Chalice of Light functions similarly to the previous encounter and remains central to progression.
Players who become Enlightened can interact with the bridge-building plate and later wield Hive Swords. The bridge can only be constructed through repeated Enlightened activations.
Once the bridge forms, Swordbearer Knights begin dropping Hive Swords that are used to defeat Gatekeepers on the opposite side of the chasm.
The Annihilator Totems must remain occupied throughout the encounter. If either Totem is left unattended for too long, the entire fireteam will wipe.
Begin by defeating enemies and rotating the Chalice of Light through the team.
As players become Enlightened, they should interact with the bridge plate located near the center of the arena. Each activation contributes progress toward constructing the bridge.
While the bridge is being built, players must ensure that both Annihilator Totems remain occupied. Communication becomes extremely important during this phase, as players frequently move between plate duty, enemy control, and Chalice management.
Once the bridge is complete, a Swordbearer Knight will spawn. Defeating this enemy drops a Hive Sword.
An Enlightened player should pick up the sword and cross the bridge. Upon reaching the opposite side, defeat the Gatekeeper guarding the far platform.
After the first Gatekeeper falls, additional players can begin crossing.
The process repeats until the entire fireteam has safely reached the far side of the chasm.
Once all six players have crossed, continue rotating the Chalice and defeating enemies. Additional Gatekeepers eventually appear. Enlightened players should retrieve preserved Hive Swords and eliminate each Gatekeeper.
Defeating the final Gatekeeper completes the encounter.
The most common cause of failure is allowing an Annihilator Totem to remain unattended. Even a brief lapse in coverage can quickly end the encounter.
Many teams also struggle with Chalice management while players are crossing the bridge. Maintaining communication during these transitions prevents unnecessary confusion.
Finally, some groups focus too heavily on crossing quickly rather than safely. A slower and more organized approach is often far more reliable than rushing players across the bridge.
Every Swordbearer Knight must be defeated from the opposite side of the bridge.
Players cannot simply eliminate Swordbearers from the side on which they originally spawn.
The challenge forces teams to think ahead when assigning bridge crossings.
Once players begin crossing, they must prepare to eliminate future Swordbearers from the far side of the arena. This requires maintaining strong communication between both sides while ensuring that sword users remain alive and available.
Most teams find success by establishing a predictable crossing order and ensuring that each side always has players capable of handling incoming Swordbearers.
The most common failure occurs when a player instinctively defeats a Swordbearer from the same side where it spawned.
Teams also frequently struggle when communication breaks down between the two sides of the bridge. Calling out Swordbearer locations and confirming who is responsible for each kill helps prevent accidental failures.
After completing the Bridge encounter, the fireteam enters a traversal section commonly referred to as the Thrallway.
While not considered a formal encounter, this area contains mechanics that must be completed in order to continue deeper into the raid.
The path forward is blocked by a series of Hive barriers protected by Shriekers. To remove these barriers, players must continue using the Chalice of Light and the Enlightened buff.
At the beginning of the area, one player should claim the Chalice of Light and begin charging it as normal.
As the fireteam advances through the corridor, an Enlightened player can pass through the first barrier and destroy the Shrieker hidden behind it. Once the Shrieker is destroyed, the barrier disappears and the team can continue forward.
This process repeats several times throughout the traversal section. Continue rotating the Chalice between players so that Enlightened remains available whenever a new barrier appears.
As additional Shriekers are destroyed, the route eventually opens into a large chamber containing the entrance to Ir Yût’s encounter.
Before dropping down, players have an opportunity to obtain the second and final secret chest.
The second secret chest is located near the end of the Thrallway and requires the fireteam to complete a short timed sequence.
Before entering Ir Yût’s arena, look for a side room containing a sealed Hive door. Opening this door requires activating a series of hidden plates located throughout the traversal area.
The fireteam should split up and stand on the plates simultaneously. Once every plate has been activated, the sealed door begins to open.
As soon as the door starts moving, a timer begins. The entire fireteam must quickly make their way to the chest room before the door closes again.
Movement abilities such as Strand Grapple, Eager Edge swords, and movement-focused Exotics can make this significantly easier.
Once inside, claim the chest before continuing to the next encounter.
Like the first secret chest, this chest can reward previously acquired Crota’s End loot and contributes toward raid triumph progress.
Ir Yût is the first true boss encounter in Crota’s End and places a heavy emphasis on speed, coordination, and information sharing.
The encounter revolves around locating Wizards hidden throughout the arena, defeating them quickly, and dealing enough damage to Ir Yût before her Dark Liturgy wipes the fireteam.
The arena consists of a central chamber surrounded by towers and elevated rooms.
Several Wizard locations are scattered throughout these rooms. During each damage cycle, players must identify which locations contain Wizards and coordinate their elimination.
Because the Wizards can spawn in different rooms each cycle, clear communication is essential.
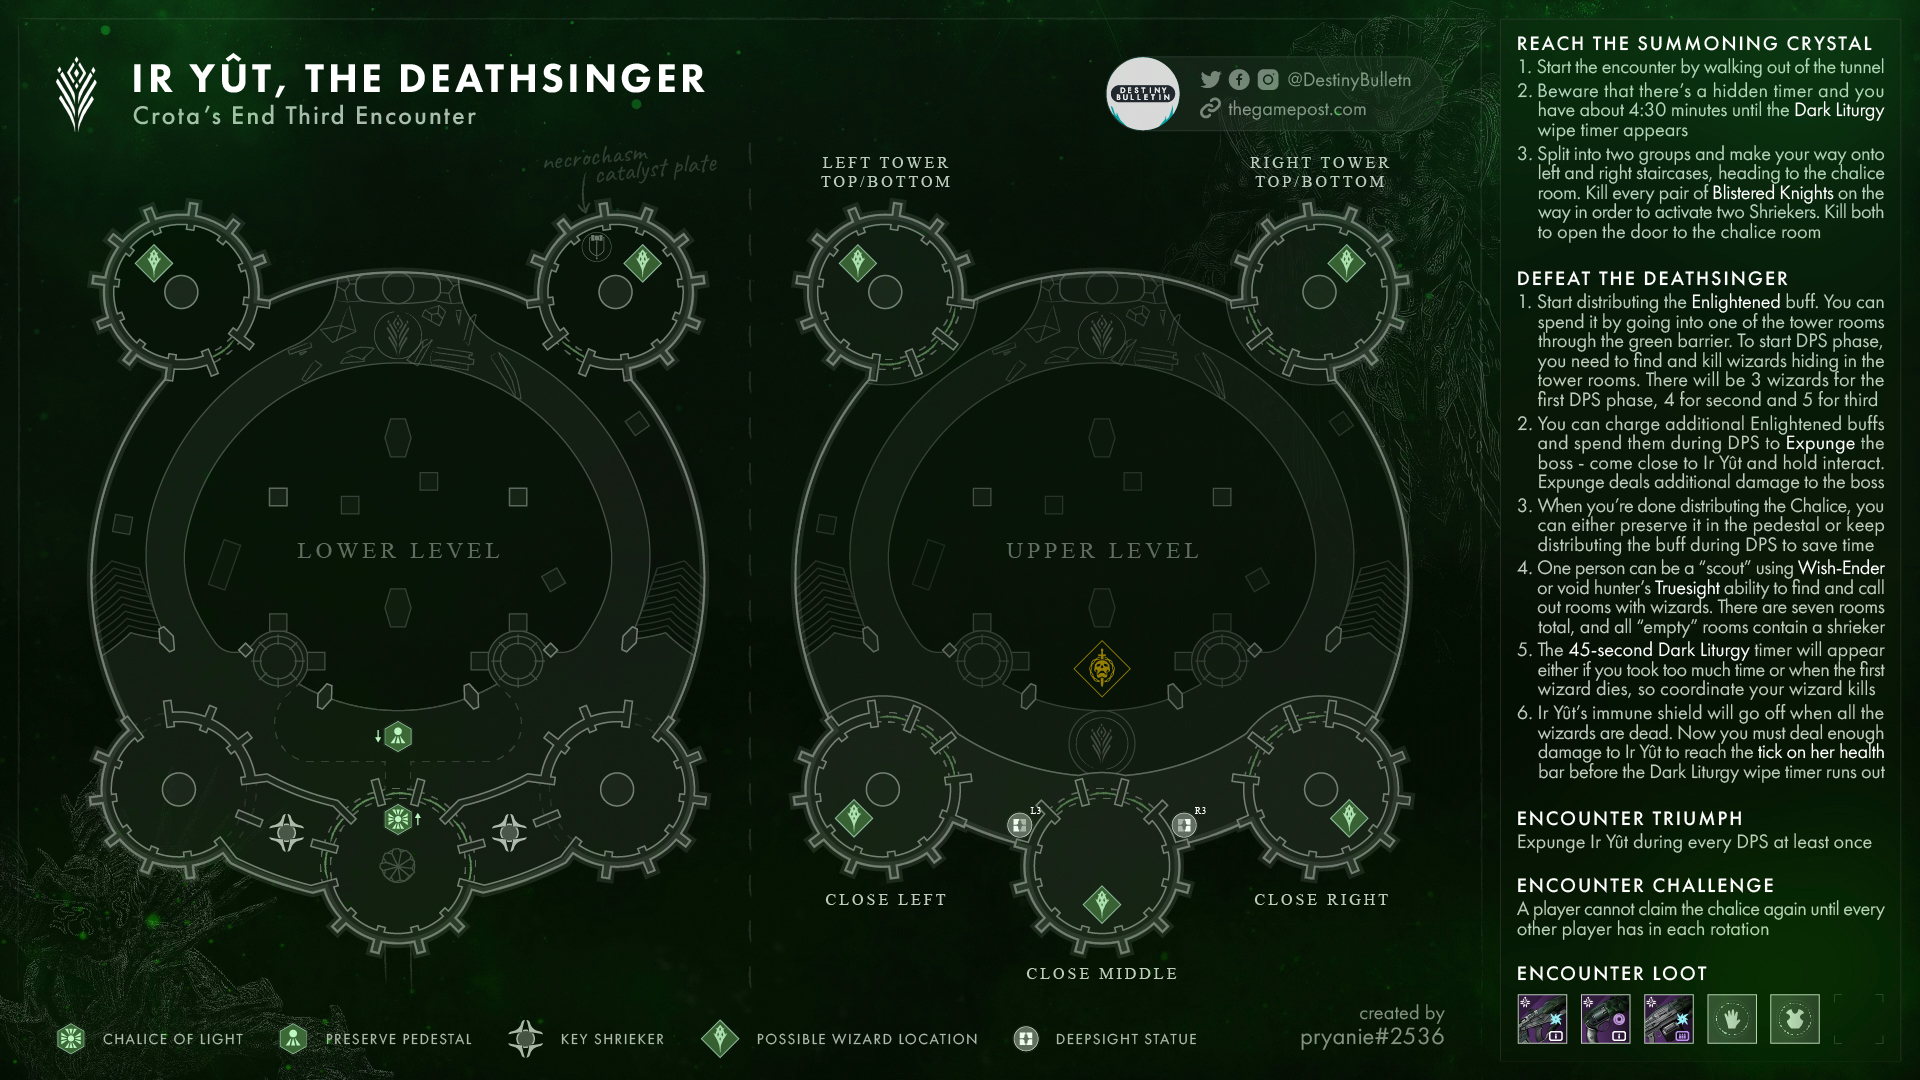
The Chalice of Light returns once again and functions similarly to previous encounters.
Players who become Enlightened gain the ability to enter protected rooms containing Wizards. These Wizards must be defeated before damage can begin.
Dark Liturgy acts as the encounter’s wipe mechanic. If enough damage is not dealt before the timer expires, the entire fireteam dies.
As the encounter progresses, additional Wizards must be defeated during each damage cycle.
Begin by splitting the fireteam into smaller groups and clearing enemies throughout the arena.
Defeat the Blistered Knights and Shriekers guarding the central crystal room. Once the room opens, retrieve the Chalice of Light and begin rotating it through the team.
As players become Enlightened, identify which rooms contain Wizards. Assign players to each location and prepare to eliminate them as quickly as possible.
The moment the first Wizard dies, Ir Yût becomes vulnerable and Dark Liturgy begins counting down.
Defeat the remaining Wizards immediately and regroup for damage.
During the damage phase, use all available weapons and abilities to deal damage to Ir Yût. Players who remain Enlightened can use Expunge for additional damage.
After damage ends, repeat the process. Each cycle requires more Wizards to be defeated before damage can begin.
Continue repeating these cycles until Ir Yût is defeated.
The most common issue is poor communication regarding Wizard locations.
Teams also frequently lose valuable damage time by eliminating Wizards too slowly. Because Dark Liturgy begins once the process starts, every second matters.
Finally, players should avoid becoming overly focused on damage. Reaching damage consistently is often more important than maximizing a single phase.
The Chalice of Light must be passed in the same order throughout the entire encounter.
This rotation must continue even during damage phases.
Establish a fixed Chalice order before beginning the encounter.
Once the rotation begins, never deviate from the assigned sequence. Even if a different player appears to be more convenient, the Chalice must continue following the original order.
Most teams benefit from numbering players one through six and passing the Chalice according to those numbers throughout the entire encounter.
The most common failure occurs during damage phases when players instinctively pass the Chalice to whoever is nearby rather than maintaining the assigned rotation.
Deaths can also create confusion and force teams to quickly re-establish the proper order.
Consistent communication and discipline are the keys to completing this challenge successfully.
The final encounter of Crota’s End challenges the fireteam to manage every mechanic introduced throughout the raid. Success requires efficient Chalice rotations, coordinated sword usage, careful Oversoul management, and strong damage output.
Unlike previous encounters, a single mistake can quickly lead to a wipe. Every player has an important role throughout the fight.
The encounter takes place within Crota’s throne room.
Crota patrols the center of the arena while Hive enemies spawn from multiple directions. Two towers sit on opposite sides of the room and are occupied by Boomer Knights throughout the encounter.
Several Pools of Light appear around the arena during each cycle. These pools are required to manage the Chalice and gain Enlightened.
The Oversoul appears above the arena whenever Crota enters a damage phase.
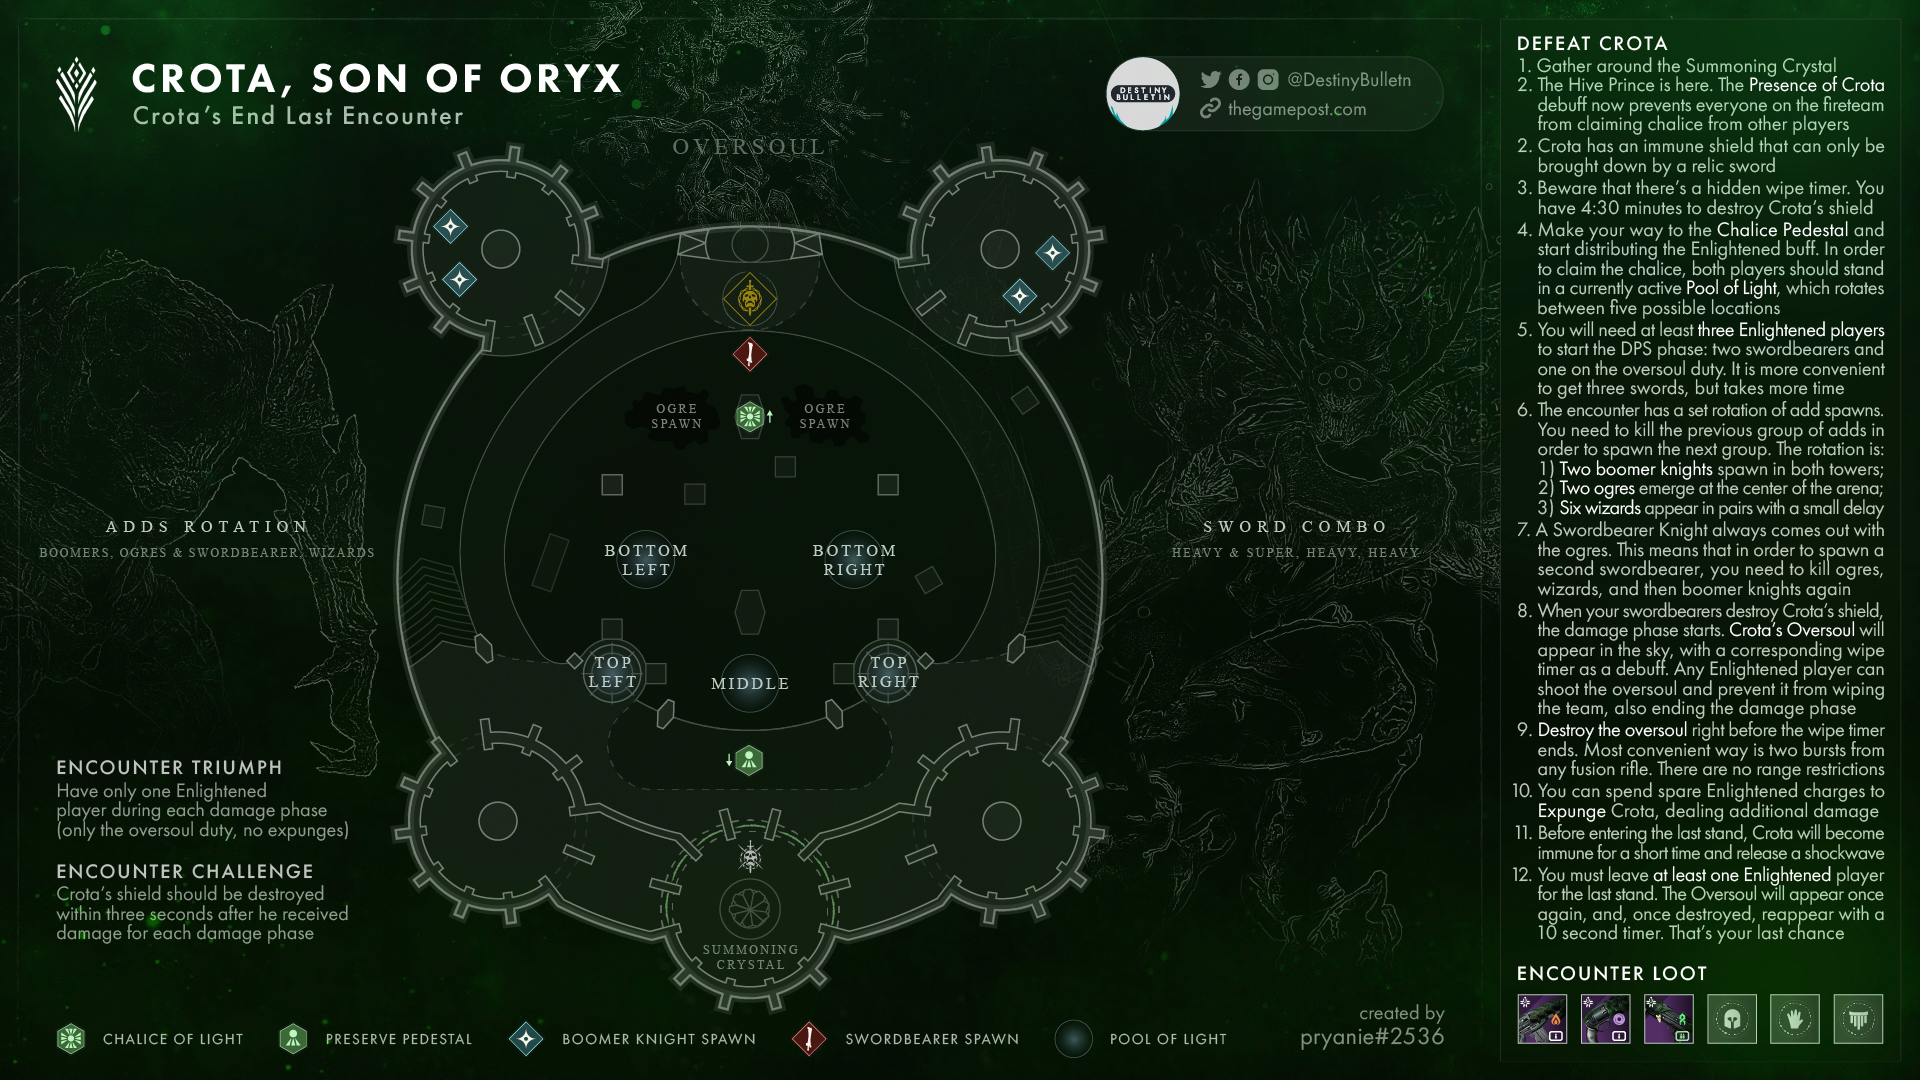
The Chalice of Light can only be charged while standing within a Pool of Light.
Players carrying the Chalice must remain inside a Pool of Light until it becomes fully charged. Once charged, the Chalice can be passed to another player.
Because Pools of Light eventually disappear, teams must quickly identify new locations throughout the encounter.
Swordbearer Knights spawn periodically during the fight.
Defeating a Swordbearer drops a Hive Sword that can only be used effectively by an Enlightened player.
The Hive Sword is required to break Crota’s shield and begin damage.
Boomer Knights occupy the towers on either side of the arena.
These enemies deal significant damage and should be eliminated whenever they appear. Leaving them alive for too long can quickly overwhelm the team.
Whenever Crota becomes vulnerable, the Oversoul appears above the arena.
The Oversoul continuously counts down toward a wipe.
Only an Enlightened player can destroy the Oversoul. Because of this, teams must always ensure that at least one player is prepared to handle the mechanic during every damage phase.
At the start of the encounter, clear the initial enemies and locate the first Pool of Light.
One player should pick up the Chalice and begin charging it while the team eliminates enemies throughout the arena. Continue rotating the Chalice until several players become Enlightened.
As the encounter progresses, Swordbearer Knights begin spawning. Defeat the Swordbearer and allow an Enlightened player to claim the Hive Sword.
At the same time, eliminate any Boomer Knights occupying the towers.
Once the team is ready, the Sword Bearer approaches Crota and attacks his shield. Breaking the shield causes Crota to kneel, beginning the damage phase.
As soon as damage begins, deploy damage supers and heavy weapons. Well of Radiance remains one of the safest and most effective options for surviving Crota’s attacks while maximizing team damage.
During this phase, an Enlightened player must monitor the Oversoul timer. Destroying the Oversoul ends the damage phase, so teams generally wait until the final moments before destroying it in order to maximize damage time.
After the Oversoul is destroyed, Crota regains his shield and the encounter returns to the setup phase.
Repeat the cycle by locating new Pools of Light, rotating the Chalice, defeating Swordbearers, and breaking Crota’s shield.
Continue until Crota reaches his final stand.
Once Crota’s health reaches its final threshold, he briefly becomes immune and unleashes a powerful attack.
After this attack, Crota becomes vulnerable one final time while a series of Oversouls begin appearing.
The first Oversoul must be destroyed by an Enlightened player. Shortly afterward, another Oversoul appears with a much shorter timer.
This final Oversoul cannot be destroyed.
The fireteam must defeat Crota before the final timer expires.
Use every remaining super, heavy weapon, and ability to secure the kill before the wipe mechanic triggers.
Many groups fail because they focus entirely on damage and forget to prepare an Oversoul player.
Boomer Knights are another common source of deaths. Allowing them to remain active can quickly overwhelm the team and disrupt damage preparation.
Poor Chalice management also creates problems later in the encounter. If players are not becoming Enlightened consistently, the team may lack enough sword users or Oversoul shooters when needed.
Finally, some teams destroy the Oversoul too early. Doing so shortens the damage phase and often forces an additional cycle.
All sword damage used to break Crota’s shield must occur within a very short window.
In practice, this means three Sword Bearers must coordinate their attacks and strike Crota almost simultaneously.
During setup, ensure that three players become Enlightened before the damage phase begins.
Each Enlightened player should obtain a Hive Sword from a defeated Swordbearer.
When Crota is positioned correctly, all three Sword Bearers should attack the shield together. The shield must break from the combined effort rather than from a series of individual attacks spread over time.
Once the shield breaks, the encounter proceeds normally.
The challenge most often fails when one Sword Bearer attacks too early.
Teams may also struggle if one player loses their sword or becomes distracted by enemy pressure before the shield break begins.
Clear countdowns and synchronized attacks make this challenge significantly easier.
Master Crota’s End introduces significantly stronger enemies and places a greater emphasis on efficient execution.
Enemies are more aggressive, survivability becomes more important, and mistakes that may be recoverable on Normal difficulty often result in immediate wipes.
Encounter challenges rotate on Master difficulty and reward Adept raid weapons upon completion.
Because Master difficulty increases incoming damage considerably, defensive abilities become much more important. Teams should prioritize survivability and consistency over aggressive damage strategies.
Completing Master Crota’s End and its associated challenges is required for several raid cosmetics and title-related triumphs.